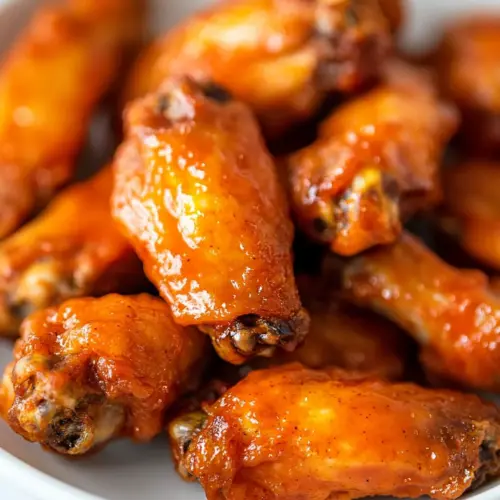
Crispy Baked Buffalo Chicken Wings
Crispy Baked Buffalo Chicken Wings deliver a crispy skin and a glossy, tangy buffalo glaze that is both spicy and slightly sweet. This easy weeknight dinner is ideal for sharing, offering crunchy texture and bold flavor with minimal fuss. Make them for game night or a casual dinner when you want maximum satisfaction with simple pantry ingredients.
Equipment
- Oven
- Rimmed Baking Sheet
- Wire Rack
- Mixing Bowls
- Small Saucepan
- Tongs
Ingredients
- 2 lb chicken wings Provide protein-rich chicken wings that form the base of the dish; offer both meat and skin that crisp during baking when properly dried and spaced on a rack. Promote juicy interior retention while allowing the skin to become golden and crunchy with the help of leavening and fat. Allow flexibility for sectioning into flats and drumettes for even cooking and presentation.
- 1 tsp garlic powder Add aromatic, savory garlic powder that enhances overall flavor without adding moisture; distribute evenly over wings to impart subtle pungency. Complement other spices and help build the familiar savory backbone of buffalo seasoning. Work well in dry rubs and merge seamlessly with baking powder for browning.
- 1 tbsp baking powder Create a dry-crisping effect by promoting browning and crisp texture on the skin when baked; coat wings lightly to lift the skin and draw out moisture. Act as an alkaline agent that reacts mildly in the oven to accelerate Maillard reactions, resulting in extra crunch. Provide a pantry-stable way to mimic deep-fried texture using the oven.
- 1 tsp ground black pepper Contribute mild heat and savory depth through freshly ground black pepper, enhancing overall seasoning balance when combined with salt and garlic. Sprinkle evenly to add earthy, slightly spicy notes that pair well with the hot sauce glazing. Help round out the flavor profile without overpowering the buffalo sauce.
- Salt, to taste Season to personal preference with salt to amplify natural flavors and balance the sauce; sprinkle sparingly before baking and adjust after saucing as needed. Encourage proper seasoning distribution to ensure the wings are flavorful from edge to center. Control total sodium by tasting and modifying according to dietary needs.
- 1/2 cup hot sauce Provide the essential tangy, spicy base of classic buffalo sauce with vinegar-led heat and a smooth, pourable consistency for coating the wings. Combine with melted butter and honey to create a glossy, clingy glaze that adheres to crisp skin and delivers signature buffalo flavor. Offer room to choose heat level depending on sauce brand and quantity used.
- 2 tbsp honey Add sweetness and a subtle viscosity to balance the heat of the hot sauce and round out the glaze; stir into warm sauce to dissolve and integrate. Promote a glossy finish and mild caramel notes that temper acidity and spice for a more complex, crowd-pleasing flavor. Enable slight stickiness that helps sauce cling to the wings.
- 4 tbsp unsalted butter Provide rich fat and a silky mouthfeel when melted into the hot sauce, mellowing acidity and binding the glaze to the wings. Encourage emulsification with the hot sauce to create a cohesive, glossy coating that enhances flavor and texture. Use unsalted butter to control seasoning and prevent over-salting of the final sauce.
Instructions
- Preheat the oven to 450 degrees F. Line a rack coated with cooking spray and place it on a baking sheet.: The moment you set the oven to 450 degrees F you begin building the environment that crisps skin, so let it fully come up to temperature for at least 10 minutes. As the oven warms you'll notice a dry heat that helps evaporate surface moisture from the chicken . I prefer a raised wire rack on a rimmed baking sheet so hot air circulates underneath each piece, promoting even browning. A common mistake is skipping the rack and placing wings directly on foil, which steams the skin and prevents crunch. Listen for the oven fan or light indicator to ensure it's reached the right heat before you insert the tray.
- To a small bowl; mix the garlic powder, baking powder, salt, and pepper. Keep it aside.: When you combine garlic powder , baking powder , salt , and ground black pepper , you're creating a dry rub that will crisp and season the skin. Whisking these together releases their aromas, especially the pepper's volatile oils, which you can smell as a bright note. Baking powder is the technical ingredient that puffs the skin, so measure carefully. Avoid grinding or overhandling the mix, because adding moisture now will clump it and reduce its effectiveness. Store the mix briefly at room temperature if you prepared it early, but don't let it sit uncovered where it might absorb humidity.
- To a large bowl add the wings and remove the moisture with paper towels. Sprinkle the spice mix and coat the wings well.: Patting each chicken wing thoroughly transforms the texture outcome, because dry skin crisps while wet skin steams. You should feel the surface go from slick to matte as you blot it. Toss the wings with the spice mix so each piece gets an even, thin layer; this distribution helps the baking powder work across all surfaces. If a piece looks wet after coating, press a bit more of the mix onto it, but do not soak the skin. A frequent error is overcoating, which can create a cakey exterior instead of a light crisp. As you toss, inhale the savory mix, and let that aroma guide how generously to season.
- Arrange the wings to the prepared baking rack and bake for 50 minutes flipping the wings halfway through until crispy. Transfer them to a bowl and keep them aside.: Arrange each wing with space around it so air flows freely, aiming for a single layer. Slide the pan into the hot oven, and listen for a faint sizzle as the surface moisture begins to evaporate. After about 25 minutes, flip each wing; this promotes even browning on both sides and prevents one side from charring prematurely. You'll watch the skin change color, moving from pale to golden brown, and eventually to deep golden, with small blistered patches that indicate crispness. When the 50 minute mark approaches, test a piece for tactile resistance and a crisp crack when you press the skin. Remove the wings to a bowl so steam does not rehydrate the underside. A common pitfall is opening the oven too often, which lowers temperature and prolongs cook time, so minimize door time and work efficiently when flipping.
- To prepare the buffalo sauce; add the hot sauce to a small saucepan over medium heat. Stir in the honey and butter. Whisk the sauce until smooth and off the heat.: Warm the hot sauce gently over medium heat so its vinegar notes soften and meld with the sweet and fatty elements. Add honey and unsalted butter and whisk until the mixture becomes glossy and slightly thickened. The sound transitions from a quiet simmer to a soft bubble, and the aroma shifts from sharp vinegar to rounded sweet butter. Removing the pan from heat before finishing prevents the butter from separating and keeps the sauce smooth. Overheating is the most common misstep here, which can make the sauce grainy or break the emulsion, so keep it warm rather than roaring hot.
- Pour the sauce over the crispy wings. Toss to coat. Transfer them to a plate and serve them warm.: With the wings warm in the bowl, pour the glossy buffalo sauce over them and toss just enough for even coverage so each bite is saucy but not soggy. The sauce will hiss slightly as it meets the hot skin, then cling and form a sticky sheen. Use tongs to fold the wings gently, watching the sauce coat crevices and pooling briefly before setting. Serve them immediately to preserve the contrast between crisp skin and sticky glaze. A typical mistake is letting sauced wings sit too long, which softens the exterior, so aim to serve within minutes of tossing. Enjoy the blend of textures and the way the sauce amplifies every savory note.
Notes
- Rack placement matters: Position the rack in the center of the oven so heat circulates evenly around the chicken. If the rack is too low the bottoms may brown too quickly, and if it is too high the tops can darken before the centers are done, so aim for the middle to hit that sweet spot.
- Room temperature wings: Let the wings sit at room temperature for about 15 minutes before baking if you have the time, because this reduces chill and promotes even cooking. However, do not leave them out for more than two hours to maintain food safety standards.
- Adjust heat to taste: If you prefer a milder profile, reduce the hot sauce slightly and compensate with a touch more honey. Conversely, to intensify heat, choose a hotter pepper sauce or add a pinch of cayenne to the dry mix.
- Make ahead for gatherings: You can bake the wings ahead of time and hold them briefly on a rack in a warm oven, then toss in freshly warmed sauce right before serving to keep the exterior crisp while offering hot, saucy wings.
- Cleaning tip: Line the baking sheet with foil for easier cleanup, but still use a raised rack so you preserve the airflow benefit that creates crisp skin.