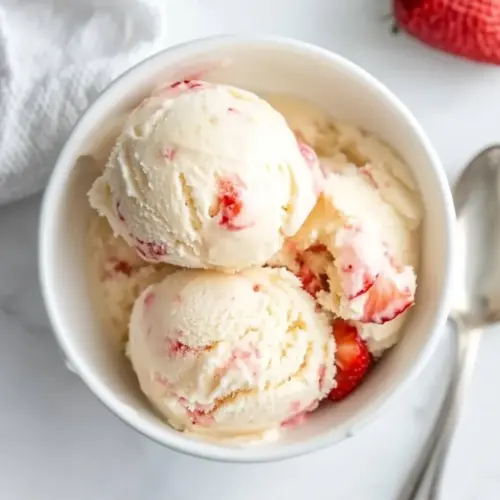
Creme Fraiche Strawberry Ice Cream
Creme Fraiche Strawberry Ice Cream is a creamy, tangy frozen treat with roasted strawberry ribbons and a silky custard base. The roasted berries offer concentrated sweetness while the crème fraîche gives a pleasant lift, creating an elegant dessert that is surprisingly easy to make at home, perfect for summer gatherings and easy entertaining.
Equipment
- Oven
- 9 inch baking dish
- Food Processor
- Medium Saucepan
- Mesh strainer
- Ice Cream Maker
Ingredients
- 2 cups hulled strawberries sliced 1/4-inch thick Slice and macerate to release juices and aromatic compounds; thin 1/4-inch slices ensure even freezing and a pleasant texture in the final ice cream. Allow slices to sit with sugar briefly so natural strawberry flavor intensifies and melds with the custard base.
- 1/3 cup sugar Sweeten and draw out fruit juices during maceration; sugar balances tartness and enhances perceived strawberry aroma. Dissolve completely to prevent grittiness and help achieve a smooth frozen texture.
- 2 tablespoons freshly squeezed lemon juice Brighten and balance sweetness with fresh acidity; lemon juice enhances strawberry flavor and prevents browning. Add sparingly to avoid overpowering the custard while contributing a clean, refreshing note.
- 1 cup whole milk Provide a lactose-rich, fluid dairy base that thins the custard and contributes to freezing point depression; whole milk supplies milkfat and proteins for a silky mouthfeel. Combine with cream component to create the desired richness without being overly heavy.
- 3/4 cup sugar Sweeten the custard base and control texture by lowering the mixture's freezing point; measured sugar contributes to scoopability and body. Dissolve fully into warm milk to ensure even sweetness and prevent grainy crystals.
- big pinch of kosher salt Season subtly to enhance overall flavor perception; a big pinch of kosher salt rounds sweetness and brightens the dairy and fruit notes. Use kosher salt for clean salinity and better distribution in the custard.
- 5 large egg yolks Thicken and enrich the custard through emulsifying proteins and natural lecithin; egg yolks create a creamy, stable texture and contribute to flavor depth. Temper into warm milk slowly to avoid curdling, then cook to proper thickness for safe consumption.
- 2 cups crème fraîche Enrich, acidify slightly, and add luxurious creaminess and tang; crème fraîche provides a silky texture and helps stabilize the ice cream while lending a gentle cultured flavor. Fold into cooled custard to preserve its delicate tang and smoothness before churning.
Instructions
- Preheat oven to 375° F.: You will feel the warmth in the kitchen right away as the oven comes up to temperature, and that steady heat is what allows the strawberries to roast evenly until they release fragrant aromas. Position a rack in the center so the fruit cooks uniformly; if the oven is cooler than expected, the berries may steam rather than roast, yielding less concentrated flavor. One common mistake is not allowing the oven to fully preheat, which delays caramelization and affects texture.
- In a 9" glass or ceramic baking dish, stir together the strawberries and sugar. Roast for 25 minutes, or until softened and fragrant. Remove from oven. Let cool slightly.: The moment the strawberries start to soften you will notice their scent shifting from bright to rich and jammy, a clear sign the sugars are caramelizing. Glass or ceramic holds heat well and gives even roasting without burning the bottoms. After removing the dish, let the fruit breathe for a few minutes so the steam dissipates, which makes pureeing easier and prevents watering down the custard later. Avoid leaving them too long in the hot pan, or they will continue to cook and become too syrupy.
- In a food processor, or with an immersion blender, puree the roasted strawberries with the lemon juice. Place mixture in refrigerator to cool.: Pureeing transforms the roasted berries into a silky sauce, and adding the lemon juice at this point elevates the fruit's brightness. You should hear a smooth whirr as the machine breaks down the fruit into a velvety consistency, and the color will deepen into a rich ruby. Cooling the puree before it meets the chilled custard prevents unwanted melting and keeps the swirl distinct. A common error is pureeing while the fruit is still hot, which will thin the sauce excessively when mixed into the custard.
- Prepare a medium bowl with a mesh strainer over the top. Set this in an ice bath.: This setup readies you to strain the custard and cool it quickly, halting the cooking process. The clink of ice and the cold bowl will help the custard drop temperature swiftly, preserving its silky texture. Straining removes any tiny cooked egg bits for a perfectly smooth base. Forgetting the ice bath can leave the custard too warm, which may affect the texture of the final ice cream.
- In a medium saucepan over medium heat, warm milk, sugar, and salt. Stir until warmed and the sugar has dissolved.: As you heat the mixture you will smell the vanilla-free sweetness building, and the surface will shimmer slightly when the sugar is fully dissolved. Warming the milk helps infuse evenness into the custard and ensures smooth tempering with the yolks. If the pan gets too hot, the milk can scald and develop an off flavor, so keep the heat moderate and stir frequently.
- In a separate medium bowl, whisk the egg yolks.: Whisking aerates the yolks slightly and separates them from any whites, which gives the custard a rich, uniform texture. The yolks will lighten in color and become glossy as you whisk, signaling they are ready to be tempered. A common misstep is not whisking vigorously enough, which can create lumps when warm liquid is added.
- Very slowly pour the warmed milk into the egg yolks, whisking constantly. Then scrape warmed egg yolks back into the saucepan and place back over medium heat. Stir mixture constantly with a heatproof spatula or wooden spoon, scraping the bottom as you stir. Once the mixture has thickened enough to coat the back of the spoon, pour the custard through the strainer. Remove strainer and stir custard over the ice bath until it is completely cool. Place custard in refrigerator to chill thoroughly, at least two hours.: As you temper the yolks, you will feel the warmth integrating into the bowl, and the mixture will become silkier. Cooking on the stovetop is tactile, you will sense the custard's weight change as it thickens and begins adhering to the spoon. Straining eliminates any coagulated bits and gives a glossy finish. Chill time is critical; inadequate chilling risks a grainy churned texture. The most common mistake here is rushing the cook time, which can leave the custard underdeveloped or curdled.
- Once custard is fully chilled, whisk in crème fraîche. Then freeze mixture in chilled ice cream maker according to manufacturer's instructions. Using the Pampered Chef ice cream maker, this only took about 15 minutes to reach the desired softly frozen consistency.: You will notice the custard regain a creamy loft as the cold crème fraîche is folded in, adding a subtle tang and silkiness. Churning introduces air and creates the soft set that will freeze firm in the freezer. Listen for a quieter motor and watch for a thickened, spoonable texture; these cues tell you it's ready. Overchurning can lead to icy crystals, so stop when the mixture is soft but holding shape.
- In a small bowl, whisk together 1/2 cup of the chilled roasted strawberry puree and 1/4 cup of the softly frozen crème fraîche ice cream to make the roasted strawberry swirl. You will have extra roasted strawberry puree. Place it in the refrigerator for another use – it's great spooned over ice cream or pound cake, and mixed into lemonade.: This step creates a ribbon that is bright and concentrated, with a velvety consistency that contrasts the smooth custard. The whisking action lifts some air and blends textures slightly, making the swirl easier to ripple through the ice cream without completely mixing. A pitfall is using puree that is too thin, which will sink and freeze into hard seams; keep it spoonable, not watery.
- In a container that holds about 5 cups, spread half of the crème fraîche ice cream evenly into the bottom. Add about 2/3 of the roasted strawberry swirl followed by the remaining crème fraîche ice cream, spreading evenly. Top with remaining roasted strawberry swirl. Then use a knife to run a few swirls through the container, to lightly combine the layers.: Layering produces visual appeal and varied texture in each scoop, and the knife swirls should create marbling not full mixing. The coldness of the ice cream will firm up the swirl slowly, so work briskly to maintain softness for easy swirling. A frequent error is overmixing, which blurs the swirl and loses the lovely contrast of fruit and cream.
- Place container in freezer to freeze completely, at least 4 hours.: The final freeze lets the ice cream set to scoopable firmness and develops stable texture. You will notice the surface firming and the aroma retreating slightly as it cools. Patience at this stage is rewarded with smooth scoops that hold shape. Avoid rushing to serve immediately, or the center may be too soft and the texture may be runny.
Notes
- Chilling is essential. Always cool the custard in an ice bath and then refrigerate it for at least two hours before churning; this improves texture and reduces ice crystal formation during freezing.
- Roast for depth. Roasting the strawberries concentrates flavor, so resist the urge to skip it even if you are short on time; the finished ice cream benefits from the jammy notes it produces.
- Use whole milk. The recipe depends on the balance between milk and the richness of the yolks and crème fraîche; substituting much lower fat milk will yield a thinner, less creamy base.
- Strain the custard. Pouring the cooked custard through a mesh strainer removes any tiny cooked bits of egg and ensures a glossy, silky finish in the churned ice cream.
- Reserve extra puree. Keep any leftover roasted strawberry puree in the fridge for up to a week to spoon over desserts, mix into drinks, or fold into yogurt; it extends the value of the effort you put into roasting.
- Control the swirl. To keep distinct ribbons of fruit, fold the swirl in gently and run the knife just a few times; too much stirring blends the flavors completely and loses contrast.