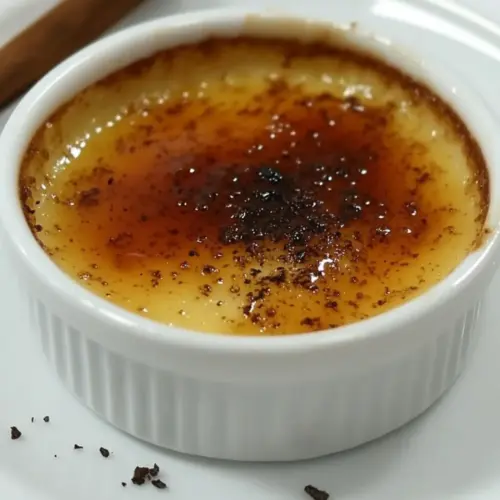
Creme Brulee
Creme Brulee is a creamy, silky custard topped with a crisp caramel shell, perfect for an elegant dessert. This classic uses simple ingredients like egg yolks, cream, and vanilla bean to create a luxurious texture and fragrant flavor, ideal for an easy dinner party finish or a special occasion treat. Make it ahead and torch just before serving for show stopping results.
Equipment
- Oven
- Ramekins
- Large baking dish
- kitchen torch
- Fine sieve
- Whisk
- Pouring jug
Ingredients
- 3 large egg yolks Provide richness and structure to the custard by adding silkiness and mouthfeel; whisk with sugar and yolks to create a smooth base before baking. Supply fat that helps set the custard gently and contributes to the creamy texture characteristic of crème brûlée.
- 1 1/4 cups fresh cream Bring luxurious fat and creaminess to the custard, ensuring a smooth, velvety texture when combined with yolks and heated gently. Carry and amplify the vanilla flavor, helping to create the dessert’s signature rich mouthfeel.
- 1/4 cups sugar Sweeten and help stabilize the custard mixture by dissolving into the cream and yolks; sugar also aids in creating the caramelized topping when sprinkled and torched. Control sweetness level while contributing to the custard’s set and surface browning.
- 1/4 cup milk Lighten and slightly thin the custard mixture so it sets with a delicate, tender texture; milk dilutes the cream just enough to balance richness without losing creaminess. Help produce a smoother custard that cooks evenly in a water bath.
- 1 vanilla bean Infuse intense, aromatic flavor by scraping the seeds and steeping the pod in the warm cream; provide the classic floral, creamy vanilla notes essential to the dessert. Offer a fresh, natural vanilla profile that elevates the overall taste of the custard.
Instructions
- Preheat oven to 170 ℃ (340 ℉).: The air in the oven should feel steady and even, not roaring hot. A water bath will moderate the heat around the ramekins so the custard sets slowly and evenly, producing a creamy texture rather than a curdled one. Listen for a calm hum from the oven and avoid opening the door repeatedly because temperature swings can cause the custard to crack. A common mistake is using too high a temperature which leads to grainy or separated custard.
- Combine the milk and cream.: You will notice a soft steam rising as the two liquids warm together, carrying the first hints of dairy aroma. Warming them helps the vanilla bean release its seeds and oil, improving infusion. Stir gently to marry the liquids and watch for tiny bubbles at the edge indicating heat, but do not let it boil. Boiling can alter texture and flavor, so keep the heat low and steady.
- Split the vanilla bean lengthwise and using the end of a teaspoon or small knife, scrape the seeds into the cream and milk mixture (best result will be achieved if this step is done the day before but not a must).: When you split the bean and scrape, the seeds look like specks of tiny black gold, and the aroma intensifies immediately. Allowing the bean and seeds to steep yields a floral, rounded vanilla that perfumes the custard. If you have time, infuse the mixture overnight in the fridge to deepen flavor, but a short warm steep still produces lovely results. Avoid tossing the pod too soon, because it carries a lot of the scent; also be cautious not to oversteep at very high heat, which can introduce bitter notes.
- Using a whisk, break up egg yolks in a large stainless steel bowl.: As you whisk the egg yolks , notice their color change to a paler, more cohesive ribbon; that indicates they are ready for sugar. Gentle whisking prevents introducing too much air which can show as bubbles in the baked custard. Overbeating is a common error, because trapped air expands in the oven and creates unwanted holes. Keep your movements controlled and even.
- Whisk the sugar into the eggs until dissolved.: As the sugar melds with the yolks, you will feel the mixture become silkier and slightly glossy. Dissolution is important because undissolved sugar can create a grainy texture. Rub a little between your fingers to test for grit, or whisk until it feels smooth. A frequent mistake is adding all the sugar later, which can leave crystals undissolved and affect mouthfeel.
- Using a rubber spatula or large spoon, stir in the cream and milk, try to avoid making bubbles but do ensure all the egg has dissolved into the cream mixture.: After combining, the mixture takes on a luxuriously thick sheen. Stir gently to integrate without aerating. Bubbles will bake into empty pockets, so skim any foam from the top before straining. Many cooks rush here and end up with a foamy surface, so take your time and use a steady hand.
- Pass the mixture through a fine sieve into a pouring jug.: The sieve catches any stray bits or cooked egg, leaving a silky, uniform custard. When it pours from the jug, the stream should be even and smooth, without clumps. Straining also ensures a glassy finish on the custard. A common oversight is skipping this step which risks small lumps or grainy texture in the finished dish.
- Place the ramekins in a large oven dish or tray that can accommodate all the ramekins and some water. Fill the ramekins with the mixture to approx half a fingers thickness from the top.: Pour slowly and watch the custard settle into each ramekin, the surface leveling out like a soft pond. Leaving a little space at the top prevents spills when the water bath is added and gives room for the caramel layer later. Overfilling can cause water to splash into the custard during baking, which ruins the texture.
- Place the oven dish on the oven shelf and fill the dish with water until the ramekins are sitting in water 2/3 rds of the way up their side (water bath).: The water should lap quietly around the ramekins, and you may see gentle steam rising as it heats. This bain marie ensures even cooking and prevents the edges from overcooking before the center sets. Use hot water to avoid shocking the custards and lowering oven temperature. A frequent mistake is adding cold water which alters bake time and can create uneven texture.
- Bake for approx 40 minutes (half way through the baking process, turn the tray around to ensure even heat distribution).: During baking you will see the custards set at the edges while the centers still tremble slightly, a sign they are done. The top will look matte rather than wet, and a gentle jiggle in the center signals perfect doneness. Turning the tray helps if your oven has hot spots, giving uniform color and texture. Overbaking yields a firmer, less creamy custard, so start checking at the earlier end of the time range.
- Remove the Brulees from the baking tray and refrigerate for at least 3-4 hours.: Cooling is where the custard finishes setting and the flavors mellow. As they chill, the mouthfeel tightens into a luxuriant creaminess. I like to cover them lightly while chilling to prevent fridge odors from settling. Cutting cooling short is a common error, because warm custard will not support the caramel layer and may be runny when served.
- Once ready to serve, remove them from the fridge (use a paper towel to dab off any condensation that may have formed on top of them) and sprinkle the top of each brulee with 1 tbsp of sugar and spread around evenly. (Be sure to wipe any excess sugar off the ramekin rim before proceeding): You will see the sugar sit as a fine layer on the chilled surface, ready to caramelize. Dabbing condensation away ensures the sugar does not dissolve before you torch, which would prevent a crisp crust. Wipe any excess sugar from the rim to keep presentation clean. Skipping the dab can cause a sticky, uneven crust instead of a glassy shell.
- Take the lit kitchen torch and gently pass the flame over the top of the brulees, ensuring that you keep the flame moving. Keep flaming the brulee’s until the sugar has caramelized and turned to a deep deep brown.: As you move the torch you will hear a faint hiss and watch the sugar transform from granular to molten, then to a deep amber glass. Keep the flame in constant motion to prevent scorching, and let the caramel rest until it hardens into that signature crack. A common mistake is lingering too long in one spot which creates burned pockets rather than an even, brittle shell.
- If you do not have a kitchen torch, take your old soup spoon and hold the handle with a folded dry towel and place the ladle end into the flame of one of your stove burners. Hold it there until it glows hot and then roll the base of the hot spoon over the sugar on the Brulees. The same effect of caramelised sugar will be achieved.: The spoon method produces a similarly satisfying caramelization, with the spoon glowing hot and creating focused heat when rolled across the sugar. Protect your hand with a towel and work quickly to avoid reheating the custard. This approach takes a little practice to get even coverage, and an error here is not heating the spoon enough which results in partial caramelization.
- Alternatively you could also use you griller (broiler) at a very high temperature and place the sugar covered brulees as close to the heat as possible, with this method, it is important however that your have a powerful griller, otherwise there is the risk of the griller not being hot enough and causing the brulee to split before the sugar caramelizes.: The broiler can caramelize the sugar rapidly if it reaches a sufficiently high temperature, producing that glassy top. Keep a close eye because the intense heat can split the custard if it warms too quickly. Use the shortest possible exposure and position the tray so the sugar is closest to the element. Many get uneven results with a weak broiler, so test carefully and be prepared to switch to a spoon or torch if it is not hot enough.
Notes
- Room temperature yolks help the eggs blend smoothly with the warm cream and milk so you avoid cooking the eggs prematurely when you combine the liquids.
- Warm the dairy gently until steaming but not boiling to fully extract the aroma from the vanilla bean while preventing scalding that can add off flavors.
- Sift before baking to catch any stray coagulated egg and ensure a perfectly smooth custard surface that will take the caramel evenly.
- Use hot water for the bain marie so the oven does not lose time reheating and the custards begin setting evenly from the start.
- Chill thoroughly for at least three to four hours so the custard firms properly, allowing the caramel to remain brittle and crack cleanly when served.