Creamy Peanut Butter Pie
Creamy Peanut Butter Pie is a silky, airy dessert with a crunchy Oreo crust and a lush peanut butter filling that is both creamy and satisfying. This easy make ahead pie uses whipped heavy cream for lightness and a chocolate drizzle for contrast, perfect for parties and weeknight celebrations. Try it when you want a show stopping, no bake dessert that stays freezer friendly.
Equipment
- Food Processor
- Electric Mixer
- Rubber spatula
- 9-inch pie plate
- Microwave-safe Bowl
Ingredients
- 28 (175 g) Oreo cookies Crushed finely to create a crunchy, chocolatey base for the pie crust; combines with melted butter to hold the crust together and provide texture contrast to the creamy filling. Adds deep cocoa flavor and a subtle sweetness that balances the peanut butter filling, and can be pressed evenly into the pan for a uniform bake-free foundation.
- 6 tablespoons unsalted butter, melted Melted and used to bind the crushed cookies into a compact, sliceable crust; imparts richness and helps the crust set firmly when chilled. Contributes smooth mouthfeel and prevents the crust from crumbling when cut and served.
- 8 ounces (170.1 g) cream cheese, at room temperature Softened to room temperature and beaten until smooth to provide a tangy, silky backbone for the filling; stabilizes the whipped cream and peanut butter mixture while adding creaminess. Helps the filling hold its shape and delivers a slightly tangy counterpoint to the sweet elements, improving overall texture and flavor complexity.
- 1 cup (90 g) powdered sugar Added to sweeten and stabilize the cream cheese layer while dissolving easily for a smooth, lump-free filling; helps control sweetness and contributes to a velvety texture. Also assists in thickening the filling slightly and ensures even sweetness throughout each bite.
- 1 1/2 cups (322.5 g) creamy peanut butter, not chunky or natural Creamy and smooth, whipped into the filling to supply rich peanut flavor and a dense, luscious texture; avoid natural or chunky varieties to ensure consistent consistency. Acts as the primary flavor driver of the pie, offering saltiness and nuttiness that complement the chocolate crust and cream topping.
- 1 tablespoon vanilla extract Stirred into the filling to enhance and round out flavors; provides aromatic warmth and depth while accentuating the sweetness and nuttiness of the filling. Small amount helps lift the overall profile and balances the richness without overpowering other ingredients.
- 2 cups (476 ml) heavy cream Whipped to soft peaks and folded into the peanut butter and cream cheese mixture to add volume, lightness, and a silky, airy finish; also helps stabilize the filling when chilled. Contributes a smooth, luxurious mouthfeel that makes each slice feel indulgent rather than overly dense.
- 1 ounce (28.35 g) semisweet chocolate, finely chopped Melted and drizzled or spread to create a thin chocolate garnish or swirl that adds bitterness and contrast to the sweet, nutty filling; finely chopped for quick melting and a glossy finish. Provides visual appeal and a complementary chocolate note that elevates the overall flavor balance of the pie.
- 2 tablespoons peanut butter Warm and slightly thinned to drizzle over the top or swirl into the filling as a finishing touch, intensifying peanut flavor and adding sheen; can be mixed with melted chocolate for a richer topping. Used sparingly to avoid overpowering the texture while providing concentrated peanut aroma and taste.
Instructions
- Make the Crust: Process the Oreo cookies in a food processor until fine crumbs. Turn the crumbs out into a medium bowl. Add the melted butter and toss with a fork until all of the crumbs are moistened. Press into the bottom and up the sides of a 9-inch pie plate. Refrigerate for at least 30 minutes.: The room will fill with a chocolatey aroma as you process the Oreo cookies into fine crumbs, a sound like light rain in the processor, and when the crumbs look uniformly pulverized stop. After you add the warm, melted butter toss the crumbs until they glisten and feel slightly tacky between your fingers, that sheen means the fat is coating the crumbs and will bind them when chilled. Press the mixture firmly into the bottom and up the sides of a 9 inch pie plate, using the flat bottom of a measuring cup to get an even thickness, and smooth the edges for a clean profile. Refrigerate for at least 30 minutes to let the butter solidify and set the crust, which prevents crumbling when you slice the pie. A common trouble is not pressing firmly enough, which leaves pockets and a fragile crust, so press evenly and inspect for gaps before chilling.
- Make the Filling: Using an electric mixer, beat the cream cheese and powdered sugar on medium speed until light and fluffy, about 2 minutes. Add the peanut butter and vanilla and beat again until completely combined.: When you beat the room temperature cream cheese and powdered sugar with an electric mixer on medium speed they will transform from stiff and slightly grainy to lighter and almost pillowy in about two minutes; look for a uniform pale mixture with no streaks of cream cheese. Adding the measured peanut butter and vanilla and beating again makes the batter glossy and intensely nutty, the smell will deepen into a warm, roasted peanut scent. This texture is essential as it creates the backbone of the filling that will accept the whipped cream without deflating too much. One mistake I see is working at too high a speed once the peanut butter is added, which can cause the mixture to become overly soft; keep to medium speed and scrape the bowl as needed.
- In a separate bowl, whip the heavy cream on medium-high speed until soft peaks form.: As you whip the chilled heavy cream on medium high speed watch closely for it to move from loose bubbles to defined soft peaks where the cream holds a barely defined tip when the whisk is lifted. The sound will change from rushing liquid to a deeper, more aerated thump, and the volume will increase noticeably. Soft peaks are important here because they integrate smoothly, lightening the base without making it grainy. If you over whip to stiff peaks the cream can break and feel curdled when folded in, so stop early and check by lifting the whisk frequently.
- Using a rubber spatula, stir 1/3 of the whipped cream into the cream cheese mixture to lighten it up. Use a rubber spatula to gently fold in the remaining whipped cream. Transfer the filling to the chilled crust and spread in an even layer. Freeze uncovered for at least 4 hours or up to 1 day covered with plastic wrap.: Start by stirring about one third of the whipped heavy cream into the cream cheese and peanut mixture to lighten it, you will notice the mixture loosen and become silkier with a softer shimmer. Use a rubber spatula to gently fold in the remaining whipped cream with wide strokes, rotating the bowl as you go to preserve air; the goal is a uniformly aerated filling that still holds structure, not a deflated batter. Transfer the filling into the chilled crust and spread it into an even layer with the spatula, watching for any streaks which indicate uneven folding. Freeze uncovered for at least four hours so the filling firms to a scoopable, mousse like texture; if you cover too soon condensation can form and weep on the surface, so if you must cover do it with plastic wrap only after it has partially set. A frequent misstep is folding aggressively, which destroys the whipped cream volume and yields a dense filling.
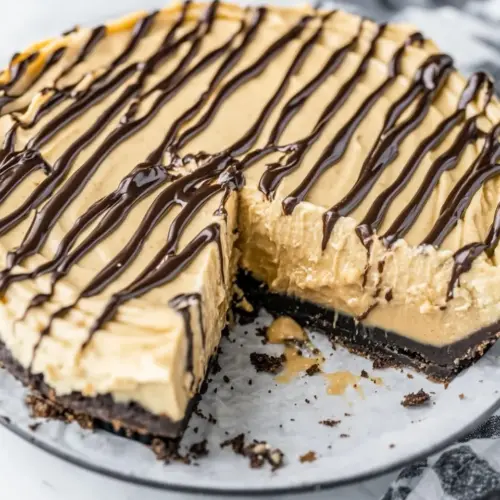
- Garnish the Pie: Put the chocolate in a microwave-safe bowl and heat in 30 second increments at 50% power, stirring after each. Continue until the chocolate is melted and smooth. Transfer to a resealable plastic bag and snip a tiny bit off the corner. Hold the bag over the pie and drizzle the melted chocolate in a zig-zag pattern. Melt the peanut butter in the microwave using the same method used for the chocolate. Add the melted peanut butter to a resealable plastic bag, snip off a corner and drizzle over the pie. Let stand for about 10 minutes to set. Return to the freeze if not serving immediately.: Melt the finely chopped semisweet chocolate in short bursts at half power, stirring in between so it becomes glossy and smooth without seizing, that inviting chocolate scent signals readiness. Transfer the melted chocolate to a resealable bag and snip a tiny corner to drizzle a thin, decorative zig zag over the frozen pie so it sets in delicate threads instead of thick blobs. Repeat the same gentle warming method for the extra two tablespoons of peanut butter and drizzle in a contrasting pattern over the chocolate, creating visual depth and concentrated pockets of peanut flavor. Let the drizzles stand for about ten minutes to set, you will feel the surface firm slightly to the touch when ready. If you do not serve immediately, return the pie to the freeze to maintain firm slices; be careful not to overheat the chocolate or peanut butter during melting, as overheating can cause grainy texture or separation.
- Remove the pie from the freezer about 10-15 minutes before you are ready to serve. If you have trouble cutting it, running your knife under warm water will help. Cover leftovers tightly with plastic wrap and foil, and store in the freezer.: Remove the pie from the freezer ten to fifteen minutes before serving so the edges soften slightly while the center remains firm, this yields clean slices that are creamy without being icy. If you find cutting difficult, run a sharp knife under warm water, dry it, and slice in a single smooth motion for neat portions, the warm blade briefly melts the chocolate drizzle for a tidy edge. Cover leftover pie tightly with plastic wrap and foil and store in the freezer to maintain texture and flavor; chilling prevents the filling from weeping and keeps the crust crisp when thawed briefly for serving. A common error is leaving the pie out too long which can make the filling too soft and messy when slicing, so time the thawing carefully.
Notes
- Equipment recommendation Use a food processor for the Oreo cookies to get uniform fine crumbs quickly, and a 9 inch pie plate for ideal slice proportions.
- Crust alternative Swap to a graham cracker crust or chocolate graham crackers if you prefer a lighter crunch, pressing the crumbs firmly with the back of a measuring cup to compact them.
- Peanut butter guidance Use processed, stable peanut butter such as classic commercial brands to avoid oil separation that natural nut butters can cause in the filling.
- Nut butter swaps You can substitute other stable nut butters like almond or cashew butter that do not separate, but measure for similar texture and flavor balance.
- Cool Whip shortcut For a time saving option fold in an 8 ounce container of Cool Whip in place of freshly whipped heavy cream, keeping in mind it will be slightly sweeter and lighter.