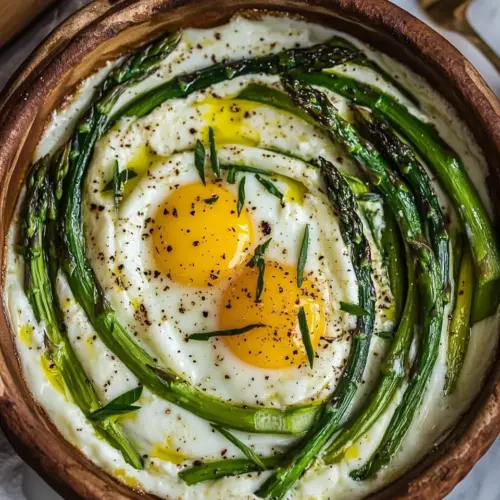
Cream Baked Eggs with Asparagus
Cream Baked Eggs with Asparagus is a creamy springtime dish with tender shaved asparagus and gently baked eggs. The rich heavy cream, bright herbs, and a touch of dijon mustard create a silky savory bite ideal for an easy weeknight dinner or a relaxed weekend breakfast. It’s quick to assemble, visually lovely, and a persuasive reason to make it when asparagus is in season.
Equipment
- Oven
- Baking Dish
- Mixing Bowl
- Whisk
Ingredients
- 1/4 pound asparagus (shaved (see note)) Shaved to provide tender, vegetal stalks that soften quickly under heat and contribute a fresh, slightly grassy flavor and pleasing texture contrast to the creamy eggs. Use thin ribbons to distribute asparagus flavor evenly throughout each serving and to ensure even cooking without becoming fibrous.
- 1/4 cup heavy cream Poured over the eggs to create a rich, silky custard as it bakes, adding body and a mellow dairy sweetness that balances the savory elements. Warm slightly before combining to help it incorporate smoothly and prevent curdling when exposed to heat.
- 1 tablespoon minced fresh flat-leaf parsley Minced finely to offer a bright, herbaceous lift and a clean parsley aroma that cuts through the richness of cream and eggs. Scatter over or mix into the custard to add color, freshness, and a mild peppery note that complements the asparagus.
- 1 teaspoon minced fresh tarragon Chopped finely to introduce a delicate anise-like complexity and aromatic lift that pairs well with eggs and cream while enhancing overall flavor depth. Use sparingly to avoid overpowering other herbs; its subtle sweet-licorice notes meld into the custard during baking.
- 1/2 teaspoon dijon mustard Emulsified in the cream mixture to give a sharp, tangy backbone that sharpens flavors and helps bind the dairy and seasonings. Whisk in well to ensure its piquant character is evenly distributed without creating pockets of intense mustard flavor.
- 1/4 teaspoons salt Measured precisely to season the custard and heighten the natural flavors of the eggs, cream, and asparagus while helping other aromatics bloom. Dissolve into the cream to avoid grainy spots and adjust to taste depending on saltiness of other ingredients.
- 1/4 teaspoon black pepper Ground to add a warm, mildly pungent heat and aromatic complexity that rounds out the dish, enhancing both savory and creamy elements. Grind fresh if possible for maximum aroma and sprinkle to taste before or after baking for varied intensity.
- 2 large eggs Cracked into the prepared custard to provide the central protein and structure, setting gently in the oven to yield a tender, slightly runny yolk when timed correctly. Allow eggs to come closer to room temperature for more even cooking and a silkier final texture.
- Chili Flakes for serving Sprinkled lightly at the end to finish with a hint of heat and a visual pop, offering optional brightness and contrast to the creamy, herbaceous flavors. Use sparingly to complement rather than overwhelm the delicate custard and asparagus.
Instructions
- Heat oven to 400˚F with a rack in the middle of the oven. Place the shaved asparagus in a small baking dish, roughly 6” to 8” wide.: When you slide the dish in, you want consistent radiant heat, so preheating the oven to 400 F ensures the eggs begin to set evenly and the cream starts to bubble gently around the edges. You should hear nothing dramatic, maybe a faint settling sound as the dish warms, and you will see small bubbles form near the edges after a few minutes in the oven, signaling gentle simmering. This step matters because a properly preheated oven prevents uneven cooking where whites could seize before yolks reach the texture you want. A common mistake is skipping preheat, which can result in patchy whites and overcooked yolks, so always wait until the temperature is reached.
- Place the cream in a bowl along with the parsley, tarragon, mustard, salt, and pepper. Whisk lightly to combine then pour half of the cream mixture over the asparagus. Stir/toss the asparagus until coated with the cream.: The visual here is delicate ribbons of bright green filling the dish, their thin edges collapsing slightly when they meet the warm cream. Shaving lets the asparagus soften in minutes, releasing a subtle vegetal steam that smells fresh and spring like. Use a shallow dish so the cream and eggs have room to breathe; if the vessel is too deep, cooking will be uneven. Watch for limp, overly wet asparagus as a sign of over shaving or older stalks, which can turn mushy; select firm stalks and shave confidently but not paper thin.
- Make two wells in the asparagus and carefully crack an egg in each. Spoon the remaining cream mixture over the egg whites.: Whisking these ingredients together blends the aromatics into the heavy cream , releasing herb oils that scent the mixture and infuse the liquid. You will notice the cream take on a faint herbaceous color and the mustard smoothing into it, creating tiny specks of green that promise flavor throughout. This step matters because even distribution prevents pockets of blandness and ensures each bite is balanced. A mistake to avoid is under seasoning; taste a tiny amount before adding to the dish so you are confident the mix is lively rather than shy.
- Place the dish in the oven and bake for 10 to 14 minutes, until the egg whites are set and the yolk is to your liking.: As the cream coats the asparagus , it clings to the ribbons, making them glossy and fragrant. You may hear a soft wet sound as the cream settles, and visually the asparagus becomes silkier and more lustrous. Let it sit for a moment so the herb oils mingle with the vegetable; this enhances the final harmony of flavors. Avoid drowning the asparagus completely, a light coating helps the vegetables retain slight texture after baking, so reserve some of the mixture for the eggs.
- Serve with an extra sprinkle of herbs and chili flakes, if desired.: Movement distributes the mixture and ensures each ribbon is lightly but evenly covered. You'll feel the asparagus soften under your spoon and smell the herbs deepen as they touch the cream. This tactile step matters because it eliminates pockets of dry vegetable that might bake inconsistently. A common slip is over stirring which can bruise the asparagus and make it overly soft before it hits the oven, so be gentle and purposeful.
- Make two wells in the asparagus and carefully crack an egg in each: Creating wells gives the eggs a place to rest so the whites spread slowly into the cream without running all over the dish. When you crack the eggs , listen for the soft thud and watch the white settle around the yolk like a cushion, a visual cue that the eggs are seated properly. This step matters because it controls how the whites set and where the yolk sits, impacting presentation and texture. Avoid cracking directly over the dish from height, which can splatter or break yolks; instead use a low crack and steady hand.
- Spoon the remaining cream mixture over the egg whites: The extra cream coats the exposed whites, protecting them from drying and helping the eggs to cook gently. You will see the whites look glossy where the cream lands and the herbs dot the surface. This technique ensures the whites set tenderly while the yolks remain luscious, and it enhances flavor distribution. The mistake to watch for is pouring too much, which could bury the yolks and change the final mouthfeel; a light spooning preserves balance.
- Place the dish in the oven and bake for 10 to 14 minutes until the egg whites are set and the yolk is to your liking: As the dish bakes, aromas of cream and herbs will rise, and you may hear faint bubbling at the edges. The whites will change from glossy to opaque, and the yolks will develop a delicate matte surface when nearing firmness. This visual transformation is your guide, because bake time determines texture: a shorter time yields runny yolks, a longer time gives firmer centers. One common error is relying solely on time without watching the visual cues, which can lead to over baked yolks; check early for your preferred doneness.
- Serve with an extra sprinkle of herbs and chili flakes if desired: The final flourish is bright and sensory, the fresh herbs smelling bright and the Chili Flakes offering a quick pop of heat. Presentation matters here, a light scatter of green and a touch of red makes the dish inviting and emphasizes contrast. This last step matters because finishing touches lift the whole plate and make the experience more layered. Avoid heavy handedness with the chili; a little goes a long way and keeps the flavors harmonious.
Notes
- Shave the asparagus thinly: Shaving results in ribbons that soften quickly and integrate with the cream, making each bite evenly textured and preventing stringy bits.
- Use room temperature eggs: Letting eggs sit for a few minutes at room temperature reduces shock in the oven and encourages more uniform cooking between white and yolk.
- Spoon instead of pouring: Spoon the reserved cream gently over the whites to control coverage and avoid burying the yolks, preserving runny centers if you like them.
- Adjust bake time for yolk preference: Reduce by a few minutes for runny yolks or add time by a few minutes for firmer yolks, checking visually to avoid overcooking.
- Finish with fresh herbs: Add parsley or tarragon after baking for a burst of freshness and aroma that cuts through the richness of the cream.