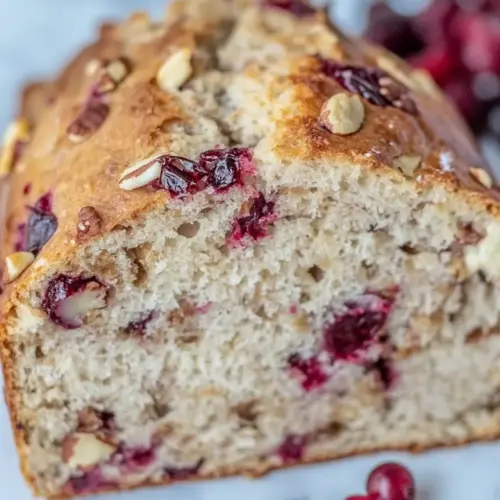
Cranberry Walnut Bread
Cranberry Walnut Bread is a cozy, slightly sweet loaf studded with tart dried cranberries and crunchy walnuts. This easy artisan style bread delivers a crisp crust and tender crumb, perfect for breakfast, brunch, or holiday tables. It’s a forgiving, make ahead loaf with comforting aromas and satisfying texture, ideal when you want a rustic, crowd pleasing loaf to share.
Equipment
- 3.5 to 6 quart Dutch Oven
Ingredients
- 3 cups white wheat flour, or unbleached all-purpose flour Provide structure and bulk to the loaf, absorbing liquids to form the dough matrix; choose white wheat or unbleached all-purpose for a tender crumb and mild flavor. Ensure proper measuring by spooning and leveling the flour to maintain consistent texture and rise in the bread. Combine with other dry ingredients thoroughly to distribute proteins and starches that contribute to gluten development during mixing and kneading.
- 1 teaspoon dry active yeast Activate the dough by producing carbon dioxide through fermentation, helping the bread rise and develop an airy crumb; sprinkle into lukewarm water to bloom if using traditional yeast activation methods. Control fermentation timing and flavor by monitoring water temperature and proofing duration, as yeast also contributes subtle fermentation notes. Use the specified amount to balance rise without overproofing, which can collapse structure or create off-flavors.
- 1/2 cup dried cranberries Introduce concentrated sweet-tart flavor and chewy bursts throughout the loaf, complementing walnuts and enhancing overall taste contrast. Rehydrate slightly during mixing to soften texture and distribute fruity acidity that brightens the bread profile. Toss with a little flour before folding in to prevent clumping and ensure even distribution in the dough.
- 1/2 chopped walnuts Add crunchy texture and a rich, nutty flavor that balances the sweet-tart cranberries and enriches mouthfeel; chop to allow even distribution and bite-sized pieces. Provide healthy fats that tenderize crumb and contribute to a pleasing aroma when toasted during baking. Fold in near the end of mixing to preserve nut integrity and prevent overprocessing oils into the dough.
- 1 1/2 teaspoons salt Enhance and balance flavor by seasoning the dough, strengthening gluten structure slightly and regulating yeast activity for controlled fermentation. Measure accurately to avoid overly salty bread, as salt impacts both taste and yeast performance. Dissolve into the water or blend with dry ingredients to ensure even seasoning throughout the loaf.
- 1 1/2 cups lukewarm water Hydrate dry ingredients to form dough, activating yeast and enabling gluten development for proper rise and texture; maintain lukewarm temperature to encourage yeast activity without killing it. Adjust slightly if necessary based on flour absorption to achieve a cohesive, elastic dough that is tacky but not overly sticky. Use measured cups to maintain consistent hydration for repeatable results.
Instructions
- In a large mixing bowl, mix together flour, yeast, salt, cranberries, and walnuts. Add in water and mix well with a wooden spoon.: The air smells faintly of dry grain and nuts when you combine the dry ingredients, which sets the stage for the dough. Mixing evenly distributes the yeast and salt among the flour , while the cranberries and walnuts will nestle into the matrix of gluten as it forms. Why this matters: even distribution prevents pockets of salt or yeast that can create uneven rise or flavor. Listen and feel for a uniformly textured dry mix, with no clumps of wet fruit or concentrated salt. Common mistake to avoid: adding the water too early or stirring unevenly, which can lead to clumping or poor incorporation of the mix ins.
- Cover with plastic wrap or a clean kitchen towel and set in a draft-free spot to rise for 12-18 hours undisturbed.: You will hear soft scraping sounds and feel the dough come together as the water hydrates the flour , transforming powder into a sticky, cohesive mass. The dough should be tacky to the touch but not overly stiff, and the cranberries and walnuts will be suspended through the dough. Why this matters: proper hydration allows gluten to develop gently during the long rest, giving an open crumb without intensive kneading. Smell the faint sweetness of the fruit and the neutral dough aroma as you work. Common mistake to avoid: overmixing vigorously which tightens gluten and can make the loaf dense, or under mixing leaving pockets of dry flour.
- After the proofing time has passed, turn the dough out onto parchment paper that has been sprinkled lightly with flour and quickly shape into a circle. It will be sticky, so you may want to flour your hands as well. And try to not overwork the dough--just a rustic circle is all you are going for. Let the dough rest, while the oven preheats.: During this slow overnight rise, the dough develops flavor and strength, and the kitchen will begin to carry a faint fermentation scent, slightly yeasty and pleasantly sour. The long, cool proofing encourages enzymatic activity that deepens flavor without aggressive kneading. Why this matters: a long rise replaces hours of kneading, producing a light structure and nuanced taste. Look for the dough to expand noticeably and feel pillowy to the touch. Common mistake to avoid: placing the dough in a drafty or very warm spot, which can cause over fermentation or a collapsed structure.
- Place the dutch oven fitted with its lid in the oven. Preheat to 450℉ (230℃). (Let the pan preheat in the oven.): The dough will be soft and slightly sticky, and the act of shaping should be quick and gentle so you preserve the bubbles inside. You will see the cranberries and walnuts dotted through the mass, and the surface may show some rippling from fermentation. Why this matters: a gentle shaping keeps the internal gas intact, leading to a better oven spring and open crumb. Visual cue: a smoothish outer skin with some tension, not a flat, squashed look. Common mistake to avoid: overworking the dough, which deflates those precious air pockets and yields a denser loaf.
- Once the pan is preheated, carefully remove it from the oven and then carefully place the prepared dough into the pan and cover with the lid. If using parchment paper that is safe up to 450℉ (230℃), you can simply pick up the parchment paper and place into the dutch oven. If you don't have parchment paper, just place the bread dough directly to the dutch oven. DO NOT USE wax paper or a silicone baking sheet.: When the pan heats, it will radiate intense thermal energy, and you will hear a faint ping as the metal comes to temperature. Preheating the vessel ensures the bottom of the loaf receives immediate heat, encouraging a dramatic oven spring and a deeply caramelized crust. Why this matters: the thermal shock from a hot pot is what gives artisan style crust and rise in a home oven. Safety note: use thick oven mitts as the handle and rim will be extremely hot. Common mistake to avoid: skipping the preheat, which results in a flatter loaf and pale crust.
- Bake for 30 minutes covered. Remove the lid and bake for an additional 20 minutes.: The sound of the dough meeting the hot metal is silent but the effect is immediate, sealing the bottom to begin crisping. If your parchment is rated for high heat, you can lift the dough on the paper and lower it into the pan; otherwise set the dough directly. Why this matters: transferring the loaf quickly minimizes heat loss and preserves the pan temperature for optimal oven spring. Visual cue: the dough should sit snugly in the pan with room to expand. Common mistake to avoid: using wax paper or a low temperature rated sheet which will smoke or melt, and can ruin the loaf.
- Remove bread from dutch oven and let cool on a wire rack completely before slicing and serving.: In the covered stage, steam circulates and keeps the surface supple so the loaf can expand fully, and you will notice the top changing from pale to lightly golden. After removing the lid, the crust will take on deep color and a satisfying crackle; you will smell toasted nuts and a warm, bread like aroma filling the room. Why this matters: the two stage bake provides both lift and crust development, giving the loaf structure and a crunchy exterior. Visual cue: the crust will be a deep golden brown and sound hollow when tapped. Common mistake to avoid: removing the lid too early which can inhibit full oven spring, or leaving it covered too long leading to pale crust.
- Remove bread from dutch oven and let cool on a wire rack completely before slicing and serving: As the loaf cools, steam inside redistributes, setting the crumb; slicing too soon results in a gummy interior. The crust will firm and the aroma will settle into a warm, inviting bouquet of grain, toasted nut, and fruity notes from the cranberries . Why this matters: patience here preserves texture and makes clean slices. Common mistake to avoid: cutting while hot, which tears the crumb and creates a pasty center.
Notes
- Flour choice matters: I recommend using either white wheat or unbleached all purpose flour, spooning and leveling the cup to avoid packing too much which would dry the dough.
- Nuts adjustment: If you want a nut free loaf, omit the walnuts; alternatively swap for pecans for a slightly sweeter, buttery note but keep the quantity the same.
- Yeast care: Use regular dry active yeast and check freshness by proofing a small amount in lukewarm water if you are unsure; dead yeast leads to no rise.
- Prevent sticking: For some pans, parchment is the safest route; otherwise dust the bottom with flour to keep the loaf from adhering to the dutch oven.
- Storage tips: Once cooled, wrap the loaf in plastic or keep in a sealed container at room temperature for up to three days, or freeze slices for up to one month.