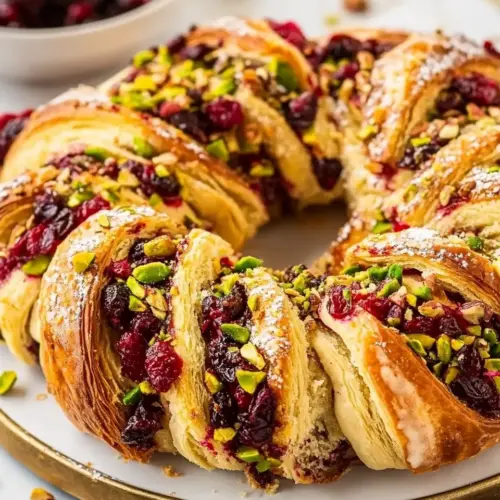
Cranberry Pistachio Babka Bread Wreath
Cranberry Pistachio Babka Bread Wreath is a festive, visually stunning loaf with a tender, enriched crumb, crunchy pistachio filling, and bright pops of cranberry. This easy to slice wreath balances tart and sweet with a creamy white chocolate drizzle, making it ideal for holiday brunch or cozy coffee dates. Make it ahead for a show stopping centerpiece that tastes as special as it looks.
Equipment
- Stand mixer
- Dough Hook
- Food Processor
- Sharp Knife
- Baking Sheet
- Parchment Paper
- Oven thermometer
Ingredients
- 3 cups bread flour 420 g, plus more, if needed Provide a strong, high-gluten base that gives the babka structure and chew; measure precisely for dough hydration and add more if needed to achieve a smooth, elastic texture suited for braiding and shaping.
- 5 tablespoons granulated sugar Add sweetness and tenderize the dough while activating yeast enzymes; use as specified to balance flavor without overpowering the enriched bread's buttery profile.
- 5 tablespoons water room temperature Hydrate yeast and dissolve sugar for initial activation at room temperature to ensure consistent fermentation; maintain the water temperature to avoid killing yeast or slowing proofing.
- 1 tablespoon instant yeast Leaven rapidly and reliably in enriched doughs; sprinkle and proof according to directions to produce lift and an airy crumb in the babka wreath.
- 2 teaspoons vanilla extract Enhance aromatic complexity and deepen overall flavor; incorporate into the dough sparingly to complement citrus and vanilla notes in the filling.
- 1/2 to 1 teaspoon orange zest optional Brighten the dough and complement cranberry flavors with subtle citrus oils; use sparingly or omit depending on preference and avoid bitterness from pith.
- 1/2 teaspoon orange extract optional Intensify citrus aroma without adding acidity; use as an optional concentrated accent when a stronger orange essence is desired in both dough and filling.
- 1 teaspoon salt Strengthen gluten network and season the dough for balanced flavor; dissolve evenly to ensure consistent distribution and avoid localized salty pockets.
- 3 large eggs Enrich the dough with fat and protein to create a tender, rich crumb; beat to incorporate air and contribute to color, texture, and structure during baking.
- 9 tablespoons unsalted butter cold Provide richness and lamination capability while cold to prevent greasy dough; cut into pieces to incorporate gradually for an enriched, flaky crumb.
- 1 teaspoon ground cinnamon optional Infuse warm, spiced notes that pair well with cranberries and nuts; add to the filling or dough lightly to avoid overpowering delicate flavors.
- 1 cup unsalted shelled pistachios 120 grams, or nut of choice Contribute nutty crunch and distinct flavor to the filling or topping; coarsely chop or pulse for texture and measure to maintain balance with sweet elements.
- 9 tablespoons granulated sugar Sweeten the pistachio filling and help create a spreadable paste when combined with butter and flour; use to balance tart cranberries and nuts.
- 3 tablespoons bread flour Absorb moisture in the pistachio filling and help bind the sugar and nut mixture into a spreadable consistency; sift or mix thoroughly for even texture.
- 1 teaspoon fine sea salt Season the pistachio filling with a clean finish and subtle brininess; use fine sea salt to highlight nuttiness without introducing grit.
- 6 tablespoons unsalted butter very cold Create a firm, buttery paste for the filing when kept very cold; grate or finely chop to incorporate into the nut-sugar mixture for lamination.
- 1 large egg Act as an egg wash or binder in the filling or assembly stages; beat and apply as directed to improve shine and adhesion.
- 3/4 teaspoon vanilla extract clear is preferable Add a clear vanilla aroma without dark specks and complement other extracts; measure precisely to avoid overwhelming delicate flavors.
- 1 cup cranberries fresh or frozen (frozen being the better choice) Provide bright tartness that contrasts the sweet pistachio filling; use fresh or frozen cranberries to maintain texture and distribute acidity throughout the babka.
- 1 tablespoon bread flour Help absorb excess moisture from cranberries and thicken the filling to prevent seepage during baking; dust and mix in to stabilize the fruit layer.
- 1/4 to 1/2 cup unsalted shelled pistachios or nut of choice coarsely chopped (optional) Offer optional crunchy topping and nutty contrast when scattered over the rolled dough; adjust quantity for desired texture and visual appeal.
- 1 large egg or egg white Give shine and help glazes adhere when used as an egg wash; apply whole egg or white depending on desired gloss and color.
- 1 tablespoon water Thin the egg wash for easier brushing and even coverage; mix thoroughly to prevent streaking and ensure a smooth finish.
- 3 tablespoons granulated sugar Add a crunchy, caramelized surface when sprinkled over the dough before or after baking; use to enhance sweetness and create texture contrasts.
- 3 tablespoons water hot Loosen sugar syrup and help it penetrate the bread; mix with hot water to create a simple syrup for glazing and preserving freshness.
- 1 teaspoon honey Provide sticky sweetness and a subtle floral depth to the glaze; dissolve into hot water to stabilize and add sheen to the finished wreath.
- 1 teaspoon vanilla extract Enhance the glaze with warm aromatic notes and round out flavors; add to the syrup to complement vanilla and fruit elements.
- 1 cup white chocolate chips quality, ex., Ghirardelli Melt into the filling or glaze to add creamy sweetness and body; use high-quality chips for best flavor and smoothness when combined with oil.
- 2 to 3 teaspoons coconut oil more/less for desired consistency (any oil can be used – canola, etc.) Soften melted white chocolate for a glossy, pourable consistency and prevent graininess; adjust amount to achieve desired spreadability while preserving flavor.
Instructions
- Combine flour, sugar, water, yeast, vanilla, orange zest and orange extract (if using), salt and eggs in the bowl of a stand mixer fitted with a dough hook. Mix on low speed for about 4 minutes, just until the dough comes together. Avoid turning the speed up too high, or the dough will become too wet.: The moment these ingredients meet, you will notice the dry flour absorb liquid and the aroma of vanilla and orange lifting from the bowl. Mixing on low for about 4 minutes allows the flour to hydrate slowly, producing a satin like dough without overworking gluten. You should hear a soft thrum from the mixer and see a cohesive mass forming around the hook, not a wet batter. This gentle start matters because jumping to a higher speed too soon can make the dough sticky and slack, which will affect the final crumb. A common mistake is turning the mixer up, which warms the dough and can make it soggy; keep the speed low. If the dough looks too dry at this point, add a teaspoon of water at a time, but only if necessary. If you do not have a stand mixer, use a sturdy spoon and finish kneading by hand until the mixture gathers together into a rope like mass.
- Add the butter one tablespoon at a time along with the cinnamon, if using. Continue mixing on low speed for about 10 minutes. Tip: If the dough still sticks to the bottom of your mixer after butter and cinnamon are added, remove it from the bowl. Finish kneading by hand on a cutting board, adding only about a tablespoon of flour at a time. Do not add too much flour. The dough should feel smooth and buttery – not wet or dry.: As you incorporate the cold, cubed butter , the dough will shift from a shaggy ball to a smooth, enriched dough over roughly 10 minutes. Each tablespoon should be added slowly so the dough can absorb the fat without breaking down. You will feel the dough become silkier and smell the faint butter and spice. The reason for this slow method is texture control; rushed mixing can cause the butter to melt into grease and leave the dough heavy. If the dough clings to the bowl bottom after the butter is in, remove it and knead briefly on a lightly floured board, adding flour a tablespoon at a time. Avoid adding too much flour, which can make the loaf dry. One common misstep is over kneading at this stage, which makes the finished crumb tight instead of tender.
- Shape the dough into a ball and place it in a lightly greased bowl. Cover with plastic wrap and let it rest at room temperature for about 1 to 1 1/2 hours until puffy, but not doubled in size.: After kneading, shaping into a smooth ball and setting it to rest triggers a calm, consistent rise. Cover with plastic wrap and let it rest until puffy for about 1 to 1 1/2 hours, where the dough will gently swell and become airy. During this rest you should notice a faint yeasty scent, and the surface will feel slightly springy when pressed. This rest allows gluten to relax, making the dough easier to roll later. A common error is letting it overproof so it flattens and loses structure; watch for puffiness, not a full double, before proceeding.
- As you’re coming to the end of your bread’s rest time, prepare the pistachio paste.: Preparing the filling while the dough rests keeps your workflow smooth and ensures the paste is at the right temperature when you spread it. Start by pulsing the pistachios briefly in a food processor until crumbly, not pasty. The sensory cue here is sight and texture, see small chunky bits rather than a creamy nut butter. This prevents an oily filling and keeps textural interest. A frequent mistake is overprocessing, which releases oils and wets the mixture; pulse in short bursts and stop when you still see little chunks.
- Add the pistachios to a food processor and pulse a few times until roughly crumbled. Pulsing too many times will cause the pistachios to release their oils, which is not what you want for the consistency.: You want a coarse texture for the pistachios , so pulse about five short bursts and check the pieces. The sound of the processor will change as the nuts break down, and you should stop while small chunks remain. This method prevents the nuts from turning into paste, preserving toothsome bits in the filling. If you accidentally over process, chill the mixture briefly to firm it up before using.
- After pulsing a couple of seconds about 5 times, add pistachios to the bowl with sugar, flour, salt, butter, egg and vanilla extract. Mash together with a fork and then set aside. Tips: Be sure to use very cold butter, as you don’t want your paste to become too soft and watery because of the butter being too soft. When you mash the butter into the pistachio paste mixture, the butter should be in chunky, pebbly pieces even after it has been mixed with a fork. If you make the paste well before the time to use it, set it in the fridge until ready to use.: Combining these elements by hand and mashing with a fork yields a rustic paste that still has texture. You will notice sugar sparkling through the mixture and small buttery pebbles holding the paste together. The cold butter ensures the paste does not become runny, and folding gently maintains those desirable pebble like bits. If you mix too vigorously the butter may soften too much, so work briskly but not aggressively. If made early, chill the paste until ready; warm paste will smear and can leak from the rolled dough during baking.
- Note: For a greener paste, shell the pistachios, removing almost all/most of the brown skins from under the shells. If you don’t do this, your paste will have a browner color.: Removing skins brightens the green hue of the paste and yields a more vibrant look in the finished loaf. This takes extra time but is worthwhile when presentation matters. Use a towel to rub off skins or purchase blanched pistachios if you want to skip this step. The only downside is added prep time, so plan accordingly.
- In a medium-sized bowl, coat the cranberries with the flour. Set aside. Tip: I highly recommend using frozen cranberries so the cranberries don’t ooze out too fast when baking. The frozen ones keep their shape and juiciness better than room-temperature cranberries. A bonus is that frozen cranberries can be found at the store year-round!: Tossing the cranberries with a tablespoon of flour creates a light dusting that helps them maintain structure during baking and prevents bleeding into the layers. You will see the berries lose some sheen and pick up a pale dusting. Frozen berries are preferred because they hold shape better and release less juice. A common slip is using room temperature berries that burst and color the filling unevenly.
- In a separate small bowl, beat the egg and water together for the egg wash. Set aside.: The egg wash should be smooth and slightly foamy, producing a glossy finish when brushed onto the dough. This simple mixture helps the loaf brown evenly and gives shine for an attractive presentation. Be careful not to over brush; too much wash can pool and create uneven spots. If you prefer a deeper sheen, use the whole egg , or swap for an egg white for a paler gloss.
- After the dough has finished rising, place it gently onto a lightly floured cutting board. Roll the dough out into an approximately 9×18-inch rectangle.: Rolling out the dough reveals its elasticity and invites careful shaping. Aim for a rectangle of about 9 by 18 inches, and use a light dusting of bread flour to prevent sticking. The dough should feel supple and slightly tacky, not dry. Rolling evenly ensures the filling spreads uniformly. A common error is rolling too thin, which can cause tearing, or too thick, which may prevent the loaf from baking through evenly.
- Spread the pistachio paste mixture across the dough, leaving a border empty so the dough can close when rolling.: Spread the paste in an even layer, leaving a clean border so the dough seals when rolled. You will see the green paste contrast vividly against the pale dough, and your fingertips may feel the slightly granular texture of the pistachio bits. Even distribution is key so each slice has balance. Avoid overfilling, which leads to leaking and messy seams during rolling.
- Sprinkle the coated cranberries and most of the pistachios (if using) on top of the paste. (Reserve some crushed pistachios for when it comes out of the oven.): Scatter the floured cranberries and most of the chopped pistachios over the paste so they nestle into the layer without crowding. You want pockets of tart berry and nutty crunch, not a single heavy lump. The visual cue is a generously dotted surface that still allows you to see the paste beneath. If you add too many cranberries they may release juice and sog the layers during baking.
- From the long end of the dough, start tightly rolling. Then tightly seal/pinch the long edge together so that nothing leaks out. Once it’s all rolled up, roll the whole “tube” out until it’s about 24 inches long.: Rolling tightly ensures defined layers inside the wreath and prevents big air pockets. As you roll, the dough will make a soft rustling sound and slightly tighten under your hands; that tension is good. Pinch the seam firmly to seal and then gently roll the tube to lengthen it to approximately 24 inches. A weak seam can open while baking, so press firmly but avoid tearing the dough.
- Using a sharp knife, cut down the middle of the long “tube,” creating 2 strands.: Cut lengthwise to reveal the spiral interior, exposing the beautiful layers of paste and fruit. The clean cut shows the contrast between dough and filling, and the strands should have exposed swirls to guide your braid. Dull knives can drag and mash the filling, so use a sharp blade for a crisp separation.
- Turn the insides of the dough strands upwards and start overlapping the two dough strands on top of each other. Then bring the ends together to form a circle. Be sure to pinch the dough as needed to keep the ends from unraveling while resting/baking. Slide the bread wreath onto a baking sheet lined with a piece of parchment paper. To create a “tighter” circle in the middle of your wreath, use a small, round ramekin (about 3-4 inches in diameter) to help it keep its shape. Before setting the ramekin in the middle, lightly grease it to prevent it from sticking when it’s time to remove it.: Turning the cut sides up displays the filling and creates dramatic ribbons when braided. Overlap the two strands and gently braid them together, then join the ends to form a wreath. Pinch seams to secure and transfer to a parchment lined sheet. If you want a tighter center, nestle a greased ramekin into the middle as a form while shaping. Beware of a loose braid which can unravel in the oven; secure the joins with a solid pinch.
- Let the wreath rest covered with a towel over the top for about 1 hour. Tip: Do not let it rest much more than 1 hour, as the wreath can become too puffy, leading to an oversized wreath that is hard to bake through.: During this final rest the dough will puff and relax, delivering a tender crumb once baked. You will notice the wreath expand slightly and feel pillowy to the touch. Do not exceed about an hour or the loaf can overproof and lose oven spring, making it hard to bake through. If the dough looks overly puffy and very soft, it may have gone too far; proceed to the oven sooner.
- Preheat the oven to 350°F. Tip: I’d recommend keeping your oven racks medium to low level just to keep the top of the bread from browning too fast. Since the bread is twisted, some parts will brown quicker than others, so just keep watch on it.: Preheating to 350°F ensures steady oven spring and even baking. Set your rack to a medium to low position so the top does not brown too quickly while the interior finishes baking. I recommend checking at around 20 minutes and tenting with foil if the top becomes too brown. Not preheating fully is a common mistake that can make the loaf dense instead of airy.
- Right before placing the bread wreath in the oven, brush the egg wash over it, being sure not to miss any spots. After you bake it for about 20 minutes, remove it from the oven and remove the ramekin carefully. Place the bread back into the oven to finish baking through. It should have an internal temperature of about 200°F, depending on the thickness of where you are inserting your thermometer. If at any point your bread starts becoming too brown, tent it with foil while it finishes baking. I’d recommend adding the foil after the 20-minute mark. Just keep an eye on it since not all ovens heat the same, and the height of your oven rack may vary.: Brushing the wreath with egg wash just before baking gives luminous color, and removing the ramekin after 20 minutes lets the center finish without trapping steam. Aim for an internal temperature near 200°F to ensure the loaf is baked through. If you notice rapid browning, tent with foil for the remaining time. A typical error is pulling the loaf too early; underbaked centers will be gummy and dense.
- While the bread is baking, mix together all of your glaze ingredients in a small bowl. Set aside.: Preparing the glaze while the wreath bakes leaves you ready to finish the loaf the moment it comes out. The glaze should be smooth and pourable, glossy when you stir it. This is the moment to taste and adjust a touch of sweetness, but keep the mix balanced to let the berries shine. If your glaze is too thick, warm a spoonful of water to loosen it slightly.
- Once your bread has reached the desired temperature, remove it from the oven and immediately brush on the glaze. Then top it with reserved, roughly chopped pistachios, if using. Melt white chocolate with the oil and gently spoon it over the bread/slices.: The hot bread will absorb the glaze in pleasing rivulets, sealing in moisture and creating shine. Sprinkle the reserved chopped pistachios while the glaze is tacky so they adhere, then melt the white chocolate chips with a little coconut oil until silky and drizzle for a final elegant finish. The contrast of glossy glaze, crunchy nuts, and smooth chocolate creates the most satisfying finish. A common slip is waiting too long to glaze, which yields a less shiny surface and weaker adhesion for the nuts.
- Optional: Add ribbon/bow to the area of the dough that had the 2 dough strands twisted together. The bow that was used was about 1 inch wide, for reference.: For a decorative touch, tie a ribbon around the wreath after it cools slightly, avoiding direct contact with the surface if glaze is still tacky. This is purely aesthetic but can make the wreath feel gift ready and festive. Be sure the bread is cool enough so the ribbon will not melt or stick to the glaze.
Notes
- Room temperature control Keep your kitchen moderately cool when working with enriched dough; warmth can soften the butter too quickly and make the dough sticky.
- Pulse not puree Pulse the pistachios a few times to maintain texture; overprocessing yields an oily paste that loses that signature nutty bite.
- Flour your cranberries Toss frozen cranberries with a bit of bread flour to prevent bleeding and preserve distinct red pockets in the loaf.
- Cold butter strategy Use very cold butter for the filling to preserve pebbly pieces that create texture, rather than a smooth oily paste.
- Tent with foil when needed If the wreath browns too quickly, tent with foil after about 20 minutes to allow the center to finish baking without overbrowning the top.
- Chill the paste if made early If you prepare the pistachio paste ahead of time, refrigerate it so it firms up and spreads cleanly without leaking during rolling.