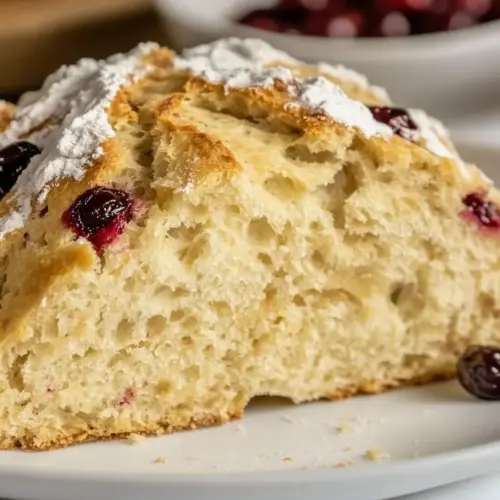
Cranberry Orange Irish Soda Bread
Cranberry Orange Irish Soda Bread is a bright, tender loaf with a crisp crust, studded with tart dried cranberries and kissed with fresh orange zest. This easy, quick bread is perfect for holiday mornings or a relaxed brunch, delivering bakery style flavor without the fuss. Make it for gatherings or cozy breakfasts, it’s a reliable, flavorful loaf that simply invites company.
Equipment
- Mixing Bowl
- Pastry blender
- Wooden Spoon
- Baking Sheet
- Sharp Knife
Ingredients
- 4 3/4 cups all-purpose flour (DIVIDED) Provide structure and bulk to the dough while absorbing liquids to form the bread's crumb; use the majority for the dough and reserve a portion for dusting or adjusting consistency. Sift or whisk before measuring to ensure even texture and prevent dense spots in the finished loaf.
- 1/4 cup granulated sugar Add mild sweetness to balance the tart cranberries and bright orange zest; dissolve into the wet ingredients to distribute flavor evenly throughout the dough. Adjust slightly if you prefer a less sweet or more traditional savory soda bread.
- 1 teaspoon baking soda Leaven quickly by reacting with acidic buttermilk to produce carbon dioxide, creating a tender, open crumb characteristic of soda bread. Measure level and distribute evenly through the dry mix to ensure consistent rise.
- 1 1/2 teaspoons salt Enhance overall flavor and help control yeastlike activity from the baking soda interaction; strengthens the dough’s taste profile and balances sweetness. Measure accurately to avoid an overly salty or flat loaf.
- 1/2 cup cold unsalted butter (cut into squares, 1 stick) Incorporate cold fat to create flaky, tender layers by cutting it into the flour so small pieces remain; these pockets of butter melt during baking and enrich flavor. Keep chilled until mixing to prevent overworking and a dense texture.
- 1 3/4 cup buttermilk Provide acidity that reacts with baking soda to leaven the bread while contributing moisture and a subtle tang; pour cold to preserve butter pieces for flakiness. Adjust quantity slightly if substituting or if buttermilk thickness varies.
- 1 large egg Bind the dough and add richness, contributing to color, structure, and a slightly denser crumb than eggless soda breads; beat lightly and mix into the wet ingredients. Use at room temperature for easier incorporation and more even texture.
- 1 tablespoon freshly grated orange zest (from 1 medium orange) Impart bright citrus aroma and flavor that complements cranberries, elevating the bread with fragrant oils; grate just the outer orange peel to avoid bitter pith. Stir into the wet mix so the zest disperses evenly without clumping.
- 1 cup dried cranberries Introduce tart, chewy bursts of flavor and visual contrast; soak briefly if desired to plump and prevent dryness, then fold into the dough gently. Distribute evenly to avoid concentrated pockets and ensure each slice has fruit in every bite.
Instructions
- Preheat oven to 375 degrees Fahrenheit. Line a cookie sheet with a silicone mat or a piece of parchment paper, or coat with non-stick spray.: The warmth of the oven should be a consistent, enveloping heat that readies the loaf for an immediate rise and a crisp crust. You will notice the faint scent of warming metal and the gentle hum from the oven as it stabilizes. Preparing the baking surface with a silicone mat or parchment prevents sticking and promotes even browning on the bottom of the loaf. Why this matters is straightforward, the loaf needs a dry hot surface to achieve that desirable golden exterior while the interior cooks through. A common mistake is not letting the oven fully preheat which can lead to uneven baking and a pale crust, so give it time and trust the dial.
- In a large bowl, mix together the four cups flour, sugar, baking soda, and salt.: As you sift or whisk these dry components together you create an even distribution of baking soda so that the lift is uniform throughout the loaf. You should see a homogeneous pale mixture, and when you stir you will notice a faint grainy texture from the granulated sugar . This step sets the stage for the doughs chemistry, ensuring pockets of leavening are not concentrated in one area. A common oversight is to skip thorough mixing, which can result in uneven rise and salty or soapy spots if the baking soda or salt are clumped.
- Add the butter and with a pastry blender or your fingers, squeeze and mix the butter in with the flour mixture until the butter is about the size of peas.: The goal here is a coarse, sandy texture dotted with pea sized flecks of butter . As you work the cold butter into the dry mix you will feel the mixture change from powdery to slightly damp and more granular. Those small butter pockets melt in the oven and create flakiness and tenderness in the crumb. If your kitchen is warm and the butter becomes too soft, pop the bowl in the fridge briefly because overly softened butter will blend completely and you will lose that textural magic.
- In a medium bowl, whisk together the buttermilk, egg, and orange zest.: Combining the wet ingredients releases the bright aroma of orange zest, and the buttermilk takes on a silky sheen as the egg is incorporated. Whisking aerates the mixture slightly, which helps with a gentle lift when it meets the dry mixture. The scent of citrus will become pronounced as oils are released from the zest, giving you an aromatic preview of the loafs profile. Avoid over whisking to the point of foam; you want a unified, glossy liquid not a froth.
- Make a well in the middle of the dry ingredients and pour in the wet ingredients. Stir with a wooden spoon just until the dough starts to come together. Add the dried cranberries and stir just until incorporated. The dough will be wet and sticky.: At this stage you should hear the soft scrape of a wooden spoon and see the dough transitioning to a shaggy mass dotted with cranberries . The initial mixing gives you a sense of the doughs hydration, and you will notice it clinging to the spoon rather than forming a smooth ball. This stickiness is normal and indicates you have enough buttermilk for a tender crumb. The temptation is to over stir for neatness, but doing so develops gluten and yields a tougher loaf, so stop as soon as the cranberries are evenly distributed.
- Spread some of the remaining flour onto a flat surface and turn the dough out onto it. Sprinkle a bit more flour over the bread and fold the dough around the flour, gently kneading the dough just to work the flour in. Add more flour as you go, until the dough is no longer sticky.: The tactile moment of turning the dough out is satisfying, and you will feel it tack a bit to the board before the added flour brings it under control. Use your hands to fold and press briefly, just to coax the dough into a cohesive round without aggressive kneading. Visually you are looking for a smooth surface that still retains some irregularities from the cranberries . A frequent error is excessive kneading which produces a dense loaf, so be gentle and stop once the tackiness subsides.
- Form dough into a round loaf and place on the baking sheet. With a sharp knife, cut an “X” into the top.: Shaping into a round is more about gentle encouragement than perfect sculpting; the loaf should retain a rustic, handmade look. The X carved into the top acts as a steam vent and gives that classic soda bread silhouette while guiding the expansion as it bakes. You will hear a faint whisper as the knife slices through the dough, and when it is set on the sheet it should hold its shape. Skipping the cut can cause unpredictable cracking during baking, so mark the top with intention.
- Bake for 45 – 55 minutes, or until golden brown and the bread sounds a little hollow when you knock on it. You can also try using a cake tester just to be sure – when it comes out clean, it’s done.: As the loaf bakes the kitchen will fill with a warm, citrus scented steam and the crust will deepen to a golden hue. You may notice small fissures forming where the X was scored, releasing a faint burst of fragrant steam. A hollow sound when tapped indicates the interior has set, and a clean cake tester confirms it is fully baked. Under baking yields gummy crumbs, so if unsure leave it in a few more minutes and retest rather than pulling it out early.
- Let cool for at least 10 minutes, then slice, butter, and serve. Wrap tightly with plastic wrap; keeps at room temperature for up to 3 days.: Cooling allows the crumb to finish setting and keeps the loaf from compressing as you slice. The crust remains pleasantly crisp while the interior yields to a knife with a gentle give. When you slice and spread with butter , the contrast of warm bread and melting fat is irresistible, releasing more of that orange perfume. Store the loaf wrapped tightly to retain moisture; leaving it exposed leads to faster staling, so wrap promptly for best results.
Notes
- Use zested citrus for brightness: Swap the orange zest for lemon or a blend of citrus to alter the aromatic profile while keeping the same technique and texture.
- Soak the cranberries: If you prefer plumper cranberries, soak them briefly in warm water and drain well before folding in to avoid adding extra liquid to the dough.
- Adjust sugar for sweetness: Increase or decrease the granulated sugar by a tablespoon or two to suit your taste, while remembering that sugar also aids browning.
- Keep it rustic: For a more artisan look, avoid excessive shaping and let the loaf form a natural round, scoring a deeper X for dramatic cracks.
- Storing strategy: Slice and freeze individual pieces to keep freshness longer, reheating briefly in a toaster or oven for a just baked sensation.