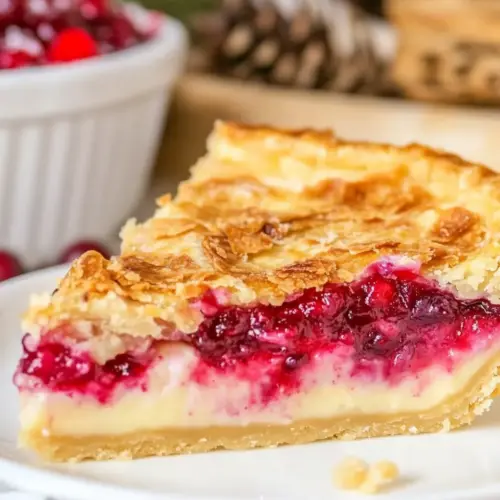
Cranberry Custard Pie
Cranberry Custard Pie is a creamy, slightly tart holiday dessert that pairs silky custard with poppy fresh cranberries. This easy to make pie balances bright citrus notes with a flaky crust for a memorable table centerpiece, ideal as an easy weeknight treat or a festive Thanksgiving offering. Make it for its vibrant flavor contrast and dependable crowd pleasing texture.
Equipment
- 9-inch pie dish
- Mixing Bowl
- Whisk
- Oven
- Pie shield or foil
Ingredients
- 1 pie crust unbaked, refrigerated, store bought or homemade Provide a sturdy, buttery shell that holds the custard and cranberries; use unbaked refrigerated pie crust for convenience or homemade for flakier texture. Blind-bake briefly if a firmer bottom is desired to prevent sogginess from the custard filling. Chill before filling to maintain shape and ensure an even bake.
- 12 ounces fresh cranberries picked through and rinsed Add bright, tart flavor and a burst of texture that balances the sweet custard; pick through and rinse to remove stems and blemishes. Cook slightly or leave whole depending on desired mouthfeel, and arrange evenly for consistent berry distribution.
- 1 1/2 cups granulated sugar Sweeten and balance the tart cranberries while helping to create a smooth custard; adjust amount slightly to taste for desired sweetness. Dissolve into the egg and cream mixture for even sweetness and to help thicken when baked.
- 3 large eggs Bind the custard, provide structure and richness, and help the filling set into a sliceable consistency; use large eggs at room temperature for best incorporation. Whisk thoroughly with sugar and cream to create a homogeneous custard base before adding dry ingredients.
- 1 cup heavy whipping cream Contribute richness, creaminess, and a velvety mouthfeel to the custard while supporting the custard’s set when combined with eggs. Use heavy whipping cream for a luscious texture and avoid low-fat substitutes that can make the filling thin.
- 1/4 cup all-purpose flour Thicken the custard slightly and stabilize the filling to prevent weeping; whisk in flour thoroughly to avoid lumps. Use all-purpose flour sparingly so the filling remains tender rather than gummy after baking.
- 1/2 teaspoon fine sea salt Enhance and balance sweetness with a subtle savory note, and help accentuate the citrus and herb flavors; use fine sea salt for even distribution. Sprinkle into the custard mix a little at a time and taste if adjusting for salt sensitivity.
- 1 tablespoon orange zest Lift and brighten the custard with aromatic citrus oils that complement cranberries; finely grate orange zest to release fragrant oils without bitterness. Mix into the filling for fresh flavor and pair with orange juice if a stronger citrus note is desired.
- 1 teaspoon vanilla extract Round out flavor with warm, sweet aromatics and deepen the custard’s scent profile; add vanilla extract to enhance overall taste and aroma. Stir into the custard base after tempering to preserve delicate vanilla notes.
- 1 tablespoon rosemary finely chopped, optional Infuse a piney, aromatic note that pairs well with cranberries when used sparingly; finely chop rosemary so it disperses evenly and avoids chewy bits. Include as optional for subtle herbaceous complexity or omit for a more traditional sweet custard.
Instructions
- Preheat oven to 400°F.: As the oven heats, you will notice the kitchen warming and the faint metallic scent of a clean oven readying itself. Preheating to a high temperature is crucial because it sets the crust quickly, creating a barrier that prevents sogginess when the custard is added. A common mistake is skipping full preheat, which can cause the crust to bake unevenly. Use an oven thermometer if your oven runs hot or cool, and resist opening the door repeatedly because that lowers the oven temperature and disrupts the initial rapid set.
- Prepare a 9-inch pie dish with non-stick spray. Roll out your pie crust to about an 11-inch circle. Place in your pie dish. Use your index finger from one hand and your index and thumb of the other to flute the top of the pie crust (if desired). Poke holes in the bottom of the crust using a fork.: When you press the chilled dough into the dish, you should hear a faint flake as the butter layers meet the ceramic, and the dough should feel cool and slightly tacky. Fluting the edge gives the pie a finished look and creates places where the crust can brown. Docking the bottom with a fork lets steam escape so pockets do not form. A common pitfall is stretching the dough while fitting it, which causes it to shrink during baking. To avoid this, gently press without pulling, and chill briefly if it becomes too soft.
- Place the cranberries in the bottom of the unbaked pie shell.: The pile of bright cranberries will look jewel like against the pale crust, and as they settle you may hear a soft thump as berries nestle together. Spreading them evenly helps ensure each slice has balanced bursts of tartness. Resist pressing them down into a single compact layer, which can impede even cooking. If the berries are crowded too tightly, the custard may not circulate well and could lead to uneven setting.
- In a large mixing bowl, whisk the remaining ingredients together and then pour over the cranberries.: Whisking the eggs , granulated sugar , heavy whipping cream , all-purpose flour , fine sea salt , orange zest , and vanilla extract creates a silky batter that should shimmer as it catches the light. Pouring it slowly over the cranberries lets the custard seep between the berries and fill gaps, coating them in a creamy sheen. The aroma will shift toward sweet cream and citrus. Avoid vigorous whisking that traps air, as too much air can create holes in the finished custard when baked.
- Bake the pie for 10 minutes at 400°F and then reduce the heat to 350°F and cover the outer crust with a pie crust shield or foil to keep it from burning.: That initial blast of heat encourages the crust to set and begin to brown, creating a protective barrier. After reducing to 350°F , covering the rim prevents overbrowning while the custard continues to cook. You will see the filling go from glossy to starting to become matte around the edges. A frequent mistake is leaving the crust exposed the whole time, which can cause the edges to char before the custard is done. Use a shield or tent of foil early and remove only briefly near the end if you want more color.
- Bake for an additional 40 to 45 minutes or until the custard is set. You can tell that it’s set when it no longer jiggles.: As the pie bakes the kitchen will fill with warm, citrusy aroma and a hint of caramel from the browning edges. The custard transitions slowly from a glossy, loose mixture to a velvety, barely quivering set. Check for doneness by giving the pan a gentle nudge, noticing that the center no longer wobbles like a liquid but holds form. Avoid overbaking which can make the custard rubbery, or underbaking which leaves it too loose. If the center still jiggles gently, give it a bit more time and watch for a slight golden color on top as a cue.
- Let your pie cool completely before serving.: As it cools the custard firms and the flavors meld, and you will notice steam dissipating and the pie losing that initial warm sheen. Cooling for a few hours, or chilling slightly, makes slicing cleaner and helps the custard hold shape. Cutting too soon yields loose slices that may slump. Be patient, and allow the pie to reach a texture that feels sliceable to the touch when gently pressed in the center.
Notes
- Chill before slicing: After baking, refrigerate the pie for at least two hours if you prefer clean slices, especially for serving at a party.
- Herb option: If you choose to use rosemary, chop it very finely and use just a tablespoon to avoid an overpowering herbal note.
- Swap crust styles: Use a store bought crust for speed or a homemade butter crust for deeper flavor, but always keep it well chilled before baking.
- Zest gently: Microplane the orange zest directly over the bowl to capture aromatic oils and avoid bitter pith.
- Storage tips: Store loosely covered in the refrigerator up to four days, or freeze wrapped tightly for longer keeping.
- Visual tip: If the top needs color without further set, briefly broil on low while watching closely to avoid burning.