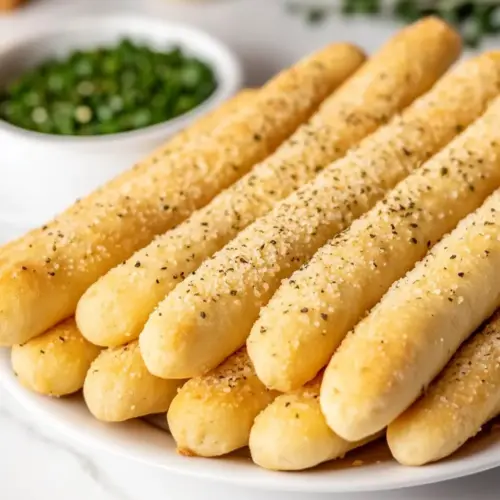
Copycat Olive Garden Breadsticks
Copycat Olive Garden Breadsticks are soft, buttery, and garlicky, offering a pillowy interior with a lightly golden crust. This easy bread recipe uses simple pantry staples like flour, butter, and parmesan cheese for a crowd pleasing side that pairs perfectly with soups and salads. Make a batch for an easy weeknight dinner or a party, you will love how quickly they disappear.
Equipment
- Mixing Bowl
- Stand mixer
- Baking Sheet
- Parchment Paper
- Measuring Cups
- Thermometer
Ingredients
- 1 cup + 2 tablespoons warm water, about 100-110℉ Hydrate and activate yeast by providing warm liquid that helps dissolve sugar and yeast while creating a comfortable temperature for fermentation; use about 100–110℉ for best rise. Also contributes to dough pliability and helps bind flour into a cohesive mass.
- 1 tablespoon granulated sugar Feed the yeast and promote browning by supplying fermentable sugars that boost yeast activity and enhance crust color; measure precisely to avoid overproofing. Also adds a touch of sweetness to balance savory flavors.
- 1 1/4 teaspoon active dry yeast Leaven the dough by producing carbon dioxide during fermentation, creating air pockets that yield a light, airy texture in the breadsticks. Activate with warm water and sugar for predictable rise and structure.
- 2 tablespoons unsalted butter, melted Enrich the dough with fat that increases tenderness, improves mouthfeel, and adds subtle flavor; melted butter also contributes to a softer crust. Reserve some for brushing to add golden color and additional richness.
- 1 1/2 teaspoon kosher salt Strengthen dough flavor and control yeast activity with salt that enhances overall taste and tightens gluten structure; kosher salt dissolves easily and seasons the dough uniformly. Measure carefully to avoid inhibiting fermentation.
- 3 to 3 1/2 cups all-purpose flour Provide bulk and structure as the primary dry component that forms gluten when mixed with water, determining chew and crumb; adjust within the range to achieve desired dough consistency. Start with less and add more if the dough feels sticky or too wet.
- 2 tablespoons unsalted butter, melted Add finishing richness and buttery flavor when brushed on hot breadsticks, encouraging a glossy, tender exterior and improved mouthfeel. Use melted butter for easy application and even coverage.
- 1/2 teaspoon kosher salt Season the finishing butter with salt to enhance savory notes and balance the richness; a small amount of kosher salt on top elevates overall flavor without overwhelming. Sprinkle evenly for consistent taste.
- 1 teaspoon garlic powder Introduce aromatic, savory garlic flavor with a powdered form that disperses evenly across the surface and avoids clumping; garlic powder delivers concentrated taste without texture. Use sparingly to prevent bitterness.
- 1/2 teaspoon Italian seasoning Bring herbaceous, Mediterranean flavor through a dried Italian seasoning blend that complements garlic and parmesan; adds complexity and familiar breadstick taste. Sprinkle lightly to avoid overpowering other seasonings.
- 1/4 cup grated parmesan cheese Provide a nutty, salty finishing touch with finely grated parmesan that melts slightly into the warm butter and adds umami; creates a pleasing savory crust and visual appeal. Use freshly grated for best texture and flavor.
Instructions
- Line 2 large baking sheets with parchment paper and set aside.: The parchment gives you a nonstick surface so the breadsticks release cleanly and helps promote even browning. You'll notice the paper prevents the undersides from overbrowning, which is especially helpful when the oven runs hot. A common mistake is skipping the parchment and assuming lightly greasing is enough, but that can cause the breadsticks to stick and tear when transferring.
- In a large mixing bowl or bowl of the stand mixer, combine 1 cup + 2 tablespoons warm water, 1 tablespoon granulated sugar, and 1 1/4 teaspoon active dry yeast. Let that mixture sit for 5-10 minutes, or until the yeast is nice and foamy.: When you stir these ingredients, breathe in the warm, slightly sweet aroma, a sign the water temperature is comfortable to the touch and the sugar is dissolving. After sitting for 5 to 10 minutes, expect a foamy, bubbly cap, which signals the yeast is alive. If the mixture remains flat, the yeast may be old or the water too hot or too cold, and the dough will not rise properly.
- Add melted butter, kosher salt, and 2 cups of flour and mix until combined. Add additional flour, 1/4 cup at a time for a total of 3 to 3 1/2 cups all-purpose flour, until the dough pulls away from the sides of the bowl and is soft and only slightly sticky to the touch.: As you incorporate the melted butter and salt , the bowl will feel sticky and loose at first, then gradually become a cohesive dough. The aroma becomes richer from the butter , and mixing helps the gluten begin to form. A common error is adding all the flour immediately, which can lead to a dense dough, so hold back and follow the next step to reach the right texture.
- Turn the dough out onto a lightly floured surface, and knead the dough until smooth and elastic, sprinkling with no more than 1 tablespoon of flour at a time as needed to make the dough manageable.: As you add flour in small increments, watch the dough change from shaggy to elastic. The correct feel is slightly tacky but not paste like; it should cling a little to your fingers but easily pull away. Over flouring will give a dry, crumbly result, while under flouring yields a dough that spreads too much in the oven. If the dough becomes too firm, a splash of water can rescue it.
- Place the dough in a lightly greased bowl, cover it with a clean towel or plastic wrap, and let rise for one hour, or until doubled in size. Depending on the temperature of your kitchen this will be between 1 to 1 1/2 hours.: Kneading develops gluten, giving the breadstick structure and chew, and you will feel the dough transform from sticky to smooth and slightly springy. The surface should show faint resistance when you press it. Over kneading can make the dough tough, while under kneading leaves it loose and unable to hold shape. Aim for a satin feel, about 6 to 8 minutes by hand or less in a mixer.
- Once the dough has risen, turn it out onto a lightly floured surface and gently punch it down. Divide the dough into 12 equal-sized balls.: During proofing the dough will inflate and smell pleasantly yeasty and slightly sweet. Visual cues are key here the dough should roughly double and hold a gentle indentation when poked. If it fails to rise, the room may be too cool or the yeast inactive. To avoid a dense outcome, place the bowl in a warm draft free spot, like an oven with the light on.
- Roll each ball out into a 6 to 8-inch rope. Place the breadsticks onto the parchment-lined baking sheet, about 2 inches apart. Cover, and let rise until doubled in size, about 1 hour to 1 1/2 hours.: You will hear a soft sigh as the air releases, and the dough becomes easier to handle. Dividing into equal pieces ensures uniform baking and consistent texture across all the breadsticks. Use a scale for precision if you want perfect uniformity. A common mistake is overhandling the dough here, which can deflate it excessively and affect the final lift.
- After the dough has risen, preheat the oven to 400℉ (205℃).: As you roll, the dough should stretch smoothly into a soft rope that holds shape without snapping back. Once shaped and on the sheet the second rise puffs them up and creates that light crumb inside. You should see an audible soft rustle as the dough expands. If they spread rather than rise, the dough was likely rolled too thin or under-kneaded.
- While the oven is preheating, combine 2 tablespoons unsalted butter (melted), 1/2 teaspoon kosher salt, 1 teaspoon garlic powder, and 1/2 teaspoon Italian seasoning in a small bowl. Brush the dough with the butter mixture, using only about half the butter mixture.: Preheating ensures instant oven spring and even browning. You want the oven fully hot before these go in so the exterior sets quickly while the interior finishes baking. If you slip them into an oven that's not up to temperature, the breadsticks will bake unevenly and may be dense. A properly preheated oven gives a subtle toasty scent when you open the door.
- Bake the bread sticks until lightly golden brown, about 12-15 minutes, or until the internal temperature reaches 190-200℉ (90-93℃).: The first brush adds flavor and encourages golden color. The butter smells nutty and aromatic when mixed with the garlic powder and Italian seasoning . Use a soft brush for an even coat. Avoid soaking the dough with too much butter at this stage or the underside may brown too soon and become greasy.
- Remove the breadsticks from the oven, and brush them with the remaining butter and sprinkle with parmesan cheese. Let them cool slightly on the baking sheet for 5 minutes.: As they bake you will see the tops take on a warm golden hue and the kitchen will fill with a toasty, buttery aroma. Tap a stick gently the bottom should sound hollow when fully baked. An underbaked center will feel doughy and dense, while an overbaked stick will be overly firm, so use the internal temperature or the visual cues to time it right.
- Remove the breadsticks from the oven, and brush them with the remaining butter and sprinkle with parmesan cheese. Let them cool slightly on the baking sheet for 5 minutes: Brushing right out of the oven melts the butter into the surface, creating shine and a burst of aroma while the parmesan cheese softens into a savory crust. The first bite during the warm resting period yields the best texture and flavor. Resist the urge to pile them on a plate immediately as they need a few minutes to set, otherwise the cheese can slide off.
Notes
- Check yeast freshness Make sure your active dry yeast is not expired, and proof it in warm water with the sugar to confirm activity before proceeding.
- Measure flour properly Spoon and level your flour into the cup or use a scale to avoid over packing, which would lead to dry, heavy dough.
- Watch dough feel Aim for slightly tacky dough that pulls away from the bowl, adding just a tablespoon of flour at a time if needed to manage stickiness.
- Control proofing environment Let the dough rise in a warm, draft free place; an oven with the light on works well for slower kitchens.
- Reserve topping butter Save half the butter mixture for brushing after baking to ensure glossy finish and maximum flavor.
- Use parchment for even bake Lining sheets with parchment helps prevent sticking and promotes uniform browning across the batch.