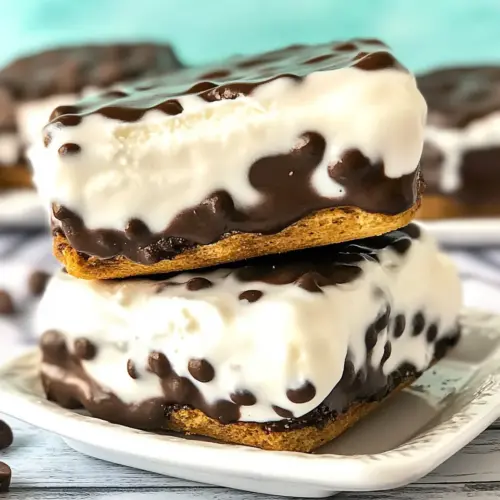
Copycat Ice Cream Sandwiches
Copycat Ice Cream Sandwiches are creamy and nostalgic, combining chewy chocolate chip cookies with smooth vanilla ice cream and crunchy mini chocolate chip edges. This easy make ahead dessert is perfect for summer parties or a spontaneous sweet craving, offering simple assembly and freezer friendly storage. Try them for an effortless crowd pleaser that tastes like a homemade upgrade to a classic treat.
Equipment
- Cookie Sheet
- Parchment Paper
- Shallow Bowl
- Airtight Container
Ingredients
- 24 chocolate chip cookies baked and cooled (see note) Baked and cooled to provide sturdy, flavorful sandwich shells that hold up to softened ice cream without becoming soggy; chocolate chips in the cookies add texture and extra chocolate flavor. Arrange cookies evenly to create uniform sandwiches and allow them to cool completely to prevent melting the ice cream during assembly.
- 3 cups vanilla ice cream Vanilla ice cream serves as the creamy, sweet filling that contrasts the cookies and complements chocolate flavors; scooping while slightly softened makes spreading easier for neat, even sandwiches. Freeze assembled sandwiches briefly after filling to firm them up and preserve shape for serving.
- 2 cups (340 g) mini chocolate chips Mini chocolate chips add concentrated bursts of chocolate and crunchy texture within the filling, distributing small pockets of chocolate throughout each sandwich. Fold chips into softened ice cream for even distribution, then quickly re-freeze to prevent chips from sinking and maintain an appealing bite.
Instructions
- Allow ice cream to soften for 5-10 minutes, or until easily scoopable.: When the ice cream softens it becomes pliable and spreads smoothly without tearing the cookies. You will notice a glossy surface forming and a spoon should glide through with little resistance, that is the visual cue to begin. This stage prevents large icy chunks from forming in the sandwich, keeping the center creamy rather than gritty. A common mistake is letting it soften too long, which makes the ice cream runny and hard to handle, so check it frequently.
- Place a cookie sheet or container in freezer to place your ice cream sandwiches as you assemble them.: A cold surface helps each sandwich firm up quickly and hold its shape, and you will feel the temperature difference when you touch it, a sharp chill that tells you it is ready. This step matters because assembling directly on the counter can cause spreading and melting. Avoid stacking warm sandwiches on top of each other as they can fuse together, instead allow space on the frozen tray.
- Place chocolate chips in a shallow bowl.: Laying the mini chocolate chips in a shallow dish makes rolling the edges efficient and even, and you can see how much coating you are getting by the way the chips cling to the spoon. Use a bowl wide enough so the sandwich edge can be rolled without compressing the chips too much. If the chips are in a narrow container you risk uneven coverage, so transfer them to a plate if needed.
- Place half of cookies upside down on a cookie sheet covered with parchment or wax paper.: Lining the tray protects the bottoms of the sandwiches and makes cleanup simple, and turning the cookies upside down creates an even surface to support the ice cream . You will notice the cookie centers look slightly domed on the top side, so flipping them gives a flatter base for assembly. One frequent issue is placing cookies too close; leave a little space so the sandwiches do not touch as you freeze them.
- Working in batches of 2-3 cookies at a time, scoop 1/4 cups of ice cream on top of each cookie and sandwich with a second cookie. Roll each sandwich in the chocolate chips to adhere. Place in freezer.: Scooping consistent portions yields uniform sandwiches that freeze evenly, and the sound here is telling, a soft thud as the second cookie meets the ice cream and compresses it. The pressure should be firm enough to spread the ice cream to the edges but not so hard that the cookies crack. If you press too vigorously the cookies can break or the ice cream will ooze excessively, so use measured pressure and a steady hand.
- Continue until all sandwiches are assembled and in freezer. Freeze for at least 3 hours, or until firm.: Rolling the rim in the mini chocolate chips adds texture and seals the edge, and you should hear tiny clinks as chips embed into the cold ice cream . The chips should stick easily if the ice cream is soft but not melted, creating a visible speckled band around the sandwich. Do this soon after assembling so the chips adhere, and avoid pressing too hard which can flatten the sandwich or push out too much filling.
- Transfer to an airtight container and freeze for up to 3 months.: Moving the assembled sandwiches onto the chilled tray immediately chills the filling and sets the shape, and you can feel the cold bite when you touch one briefly to test firmness. This rapid cooldown limitsthe migration of moisture from the ice cream into the cookie, preserving texture contrast. A typical error is crowding the tray which slows freezing and causes sandwiches to lose their neat edges, so give each sandwich breathing room.
- Continue until all sandwiches are assembled and in freezer: Working steadily in batches keeps the ice cream at an optimal consistency, and you will notice the rhythm of scooping, pressing, and rolling becomes quicker as you go. Keep unused cookies covered to prevent them from drying out, and if the ice cream begins to refreeze too hard periodically let it soften slightly between batches. Do not try to speed the process by using warmer ice cream , as that harms texture.
- Freeze for at least 3 hours, or until firm: A full freeze ensures the center is solid enough to hold up in storage and when eaten, and you will see the surface go from glossy to matte as the temperature drops. This stage also helps the mini chocolate chips set into the rim, preventing them from falling off during storage. Rushing this step leads to sandwiches that collapse or weep when handled, so plan for adequate freeze time.
- Transfer to an airtight container and freeze for up to 3 months: Storing in a sealed container protects the sandwiches from freezer burn and off flavors, and you will appreciate the convenience of pulling one out whenever you want a treat. For best texture, let a frozen sandwich rest at room temperature for a few minutes before eating so the ice cream softens slightly, but do not leave it out long enough to melt. Be careful when stacking, place parchment between layers to prevent sticking.
Notes
- Soften ice cream intentionally This lets you shape and smooth the filling without creating icy pockets, aim for a scoopable but still cold consistency.
- Use room temperature cookies briefly If cookies are too cold they can make the ice cream harden unevenly, while very warm cookies will melt the filling.
- Freeze the tray ahead of time A frozen surface prevents early melting and helps every sandwich set quickly, streamlining the process.
- Choose mini chips for coating Their small size ensures even coverage and a pleasant crunch without overwhelming the bite.
- Label and date your storage container Frozen sandwiches stay best for up to three months, so dating helps you rotate stock and enjoy them at peak quality.