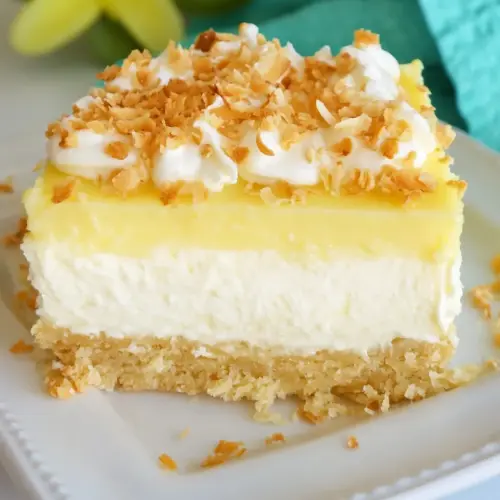
Coconut Cream Cheesecake Bars
Coconut Cream Cheesecake Bars are creamy and slightly tangy with a crunchy vanilla wafer crust and toasted coconut on top. This easy make ahead dessert layers cream cheese, instant pudding, and COOL WHIP for a light, fluffy finish, perfect for potlucks and summer gatherings. Make it for its texture contrast and reliable crowd pleasing appeal.
Equipment
- 13 x 9 inch pan
- Mixer
- Whisk
- Measuring Cup
Ingredients
- 84 vanilla wafers, divided Crushed finely to form a buttery, crunchy base and garnish; helps provide structure and contrast in texture for the bars. Can be divided between crust and crumbs for topping to balance sweetness and mouthfeel.
- 6 tbsp . butter, melted Melted and mixed with crushed wafers to bind the crust; imparts rich flavor and helps the base hold together when chilled. Adds a smooth, buttery component that enhances overall richness.
- 1 pkg. 8 oz. PHILADELPHIA Cream Cheese, softened Softened and beaten until smooth to create the creamy cheesecake layer; provides tang and body to the filling, ensuring a dense, silky texture. Works with other dairy elements to stabilize and enrich the dessert.
- 2 tbsp . sugar Sprinkled into the cream cheese mixture to add a touch of sweetness and balance the tang; helps round out flavors without overpowering the coconut and vanilla notes. Can be adjusted slightly to taste for desired sweetness.
- 1 tub 8 oz. COOL WHIP Whipped Topping, thawed, divided Folded into the filling and used as a light, airy topping when divided; contributes whipped cream-like texture and stability to the dessert. Thawed COOL WHIP adds volume while keeping the bars lighter than pure cream cheese.
- 2 pkg. 3.4 oz. each JELL-O Vanilla Flavor Instant Pudding Prepared and thickened to create a smooth, vanilla-flavored pudding layer that enhances creaminess; adds concentrated vanilla taste and body to the filling. Instant pudding helps set the bars and meld other textures together.
- 2 -1/2 cups cold milk Poured cold into the instant pudding mix to hydrate and thicken it quickly; provides a dairy base that creates a creamy consistency for the pudding layer. Cold milk ensures the pudding sets properly without lumps.
- 1 -1/2 cups BAKER'S ANGEL FLAKE Coconut, toasted, divided Toasted and sprinkled into the filling and on top as divided portions to provide nutty flavor and chewy texture; enhances tropical character and adds a pleasant contrast to the creamy layers. Toasting deepens coconut flavor and aroma.
Instructions
- Reserve 24 wafers. Crush remaining wafers; mix with butter. Press onto bottom of 13 x 9-inch pan. Refrigerate until ready to use.: The moment you open the package of vanilla wafers , set aside 24 whole wafers for decoration, and crush the remainder for the crust. You will notice the aroma of vanilla and a dry, sandy texture as you crush them. Keeping a few whole wafers gives you a pleasing edge detail. A common mistake is crushing all the wafers and missing that decorative border, which slightly reduces the finished look.
- Beat cream cheese and sugar with mixer until blended. Whisk in 1 cup COOL WHIP; spread carefully over crust. Stand reserved wafers around edges.: After reserving those 24, crush the rest into fine crumbs, then combine thoroughly with the melted butter until the mixture resembles wet sand. The butter should evenly coat the crumbs, and you may hear a faint, soft stirring sound as you press the crumbs together. This step matters because the butter solidifies in the fridge and locks the crumb structure. Avoid under mixing, which leads to a crumbly crust that will fall apart when sliced.
- Beat pudding mixes and milk in medium bowl with whisk 2 min. Stir in 1 cup of the remaining COOL WHIP and 3/4 cup coconut; spread over cream cheese layer. Top with remaining COOL WHIP and coconut. Refrigerate 5 hours.: Firmly press the crumb mixture into the bottom of a 13 x 9 inch pan, using the base of a measuring cup to compact it. You want a uniformly dense layer that will hold the fillings; press until the surface is level and tightly packed. This compaction prevents the crust from crumbling when you cut the bars. If you press too lightly, slices will be unstable and messy.
- Refrigerate until ready to use: Chill the crust in the refrigerator to firm up the butter and set the base. The chilled crust will feel cool and slightly firm to the touch after about 10 to 15 minutes, which makes spreading the next layer much easier. Skipping this chill will make it harder to apply the cream cheese layer without disturbing the crust.
- Beat cream cheese and sugar with mixer until blended: In a bowl, beat the softened cream cheese with the sugar using a mixer until smooth and fully blended. You should see a creamy, glossy mixture with no visible lumps, and the sound of the mixer will change as the texture becomes silkier. Properly beating ensures a lump free layer that spreads easily. Under beating leaves tiny clumps and a grainy mouthfeel.
- Whisk in 1 cup COOL WHIP spread carefully over crust: Fold or whisk in 1 cup of the thawed COOL WHIP to lighten the cream cheese mixture, then gently spread it over the chilled crust. The surface should look pillowy and smooth, and the spreading should feel effortless if the crust is firm. Careful spreading prevents dragging crumbs into the layer. If you rush and press too hard, the crust can break or the layers can mix.
- Stand reserved wafers around edges: Take the 24 reserved whole vanilla wafers and stand them up around the pan edges, pressing them gently into the cream cheese layer so they stay upright. This creates an attractive frame and adds a nostalgic touch. The wafers should be snug and stable; if they wobble, press a little deeper. A common oversight is not placing them quickly enough before the layer chills and firms, making them harder to secure.
- Beat pudding mixes and milk in medium bowl with whisk 2 min: In a separate bowl, whisk the two packages of instant pudding with the cold milk for a full two minutes until the mixture thickens and becomes glossy. You will feel the texture transform from liquid to a velvet thickness, and the whisk will make a soft slapping sound as the pudding firms. Thorough whisking activates the thickener for the right set. Under whisking yields a runny filling that will not hold its shape.
- Stir in 1 cup of the remaining COOL WHIP and 3 4 cup coconut spread over cream cheese layer: Fold in 1 cup of the remaining COOL WHIP and 3 4 cup of the toasted coconut into the pudding until it is uniform, then spread that mixture over the cream cheese layer. You will notice an enticing sweet dairy aroma and a light, airy texture after incorporating the COOL WHIP . The folded-in COOL WHIP keeps the pudding from becoming too dense and the coconut adds pleasant chew. Avoid over folding, which deflates the mixture and makes it heavy.
- Top with remaining COOL WHIP and coconut: Smooth the remaining COOL WHIP over the pudding layer to create a cloud like topping, then sprinkle the remaining toasted coconut evenly across the surface. The contrast between the snowy whipped topping and golden toasted coconut is both visual and textural. Even, light sprinkling ensures every bite has coconut. A mistake to watch for is piling too much coconut, which can overwhelm the delicate topping.
- Refrigerate 5 hours: Chill the assembled bars for about five hours or until fully set, so layers firm and flavors meld. As it chills, the pudding will stabilize and the edges of the bars will cleanly hold their shape when sliced. This resting time is crucial for clean cuts and ideal texture. Cutting too soon results in sloppy slices and a filling that creaks out of the pan.
Notes
- Chill between stages Chill the crust briefly before adding the cream cheese layer so you avoid dragging crumbs into the filling. This helps create clean lines between layers and makes slicing neater.
- Toast coconut carefully Toast the coconut on a sheet pan in a single layer and stir every minute or so, because it browns quickly and can go from golden to burnt in moments.
- Soften cream cheese properly Bring the cream cheese to room temperature so it blends smoothly with the sugar and COOL WHIP, preventing lumps that are hard to remove once combined.
- Use cold milk for pudding Measure and chill the milk before whisking with the instant pudding, ensuring the mix thickens correctly and yields a stable filling texture.
- Reserve wafers early Remove and reserve the 24 whole vanilla wafers before crushing the rest so you do not accidentally use them, preserving the decorative edge.
- Slice with a hot knife Warm a sharp knife under hot water and wipe dry before slicing the chilled bars for cleaner, neater pieces.