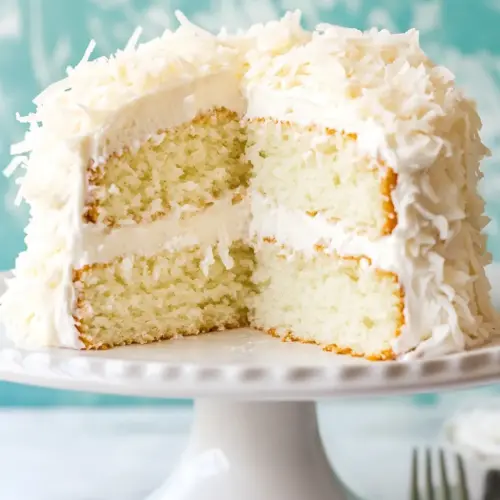
Coconut Cake with Coconut Meringue Buttercream Frosting
Coconut Cake with Coconut Meringue Buttercream Frosting is a creamy, airy dessert with layers of tender cake and a glossy coconut buttercream. The sweet shredded coconut adds chew while the satin frosting feels luxurious, making it perfect for celebrations or an indulgent weekend. Easy enough for bakers ready to level up, it rewards patience with show stopping results.
Equipment
- Electric Mixer
- Whisk
- Saucepan
- Wire Rack
- 8 inch round cake pans
- Offset Spatula
Ingredients
- 2 1/4 cups (281.25 g) cake flour Sifted and lightly aerated to create a tender crumb in the cake batter; provides structure while keeping the texture soft and delicate. Measure accurately by weight for consistent results and avoid overmixing once combined with liquids. Works best when combined with leavening agents to produce even rise.
- 1 1/4 cups (250 g) granulated sugar Granulated and used to sweeten and tenderize the cake; dissolves into the batter to help create a fine crumb. Creams with the butter to incorporate air that aids in leavening and texture development. Adds balance to coconut flavors without overwhelming them.
- 2 teaspoons baking powder Leavening agent that releases gas when activated by moisture and heat to raise the cake. Combine evenly with the flour to ensure uniform lift and avoid dense spots. Works best when measured precisely and added to dry ingredients only.
- 1/2 teaspoon (0.5 teaspoon) kosher salt Fine crystalline salt used to enhance overall flavor and balance sweetness in the cake. Dissolves into the batter to bring out other flavor components and strengthen gluten slightly. Measure carefully to avoid oversalting delicate cake layers.
- 3/4 cup (170.25 g) unsalted butter, at room temperature, cut into 2-inch pieces Softened unsalted butter contributes richness, moisture, and flavor while helping to create a fine, tender crumb through creaming. Cut into pieces to allow even creaming and incorporation of air when beaten with sugar. Use at room temperature to ensure smooth emulsion with eggs and liquids.
- 6 egg whites Whites beaten to provide lift, lightness, and structure through aeration when folded into batter. Separate from yolks to reduce fat and produce a lighter cake crumb while enabling meringue-like volume. Whisk to appropriate stiffness depending on recipe stage to avoid collapse.
- 1 cup (226 ml) coconut milk Coconut milk adds moisture, subtle coconut flavor, and tenderizes the crumb due to its fat content. Use full-fat for richest flavor and consistent texture; shake or stir before measuring to reincorporate solids. Complements shredded coconut and enhances overall coconut profile.
- 1 cup (90 g) sweetened shredded coconut Sweetened shredded coconut offers concentrated coconut flavor and chewy texture, distributed through the batter for pockets of coconut taste. Toast lightly if desired to deepen nuttiness and reduce excess moisture. Can absorb some liquid, so ensure batter accounts for additional texture.
- 1 vanilla bean, split in half lengthwise Vanilla bean imparts intense aromatic vanilla flavor from seeds and pod, adding depth and complexity beyond extract. Split to scrape seeds into batter and steep pod in milk if desired to maximize flavor extraction. Use fresh beans for the most pronounced and natural vanilla notes.
- 1 1/2 cups (300 g) granulated sugar Granulated sugar used in frosting to build structure and sweetness; dissolves during cooking or whipping to create a stable meringue-based buttercream. Adds body and helps stabilize egg whites when making Italian or Swiss meringue. Use measured by weight for consistent frosting texture.
- 6 egg whites Egg whites used to form a stable meringue base for buttercream, providing lightness and structure when whipped with hot sugar. Separate from yolks and ensure no fat contamination to achieve maximum volume and stability. Gradually incorporate melted sugar to create a glossy, firm meringue.
- 1 1/2 cups (340.5 g) unsalted butter, at room temperature, cut into 2-inch pieces Softened unsalted butter provides richness, smoothness, and a spreadable consistency to the buttercream; incorporated slowly into meringue to produce a silky emulsion. Cut into pieces for even creaming and to prevent lumps when beating into whipped egg whites. Use at proper temperature to avoid separation.
- 1 teaspoon vanilla extract Vanilla extract contributes straightforward aromatic vanilla flavor to the buttercream, rounding out sweetness and enhancing other flavors. Add toward the end of mixing to preserve volatile aromatic compounds. Measure carefully since extracts are concentrated.
- 1/4 teaspoon (0.25 teaspoon) kosher salt Fine salt used sparingly to balance sweetness and enhance the other flavors in the frosting. Dissolves easily into the buttercream to prevent any localized salinity and to lift the overall taste profile. A small pinch creates a more rounded and less cloying finish.
- 2/3 cup (150.67 ml) coconut milk Coconut milk adds richness and coconut flavor to the buttercream while slightly loosening consistency for spreadability. Incorporate gradually to reach desired frosting texture and to enhance the overall coconut character. Use full-fat for best creaminess and stability.
- 1 cup (90 g) sweetened shredded coconut Sweetened shredded coconut used as mix-in or garnish for the buttercream, adding texture and concentrated coconut sweetness. Sprinkle or fold in to distribute chewy coconut throughout the frosting and add visual interest. Toasting can intensify flavor and reduce moisture if needed.
Instructions
- Make the Cake: Preheat oven to 350 degrees F. Grease and flour two 8-inch round cake pans; set aside.: Preheat oven to 350 degrees F. Grease and flour two 8 inch round cake pans; set aside. : Warmth in the oven awakens the leavening agents and sets the scene, so preheating until it holds a steady heat is crucial, you should feel the small rush of heat when you open the door. Greasing and flouring the pans creates a thin barrier so the crumb releases cleanly, and when you tap the pan gently you should hear a dull thud rather than a sticky slap. If you skip properly preparing the pans, the layers may stick, tearing the crumb on release. A common misstep is not checking the oven temperature, so an oven thermometer is a simple safeguard to ensure even baking.
- Sift the cake flour into the bowl of an electric mixer. Add the sugar, baking powder and salt and beat on low speed for 15 seconds to combine. Add the butter pieces and beat on low speed for 1 minute, or until the mixture is coarse and crumbly.: As you blend, the dry ingredients should smell faintly wheaty with a hint of sweetness from the granulated sugar , and the butter will begin to distribute into pea size bits swallowing pockets of flour. That coarse, crumbly texture is the visual cue you want before adding liquids; it helps create a tender crumb by coating flour with fat and reducing gluten development. Over mixing here will cause the mixture to become too smooth and lead to denser cake. Avoid working the mixture on high speed, which can create too much air too early and alter the finished texture.
- In a separate medium bowl, whisk together the egg whites, coconut milk and the 1 cup shredded coconut until combined. Scrape the seeds from the vanilla bean into the mixture and whisk to thoroughly incorporate the seeds throughout the mixture.: When you stir the egg whites and coconut milk , the mix should shimmer slightly as the liquid binds to the shredded coconut; the vanilla bean seeds look like tiny black flecks distributed through the liquid, offering aromatic bursts. This wet mix adds moisture and flavor that will steam in the oven, contributing to lift and a tender crumb. A typical error is using cold ingredients; room temperature liquids help emulsify with the fat. If the vanilla bean seeds clump, use a spatula to disperse them fully.
- Add half of the coconut milk mixture to the dry ingredients and beat on medium-high for 1 minute. Scrape down the sides and bottom of the bowl, add the remainder of the coconut milk mixture and beat on medium speed for 30 seconds, or until the batter is well-mixed, light and fluffy.: At this stage the batter should transition from floury pockets to a smooth mixture with a matte sheen and slight billowy texture, and you might hear a soft hum from your mixer as it incorporates air. Scraping the bowl prevents unmixed pockets that would bake dense; the time on the mixer allows the egg whites to trap air for lift while the butter contributes richness. Over beating after full incorporation risks deflating those air pockets, so stop once it looks light. Avoid leaving unmixed streaks that show as flour in the baked cake.
- Divide the batter evenly between the cake pans and bake for 35 to 45 minutes, or until the tops are firm and golden brown and spring back when pressed lightly in the center. Let the cakes cool completely in the pans on a wire rack.: As the cakes bake, the kitchen will fill with a toasty, coconut scented aroma and the tops will gradually brown, signaling the Maillard reaction. The spring back test is tactile, press gently in the center and you should feel a subtle give that quickly recovers, indicating doneness without dryness. Letting the cakes cool in the pans prevents sudden temperature shifts that could make them sink, and the wire rack promotes airflow so bottoms do not trap steam. A common mistake is removing them too early which can cause collapse, and cutting into them warm will result in crumbly slices.
- Make the Frosting: In a small, heatproof bowl, whisk together the sugar and egg whites. Place the bowl on top of a saucepan with about an inch of simmering water (do not let the bottom of the bowl touch the water). Heat the mixture, whisking occasionally, for 6 to 8 minutes, or until the mixture is hot to the touch and the sugar is dissolved.: In a small, heatproof bowl, whisk together the sugar and egg whites. Place the bowl on top of a saucepan with about an inch of simmering water do not let the bottom of the bowl touch the water. : Heating the sugar with the egg whites dissolves the granules so the meringue will be silky and stable; you should feel the bowl warm and see small steam wisps without boiling. Whisking occasionally prevents cooked egg strings and encourages even heating. If the bowl touches the water, the eggs may scramble, ruining the base for your buttercream. Keeping the water at a gentle simmer is safer than a rolling boil that could overheat the mixture.
- Remove the bowl from the heat and transfer the mixture into the bowl of an electric mixer. Using the whisk attachment, whip on medium-high speed for 6 to 8 minutes, or until the mixture becomes a light, white meringue and the mixture is cool to the touch. Reduce the speed to low and add the butter a couple of pieces at a time. Increase the speed to medium and mix for 4 to 5 minutes, or until the butter is thoroughly incorporated and the frosting is smooth and glossy. The frosting may initially look curdled after adding the butter, but continue beating and it will come together, looking smooth and creamy by the end of the mixing time.: As you heat, the mixture will turn glossy and lose any graininess when a pinch between fingers no longer feels gritty, that is the test for dissolved sugar. You should notice the aroma brighten as the sugar melts and the whites loosen. If you stop too soon, undissolved sugar will give the frosting a gritty mouthfeel; too long or too hot risks cooking the whites into ribboned strands. Watch carefully and test by rubbing a small amount between fingers.
- Add the vanilla extract, salt and coconut milk and whip for another few minutes on medium speed, or until the coconut milk is thoroughly incorporated and the frosting is smooth. Again, the buttercream may look thin and separated, but continue mixing until it comes together. It will be more of a satin-like consistency, versus the thick powdered sugar frostings that are often used. Note: Use the frosting within 30 minutes, or transfer to an airtight container and store at room temperature for up to 1 day, then beat with a mixer (using the paddle attachment) until smooth before using. You can also store the frosting in an airtight container in the refrigerator for up to 2 weeks, then bring to room temperature and beat with a mixer (using the paddle attachment) for 6 to 8 minutes until smooth before using.: The whipped meringue will transform from glossy liquid to stiff, cloud like peaks, and the bowl should become cool, which is an important signal before adding butter. The sound of the mixer may change as the foam tightens, and you should see a bright white mass that holds shape. If you add butter to a warm meringue, it can melt and separate, so patience here preserves texture. A typical mistake is under whipping, which leaves the meringue too soft to hold butter properly.
- Assemble the Cake: Remove the cooled cakes from their pans and level the tops, if necessary. Place one cake layer on a cake stand and top with 2 cups of the frosting, using an offset spatula to spread it evenly to the edges.: When the unsalted butter is added slowly, the meringue and butter will emulsify into a silky buttercream; initially it may look curdled and lumpy and that shock is normal. Keep beating steadily and you will see it begin to unify into a satin texture with a luminous sheen. If you add the butter too quickly you risk a separated frosting that will take much longer to come together. If separation persists, chilling briefly and then beating again can bring it back.
- Place the second layer on top, top-side down. Spoon 1 cup of the frosting onto the top of the cake and use a large offset spatula to spread the frosting on top and over the sides of the cake, covering it with a very thin layer (this is the crumb coat). Refrigerate for 20 minutes.: The transition from curdled to smooth is a visual journey, watch as the mixture becomes uniform and glossy, and smell the rich buttery aroma melding with sweet coconut. This final smoothing step is what yields that professional looking finish. Avoid panic if it looks off at first, most of the time perseverance is the remedy. If it remains broken after extended beating, you can start with a small amount of fresh meringue and slowly reincorporate it to rescue the batch.
- Use a wooden spoon to mix the remaining frosting to lighten it up since it has been sitting. Spoon it onto the cake and spread it evenly over the top and down the sides. Use an offset spatula to create a smooth finish. Press the 1 cup shredded coconut onto the top and sides of the frosted cake. The cake can be stored in an airtight container at room temperature for up to 3 days.: Adding vanilla extract and coconut milk brightens the flavor and adjusts the consistency to a satin spreadable state, you should notice a fragrant lift and a smoother flow in the frosting. The coconut milk will thin the texture slightly so whip until it holds yet spreads easily. Adding too much liquid will make the frosting runny, while too little leaves it overly stiff. If it becomes too thin, chill briefly and beat again to regain body.
- Note: Use the frosting within 30 minutes, or transfer to an airtight container and store at room temperature for up to 1 day then beat with a mixer using the paddle attachment until smooth before using. : The frosting tastes best when freshly whipped because the air is at its peak, and the texture will be most satiny. If you store it, the fats may firm up or separate slightly, but re beating restores consistency. Avoid leaving it exposed to warm temperatures which may cause melting. A common oversight is forgetting to bring refrigerated frosting back to room temperature before re beating, which makes it harder to reincorporate.
- Assemble the Cake: Remove the cooled cakes from their pans and level the tops, if necessary. Place one cake layer on a cake stand and top with 2 cups of the frosting, using an offset spatula to spread it evenly to the edges. : When assembling, the tactile feedback of spreading should be smooth and slightly resistant, showing that the frosting has body to support the layers. Leveling the tops ensures stable stacking and even bite size across slices, and a light press will show if any air pockets remain. Work on a cool surface to keep frosting from softening too fast. Slicing into un leveled layers often creates a leaning cake that is harder to frost neatly.
- Place the second layer on top top side down. Spoon 1 cup of the frosting onto the top of the cake and use a large offset spatula to spread the frosting on top and over the sides of the cake covering it with a very thin layer this is the crumb coat. Refrigerate for 20 minutes.: The crumb coat traps loose crumbs so the final outer layer appears pristine, and chilling firms the buttercream so the next layer spreads without pulling crumbs. You should see a thin opaque layer that dulls the surface and feels cool to touch after refrigeration. Skipping the chill risks a messy exterior when you apply the final coat. If the crumb coat is too thin, it may not catch all crumbs, so err slightly thicker rather than thinner.
- Use a wooden spoon to mix the remaining frosting to lighten it up since it has been sitting. Spoon it onto the cake and spread it evenly over the top and down the sides. Use an offset spatula to create a smooth finish.: Mixing the frosting refreshes its texture and reincorporates any settled air, producing a lighter spread that will glide across the chilled crumb coat. As you smooth, watch for tiny air bubbles and work them out with gentle strokes to achieve a flawless appearance. Press the sweetened shredded coconut onto the top and sides to adhere, which provides texture and an attractive finish. If the frosting resists smoothing, let it warm a touch and then continue, but not so much that it becomes soft and slumps.
- Press the 1 cup shredded coconut onto the top and sides of the frosted cake. The cake can be stored in an airtight container at room temperature for up to 3 days.: The final press of the shredded coconut should be even and gentle, leaving a pleasing uniform coating that delivers a slight chew against the satin frosting. Storage at room temperature preserves the buttercream texture while keeping the crumb moist, and an airtight container prevents the coconut from drying out. Refrigeration can firm the cake but may mute the coconut aroma. A common error is leaving the cake uncovered which will dry the frosting and the outer coconut.
Notes
- Swap presentation: Turn the layers into cupcakes by dividing batter into lined muffin tins and reduce baking time, checking for spring back in the center to avoid dry crumb.
- Lighten the frosting: Chill the butter briefly if the buttercream looks greasy and then beat again, which helps re integrate the fats into a smoother emulsion.
- Make ahead strategy: Bake the layers a day early and wrap tightly, then finish frosting on the event day to keep flavors fresh and make assembly less stressful.
- Storage tip: Keep the finished cake in an airtight container at room temperature for up to three days, or refrigerate for longer storage, bringing it back to room temperature before serving for best texture.
- Textural contrast: Toast half the shredded coconut for garnish to add a toasty crunch that contrasts with the satin buttercream without changing the inner crumb.