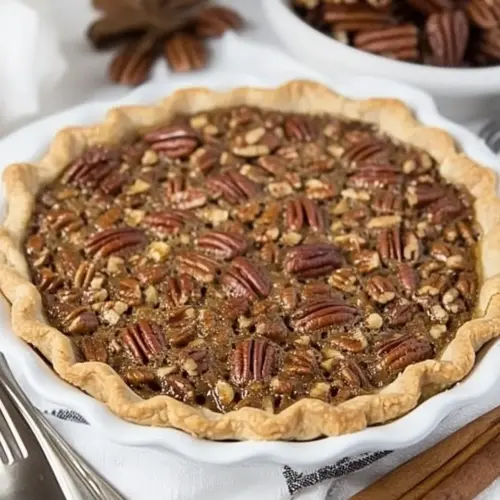
Classic Pecan Pie
Classic Pecan Pie offers a glossy, caramel like filling studded with toasted pecans and set in a flaky crust, delivering creamy, crunchy, and buttery notes in every bite. This easy to love dessert brings deep, toasted flavor and comforting textures, perfect for Thanksgiving or an easy weekend treat. Make it for company and enjoy a pie that slices beautifully and tastes like tradition.
Equipment
- 9-inch pie plate
- Double boiler
- Oven
Ingredients
- 1 unbaked pie crust, homemade or store bought Provide a flaky, tender base that holds the filling; use an unbaked crust to ensure a crisp bottom and buttery texture. Blind-bake slightly if needed to prevent sogginess when baking with a wet filling. Choose homemade or store-bought based on desired convenience and flavor.
- 6 tablespoons butter, cut into 1-inch pieces Add rich, creamy fat and deepen flavor; cut into 1-inch pieces to melt evenly into the filling for a smooth texture. Contribute to a glossy finish and help bind sugars and eggs for a silky custard.
- 1 cup packed dark brown sugar Impart deep, caramel-like sweetness and moistness; packed dark brown sugar adds molasses notes that complement the pecans. Help stabilize the filling and balance the corn syrup’s sweetness for a well-rounded flavor profile.
- 1/4 teaspoon salt Enhance and balance sweetness while bringing out other flavors; a small pinch of salt brightens the custard and reduces cloying richness. Even distribution is important to avoid salty pockets in the pie.
- 3 eggs Provide structure and set the custard through coagulation; whisk eggs thoroughly to create a smooth, firm filling. Also contribute richness and a slightly custardy texture when baked.
- 3/4 cup light corn syrup Supply viscous sweetness and chewiness while helping the filling set; light corn syrup prevents crystallization and gives a glossy, stable texture. Incorporate fully with sugars and eggs for an even, gooey center.
- 1 tablespoon vanilla Add fragrant warmth and enhance overall flavor complexity; vanilla rounds out the sweetness and complements the brown sugar and pecans. Use pure vanilla for the best aromatic result.
- 2 cups whole pecans, toasted and chopped into small pieces Contribute crunchy texture and nutty flavor as the pie’s star ingredient; toasting intensifies aroma while chopping into small pieces ensures even distribution. Scatter throughout the filling to provide consistent bites of pecan in every slice.
Instructions
- Fit the pastry crust into a 9-inch pie plate and flute the edges. Chill for about an hour or until firm.: The chilled crust feels cool and slightly firm to the touch, which helps it hold a neat shape in the oven; this step prevents the crust from shrinking during blind baking. You'll notice the dough relax and become easier to flute after resting, which creates even, decorative edges. A common mistake is to skip chilling, which often leads to collapsed sides and an uneven rim. If your kitchen is warm, pop the crust back into the fridge for an extra 20 to 30 minutes to maintain structure.
- Prick the bottom sides of the shell with a fork, then line the crust with non-stick foil and add pie weights. Return to the refrigerator while preheating the oven to 400 degrees.: When you prick the base, you will hear a faint patter as the fork moves through, creating tiny vents so the crust bakes evenly without bubbling. Lining with foil and adding weights keeps the bottom flat and prevents air pockets, yielding a crisp, even shell. A typical pitfall is using no weights, which leads to puffed or uneven bottoms. Keep the pie on a chilled tray while the oven heats to avoid the crust warming up too soon.
- Bake for 15 minutes, then remove foil and pie weights and bake for 10 more minutes until the shell is lightly browned.: During blind baking you will see the edges begin to take color and the surface shift from raw to matte, then to slightly golden once weights are removed. That hint of brown indicates the crust has set enough to hold the filling without becoming soggy. If you underbake at this stage, the crust may become soggy when you add the filling, so look for a delicate golden tone. Overbaking will dry the edges, so remove once the color is even and light.
- While the crust is cooking, make the filling. Remove the pie crust and decrease the oven temperature to 275 degrees.: Lowering the oven allows the filling to bake gently so the center sets without overbrowning the pecans. The kitchen will radiate a warmer, caramel like aroma as you move from high heat to a slow bake. A frequent error is leaving the oven too hot, which can cause the filling to puff and crack. Make this temperature change deliberate and quick to protect the filling's texture.
- Melt butter in a double boiler, keeping the water at a simmer. Remove the top of the double boiler from the heat.: Using a double boiler yields gentle, even melting so the butter becomes smooth and silky rather than scorching, which would impart bitter notes. You'll notice soft, shiny melted butter forming quickly in the upper pan, a calming sight that signals controlled heat. If the water boils vigorously, the steam can overheat the butter, so keep it barely simmering. Avoid direct heat to prevent separation or burning.
- Mix in the sugar and salt with a wooden spoon until well combined and the butter is absorbed.: As you stir, the mixture transforms into a cohesive, glossy mass, the sugar softening into the melted butter and taking on a slight sheen. The wooden spoon gives you tactile feedback, letting you sense when there are no dry sugar streaks left. A common slip is not fully incorporating the sugar, which leaves a grainy filling; keep stirring until the texture is smooth and homogeneous.
- Beat in the eggs, then corn syrup and vanilla.: Adding eggs and then corn syrup introduces structure and syrupy sweetness, and the mixture will gain body and a richer color. When you stir, the batter should feel thicker and more unified, with the vanilla scent lifting the whole mixture. If you add eggs to overly hot butter, they will scramble, so ensure the mixture has cooled slightly; temper if necessary by whisking in a small amount before combining fully.
- Return the pan to the double boiler and stir until the mixture is shiny and warm to the touch, about 130 degrees.: Warming the filling to roughly 130 degrees helps it come together without cooking the eggs too quickly, resulting in a smooth, glossy consistency that pours easily. You should feel a gentle warmth, not hot, when touching the pan; the sheen indicates proper emulsification. Overheating can cause thickening or curdling, so remove promptly when the temperature is reached and trust a thermometer for accuracy.
- Remove from heat and stir in pecans.: As you fold in the toasted nuts, you'll notice their aroma intensify, and the mixture becomes studded with rich, brown bits that promise crunch. The contrast between the warm filling and crisp pecans is pleasing to the senses, and folding gently ensures even distribution. A mistake here is adding raw or untoasted pecans, which will give a flatter flavor, so always toast first for maximum impact.
- Pour the pecan mixture into the warm pie crust and bake until the center is set, but still slightly soft, 50-60 minutes.: As the pie bakes low and slow, the top will glisten and the filling will firm from the edges toward the center, leaving a slight jiggle in the middle when done. You should hear a faint crackle as the nuts toast further and smell caramel notes filling the kitchen. Avoid underbaking, which leaves the center too loose, and overbaking, which will dry and crack the filling; aim for a gentle wobble in the middle to achieve that perfect custard like set.
- Transfer the pie to a cooling rack and cool completely before serving.: Cooling lets the filling finish setting and makes slicing clean and elegant, while the glossy top dulls to a rich sheen. As it cools, the aroma settles into the pecans and crust, and you will hear quiet kitchen sounds as steam dissipates. Cutting too soon risks a runny center, so be patient; if you need slices sooner, chill briefly to speed the process.
Notes
- Swap crust textures Use a crumb crust for a denser base that highlights the filling, or rub more butter into the flour for a flakier, more layered pastry.
- Adjust nut size Chop pecans finer for a more uniform mouthfeel, or leave halves intact for a dramatic, rustic top that provides big crunch.
- Control sweetness Reduce the brown sugar by a couple of tablespoons if you prefer a less sweet finish, but keep the corn syrup amount steady to maintain structure.
- Enhance aroma Stir in a pinch of cinnamon or a fraction of a teaspoon of warm spice to complement the pecans, using sparingly so the pie remains classic.
- Presentation twist Arrange whole pecan halves in a concentric pattern on top before baking for a photoshoot ready surface that still tastes like the original.