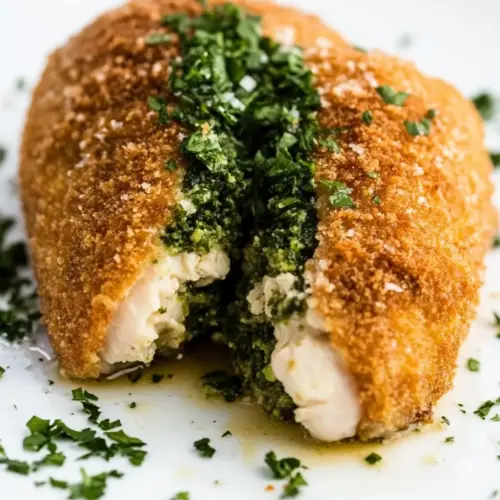
Classic Chicken Kiev
Classic Chicken Kiev is a crispy, buttery masterpiece with a molten herbed center, perfect for an easy weeknight dinner or a special weekend meal. The golden breadcrumb crust gives a satisfying crunch while the parsley garlic lemon butter melts into juicy boneless skinless chicken. Make it for company to impress without fuss.
Equipment
- Medium Saucepan
- Oven
- Bowl
- Sheet tray
- Plastic Wrap
- Meat Mallet
Ingredients
- 1 stick softened unsalted butter Softened and spreadable, provides a rich, creamy center when whipped with herbs; helps create the classic indulgent filling that melts inside the chicken during cooking. Allows easy shaping and binding with other flavor components, contributing moisture and silky texture to each bite.
- 1/4 cup finely minced fresh parsley Finely minced to release fresh, herbaceous brightness and balance the butter's richness; adds color and a lively, slightly peppery note that complements garlic and lemon. Helps cut through fat and enhances the overall savory profile of the filling.
- 1 finely minced garlic clove Finely minced to distribute pungent, aromatic flavor evenly throughout the butter mixture; delivers savory depth and a warm, slightly spicy undertone. Works with lemon and parsley to build the classic garlicky punch associated with this dish.
- Zest and juice of 1/2 lemon Zested and juiced to provide bright citrus aroma and acidity that lightens the butter filling; balances richness and adds a subtle tang that enhances other flavors. Lemon components also help preserve freshness and uplift the overall taste profile.
- Salt and pepper to taste Seasoned to taste to enhance and balance all ingredients; adds necessary savory contrast that prevents the filling and chicken from tasting bland. Used both in the filling and the breading stage to ensure layers of seasoning across the dish.
- 4 boneless skinless chicken breasts Boneless and skinless to allow easy butter pocket creation and even cooking; serves as the main protein that is flattened, stuffed, rolled, and sealed around the compound butter. Provides tender, juicy meat when cooked properly and acts as the vehicle for the molten herb butter.
- 1/2 cup all-purpose flour Used to coat the chicken before egg wash, creating a dry surface that helps the egg and breadcrumbs adhere; imparts a light, crisp outer layer when fried. Also helps add structure to the breading, ensuring an even, golden crust.
- 2 large eggs Beaten to form an adhesive layer that helps breadcrumbs stick to the floured chicken; contributes moisture and binds the breading components during frying. Also aids in achieving a uniform, crunchy coating around the stuffed breasts.
- 1 cup breadcrumbs Provides a crispy, crunchy exterior when pressed onto the egg-washed chicken; browns nicely in hot oil and protects the filling during frying. Adds texture contrast to the tender chicken and melted butter inside.
- Salt and pepper to taste Used to season the breading and chicken to ensure consistent savory flavor throughout the outer crust; reinforces seasoning from the filling and the meat for a balanced bite. Applied at the breading stage so each layer is properly seasoned.
- neutral flavored oil for frying Neutral flavored oil used at a high heat to fry the breaded chicken evenly without imparting additional flavors; helps achieve a golden-brown, crisp crust while allowing the interior to cook gently. Chosen for a high smoke point to maintain stable frying temperatures.
Instructions
- Start by mixing the butter, parsley, garlic, lemon juice, lemon zest, salt, and pepper in a medium size bowl until completely combined.: The first sensations are aromatic, as the fresh parsley and minced garlic release their scents into the softened butter , and the citrus oils from the lemon zest lift everything. As you mash and stir, the texture should become uniform and slightly glossy, showing the butter is fully incorporated. This step matters because a homogenous filling melts predictably, ensuring each roll delivers the same burst of flavor. A common mistake is under mixing, leaving lumps of unseasoned butter that can cause uneven pockets; scrape the bowl well and taste a tiny bit, adjusting salt and pepper as needed.
- Form the butter into a log and place it on a half sheet of parchment paper and roll it until is enclosed, and place it in the freezer for 20 to 25 minutes or until very firm. See video.: You'll feel the butter cool through the parchment as it firms up, which is key because a very cold log holds its shape when cut into portions and prevents the filling from leaking during assembly. The surface will become matte and solid to the touch when ready. If you skip chilling, the filling will be too soft to handle and will ooze out during rolling, which is the most frequent error here. Keep the log compact so each portion is neat and manageable.
- Pound each chicken breast one at a time with a mallet between two pieces of plastic until it is about a 1/4” thick and set them to the side.: As you pound, you will hear a rhythmic tapping and notice the meat flattening evenly, transforming thick breasts into broad, thin pieces that are easy to roll. The goal is an even thickness, about a quarter inch, which allows quick cooking without overbrowning the exterior. Uneven pounding leads to parts that are undercooked or dry, so take your time and rotate the breast to keep edges uniform. The texture should be soft and flexible, not torn, which indicates you used the right pressure and protection with plastic.
- Once the butter is chilled, cut it into 4 equal size pieces. Set aside.: Each chunk should be compact and cold, firm enough to hold its shape in your hand for a few seconds, which makes it simple to tuck into the center of the pounded chicken . This portioning ensures even distribution of flavored butter per serving. If pieces are uneven or too large they can cause leakage or rolling trouble; use a sharp knife and measure visually for balance. A helpful cue is that each piece should be roughly the size of a small egg.
- Season the inside of one of the pounded-out chicken breasts with salt and pepper and place the 1 butter chunk in the center and roll it up and fold in the sides, making sure that it is tight and sealed.: When you press the chilled chunk into the center, you will hear a faint squish as it nestles into the meat, and the edges of the chicken should meet neatly. Tightness is crucial because it prevents the melted filling from escaping during cooking and ensures even internal temperature. Press seams firmly and tuck ends under as if wrapping a parcel. A common slip is leaving gaps at the seams which causes a loss of the molten herb center; use gentle but firm pressure to seal.
- Place the rolled chicken Kiev on a piece of plastic wrap, roll it up tight, and twist the ends to ensure it is a tight chicken roll. Freeze for 15 to 20 minutes or until firmer. See video.: Rolling in plastic compresses the structure so the roll becomes compact and uniform, which makes breading easier. The chill firms the surface and sets the shape, so it resists deformation when dredged. You'll feel the roll become noticeably colder and firmer; that tactile cue tells you it is ready. If you skip this chill, the roll can fall apart during breading; patience here pays off.
- In a shallow bowl, mix together the flour with salt and pepper. In a separate shallow bowl, whisk together the eggs with salt and pepper. Finally, in another separate shallow bowl, mix together the breadcrumbs with salt and pepper.: Preparing the three station setup creates rhythm and prevents messy transfers. The flour roughs up the surface for the eggs to adhere, the eggs bind the crumbs, and the seasoned breadcrumbs deliver the golden crust. Smelling the seasoned bowls is satisfying and confirms seasoning is present at each layer. A common mistake is under seasoning the coating which leads to bland crust; season each bowl intentionally.
- Remove the chicken from the plastic and dredge in the flour, shaking lose any excess, then thoroughly coat it in the egg wash, and then finally the breadcrumbs ensuring it is completely coated. Repeat the process until all the chicken is breaded. See video.: As you work, notice the change from powdery flour to glossy egg wash to textured breadcrumbs . The sound of crumbs dropping into the bowl and the visual of an even golden layer are satisfying indicators of success. Make sure to press the crumbs gently so they adhere without tearing the roll. Avoid clumping by shaking off excess flour before the egg , and if crumbs fall away, re press them lightly before frying.
- Fry the chicken in enough oil to cover half of it at 350° in a medium size saucepan for 3 to 4 minutes per side or until golden brown on both sides.: When the rolls hit the oil you will hear a steady sizzle and see a rapid formation of small bubbles around the crust, which is a reliable visual cue. The surface should develop a deep golden tone, not dark brown, signaling proper caramelization without burning. Frying half submerged gives you control, and the gentle turn helps shape even browning. If the oil is too hot, the crust will darken before the interior cooks, so keep the temperature around 350 degrees and adjust the flame as needed.
- Transfer to a sheet tray with a rack and parchment paper and bake on the bottom rack of the oven at 400° for 10 to 12 minutes or until cooked throughout.: Moving from stovetop to oven finishes cooking evenly and ensures the center reaches a safe internal temperature while preserving crispness. In the oven the rolls will emit a warm, toasty aroma as the filling softens further. Use a thermometer to check for doneness if you like; the visual cue is a steady golden crust and minimal juices escaping. A common oversight is overcrowding the tray, which reduces airflow and softens the crust, so space the rolls apart.
- Slice and serve.: When you cut into a properly cooked roll, you should see a ribbon of glossy herbed butter and steam rising with bright herb flecks. The contrast of the crunchy exterior and the silky center is the reward for careful technique. Let the pieces rest for a minute to allow juices to settle so the filling does not run out excessively. A frequent mistake is slicing immediately and losing the molten butter; a brief pause gives you a cleaner presentation.
Notes
- Herb swap Replace or add herbs such as dill or chives to the butter for a different aromatic profile, being mindful to chop them finely so the texture remains smooth.
- Breadcrumb texture Use panko for an extra crunchy crust or finely ground fresh breadcrumbs for a more delicate exterior that browns evenly.
- Make ahead Roll and bread the chicken, then freeze on a tray. Once solid, transfer to freezer bags and bake from frozen adding a few extra minutes in the oven.
- Oven finish If you prefer less frying, brown briefly in oil to set the crust then finish on a wire rack in the oven to crisp without excessive oil absorption.
- Alternative meats You can use thin veal scallopini or dark thigh meat pounded thin, noting the finished portion may be smaller and cook slightly differently.