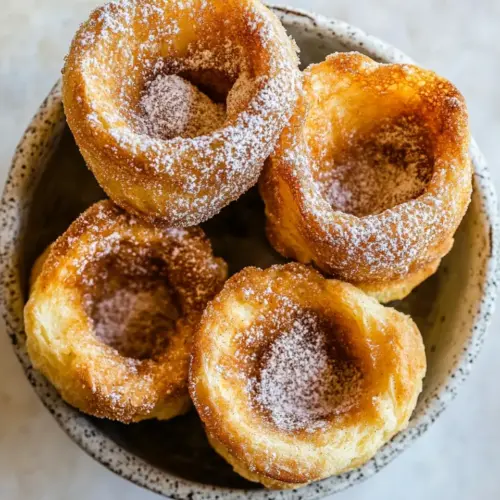
Cinnamon Sugar Brown Butter Popovers
Cinnamon Sugar Brown Butter Popovers are airy, crisp on the outside, and tender inside, with a nutty brown butter finish and a sweet cinnamon sugar crust. These easy bakery style popovers make a show stopping brunch or cozy dessert, perfect for weekend gatherings or an indulgent treat. Make them for their dramatic puff and caramelized scent, you will want seconds.
Equipment
- Popover pan or muffin pan
- Skillet
- Mixing Bowl
- Whisk
- heat proof bowl
Ingredients
- 6 teaspoons + 6 tablespoons salted butter Melted and foamy, provides rich nutty flavor and helps create a crisp, golden exterior while enriching the popover batter; measure precisely combining teaspoons and tablespoons as listed to control richness and frying effect in the pan.
- 1 1/2 cups whole milk, at room temperature Warmed to room temperature to encourage even incorporation, adds moisture and tenderness to the batter while contributing to steam that helps the popovers rise; use whole milk for its higher fat content and smoother texture.
- 3 large eggs, at room temperature Beaten at room temperature to incorporate air and stabilize the batter, contributes structure, richness, and leavening through steam and coagulation during baking; bring eggs to room temperature for better emulsification.
- 1 tablespoon salted butter, melted Lightly melted and brushed or whisked in to add a finishing richness, helps create an additional layer of butter flavor and slight shine on the finished popovers; use exactly as listed to balance buttery notes.
- 1 teaspoon vanilla extract Added for its warm aromatic flavor, enhances the overall taste profile with subtle vanilla notes and balances sweetness; measure accurately to avoid overpowering delicate flavors.
- 1 1/2 cups all purpose flour Sifted or whisked to remove lumps, supplies the primary structure and body of the popover batter through gluten development and starch gelatinization; avoid overmixing once combined to keep popovers light.
- 4 ounces cream cheese, cut into 6 to 12 cubes Cut into small cubes and chilled, provides pockets of creamy richness that melt during baking to create tender, flavorful pockets; distribute evenly to prevent large cold spots in the batter.
- 1 teaspoon kosher salt Dissolved into the batter to enhance savory balance, strengthens gluten slightly and amplifies other flavors while controlling sweetness; use kosher salt for a clean, reliable seasoning profile.
- 1/2 cup granulated sugar Sprinkled into the mixture for bulk sweetness and browning, helps caramelize surfaces and balance the buttery and tangy elements while energizing the batter for Maillard reactions; measure to control total sweetness.
- 1 tablespoon ground cinnamon Folded into the sugar or batter to impart warm spice and aroma, complements the brown butter and sugar for a classic sweet-spiced finish while adding depth to each bite.
Instructions
- Position a rack in the lower third of the oven. Preheat the oven to 450 degrees. Place 1 teaspoon of butter in each cup of a 6 cup standard popover pan. Alternately, you can use a 12-cup muffin pan and make 12 mini popovers. Transfer the pan to the oven 3-5 minutes before baking to melt the butter and heat the pan. In a medium bowl, vigorously whisk together the milk and eggs until frothy, about 1 minute. Add 1 tablespoon melted butter, the vanilla, flour, and salt. Whisk to combine. It's OK if there are small lumps. Carefully remove the popover pan from the oven and swirl the butter around the cups to grease the pan. Evenly divide the batter between the popover cups, filling them 3/4 of the way full. If using, push 1 cube of cream cheese into the center of each popover. Transfer to the oven and bake for 20 minutes. Lower the oven temperature to 350 degrees. Bake another 15-18 minutes, until puffed, golden and crisp. If using a muffin pan, only bake 15-18 minutes total at 450. To make the brown butter. Add the remaining 6 tablespoons butter to a skillet set over medium heat. Allow the butter to brown until it smells toasted and is a deep golden color, about 3-4 minutes. Remove from the heat and transfer the butter to a heat-proof bowl. Combine the sugar and cinnamon in a shallow bowl. Brush each warm popover with browned butter, then roll (generously) through the cinnamon sugar. Enjoy warm.: When the oven is set up low, the popovers get strong bottom heat first, which helps them puff dramatically. You should hear a faint sizzle when the pan goes in, and the bottoms will brown faster when the rack is low. A common mistake is placing the rack too high, which can cause uneven rise and softer bottoms.
- Preheat the oven to 450 degrees: High initial heat creates steam immediately, pushing the batter up into tall walls. You want the oven thoroughly preheated, so wait until the indicator says it is ready and the interior is evenly hot. If you open the door too often while preheating, the temperature drops and ruins that initial burst of steam.
- Place 1 teaspoon of butter in each cup of a 6 cup standard popover pan: The butter melts and pools at the base, crisping the bottoms and adding flavor. Look for the butter to foam slightly and become fragrant, a sign it is ready. If you skip or skimp on the butter, the popovers may stick and will lack a crisp bottom.
- Alternately, you can use a 12 cup muffin pan and make 12 mini popovers: Using a different pan affects baking time and rise. Mini popovers bake faster and often brown more quickly on the edges, so reduce overall bake time and watch for color. A mistake here is assuming mini and standard popovers take the same time, which can lead to overbaking.
- Transfer the pan to the oven 3 to 5 minutes before baking to melt the butter and heat the pan: Heating the pan ensures the batter begins cooking on contact, promoting a crisp base and immediate uplift. You will notice the butter fully liquefy and shimmer when the pan is hot. If you fail to preheat the pan, the batter may spread instead of rising upward.
- In a medium bowl, vigorously whisk together the milk and eggs until frothy about 1 minute: Whisking aerates the mixture, creating tiny bubbles that help with lift, and blends the liquids for a smooth batter. The froth should be visible and light. A common error is underwhisking, which leaves a denser mix and fewer pockets of steam to drive rise.
- Add 1 tablespoon melted butter, the vanilla, flour, and salt: These ingredients bring flavor and structure to the batter. After adding the flour , stir until mostly combined; small lumps are fine as they hydrate and bake out. Overmixing at this point can develop gluten and make the popovers chewy rather than tender.
- Whisk to combine: Aim for a batter that is cohesive but still slightly lumpy, which indicates you have not overworked the gluten. The batter should flow easily when poured and have a slightly glossy sheen from the melted butter . If you beat it to a perfectly smooth paste, you risk denser results.
- Carefully remove the popover pan from the oven and swirl the butter around the cups to grease the pan: Swirling spreads the hot butter, ensuring even coverage and a crisp edge. You will smell the toasty butter and see a thin film on the pan. Be cautious when handling a hot pan to avoid burns, and do not let the butter smoke or burn.
- Evenly divide the batter between the popover cups filling them 3 4 of the way full: Filling to the proper level leaves room for the dramatic rise without overflow. The batter should sit slightly below the top rim so it can puff and form tall collars. Overfilling is a frequent mistake that causes spillover and less crisp sides.
- If using push 1 cube of cream cheese into the center of each popover: The cold cream cheese cube melts into a tender pocket, offering a silky contrast to the crisp shell. Press it down gently so it is centered. Forgetting this step means you miss the creamy surprise, but adding too large a piece can prevent the popover from rising fully around it.
- Transfer to the oven and bake for 20 minutes: During this initial high heat stage, the popovers will rapidly expand and set their structure. You should see pronounced rise and hear faint popping or crackling as the crust forms. Opening the oven here risks a collapse, so resist the urge to peek.
- Lower the oven temperature to 350 degrees: Reducing the heat allows the centers to finish cooking without burning the exterior, and it helps set the interior custardy texture. You will notice the color deepen more slowly now. If you do not lower the temperature, the popovers may brown too quickly on the outside while remaining underdone inside.
- Bake another 15 to 18 minutes until puffed golden and crisp: Watch for a rich golden color and a dry, crisp surface. Tap the top lightly it should feel firm and not doughy. Underbaking results in a gummy interior, while overbaking will dry them out, so keep a close eye near the end.
- If using a muffin pan only bake 15 to 18 minutes total at 450: Mini popovers require less time because of their smaller volume, and the 450 degree single stage gives quick lift and crisp edges. Expect a faster visual change in color. A common trap is following standard popover timings, which leads to overly browned, dry minis.
- To make the brown butter add the remaining 6 tablespoons butter to a skillet set over medium heat: As you heat it, the butter will foam then subside, and milk solids will darken. Stir gently and watch for an amber color and a toasted aroma that signals readiness. Burnt butter will taste bitter, so remove it promptly once it reaches the right color.
- Allow the butter to brown until it smells toasted and is a deep golden color about 3 to 4 minutes: The aroma should be rich and nutty rather than acrid. Transfer the butter immediately to a heat proof bowl to stop further cooking, otherwise residual heat can carry it from browned to burnt. Leaving it in the hot skillet is a frequent oversight.
- Remove from the heat and transfer the butter to a heat proof bowl: Cooling in a separate bowl preserves the perfect browned flavor and prevents continued browning from the hot pan. The butter will glisten and smell toasty. If you forget this, the butter can darken beyond the ideal point.
- Combine the sugar and cinnamon in a shallow bowl: Mixing this while the popovers finish baking lets you quickly coat each warm pastry. The aroma will be sweet and warmly spiced. Make sure the granules are evenly combined so each popover gets a balanced coating.
- Brush each warm popover with browned butter then roll generously through the cinnamon sugar: The warm butter helps the cinnamon sugar stick and creates a thin, slightly caramelized crust. You will feel a slight tack as you brush then hear a faint crunch as you roll. If you wait too long and the popovers cool, the sugar may not adhere well and the coating will be less satisfying.
- Enjoy warm: The best texture contrast and flavor emerge when the popovers are freshly finished, with warm, crisp exteriors and soft interiors. Serve soon after coating to preserve that contrast. Storing and reheating can reduce the crispness, so plan to make them close to serving time.
Notes
- Preheat the pan fully — Heating the popover or muffin pan ensures the butter foams and the batter gets an immediate sear, promoting a dramatic rise and crisp bottoms.
- Room temperature liquids — Bring the milk and eggs to room temperature so they emulsify and create more lift when whisked together.
- Do not overmix after adding flour — Small lumps are okay, and vigorous mixing can develop gluten making the popovers tougher instead of tender and airy.
- Watch the brown butter closely — Butter goes from golden to burnt quickly, so remove it from heat and transfer to a cool bowl as soon as it becomes deeply aromatic and amber.
- Fill correctly — Fill the cups three quarters full to allow room for rise, overfilling will cause spillover and uneven texture.
- Serve immediately — These are at their best warm when the contrast between crisp shell and soft interior is most pronounced; make them close to serving time for the best experience.