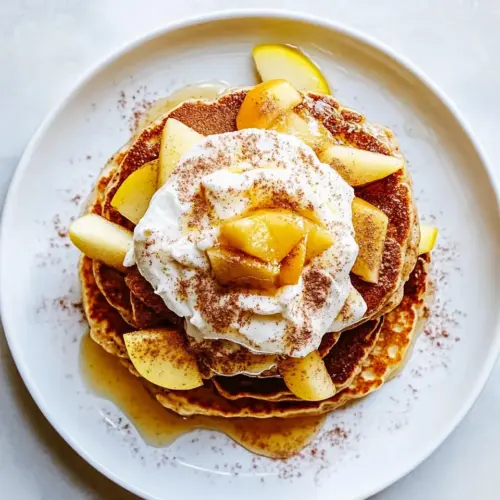
Cinnamon Pancakes with Apples and Meyer Lemon Whipped Cream
Cinnamon Pancakes with Apples and Meyer Lemon Whipped Cream are fluffy, warmly spiced pancakes topped with crisp apple and a bright, creamy Meyer lemon whipped cream. The batter yields tender, golden stacks while the lemon whipped cream adds a refreshing tang, making these perfect for an easy weekend brunch or a special autumn morning. Make them for a comforting yet elevated breakfast that feels worth making.
Equipment
- Cast-Iron Skillet
- Electric griddle
- Mixing Bowls
- Whisk
- Stand mixer with whisk attachment
- Ladle
- Spatula
Ingredients
- 2 cups all purpose flour Provide structure and bulk to the batter, forming the base of the pancakes; combine with leaveners and liquids to create gluten networks that give chew and body. Sift or whisk before measuring to ensure even texture and prevent lumps, which helps yield tender pancakes.
- 3 tablespoons sugar Add sweetness and help with browning during cooking, balancing the tartness and richness of other components; dissolve into the wet ingredients for even distribution throughout the batter. Measure precisely to avoid overly sweet pancakes that can mask delicate spices.
- 1 1/2 teaspoons baking powder Lighten the batter by producing carbon dioxide when reacting with acids, contributing to lift and a tender crumb; use with baking soda to create reliable rise. Make sure it is fresh and not clumped to ensure effective leavening action.
- 1 1/2 teaspoons baking soda Provide rapid leavening and work with acidic ingredients like buttermilk to create additional lift and a soft texture; help make pancakes light and airy. Activate at room temperature and mix into dry ingredients to ensure uniform distribution.
- 1 teaspoon ground cinnamon Add warm, aromatic flavor that complements the apples and lemon, enhancing the overall spice profile of the pancakes; infuse both batter and cooked cakes with subtle depth. Use a fine measure for balanced spice without overpowering the other flavors.
- 1 teaspoon fine grain sea salt Contribute seasoning and enhance all other flavors by balancing sweetness and acidity; also aid in strengthening gluten slightly for proper texture. Use fine grain sea salt for even incorporation and better dissolution in the batter.
- 2 1/2 cups well-shaken buttermilk Provide acidity and moisture that react with leaveners to create lift while adding tangy depth to the pancakes; hydrate the dry ingredients for the proper batter consistency. Shake well to ensure uniform thickness and measure at the surface to get accurate volume.
- 2 eggs Bind the batter, add richness, and contribute to structure through proteins that set during cooking; whisk lightly to incorporate air for a lighter pancake. Use room-temperature eggs if possible to emulsify more smoothly with other wet ingredients.
- 1 teaspoon good vanilla extract Bring aromatic sweetness and depth, enhancing the flavor complexity of the batter; pairs well with cinnamon and apples to round out taste. Use a good quality extract and measure carefully to avoid overly concentrated flavor.
- 4 tablespoons unsalted butter, melted and cooled (plus more for the skillet) Add rich, buttery flavor and tenderize the crumb by coating flour proteins and contributing fat; melt and cool to avoid cooking the eggs when mixed into the wet ingredients. Reserve extra for greasing the skillet to prevent sticking and encourage golden browning.
- 1 cup cold heavy cream Create a stable whipped cream when chilled and whipped, adding luxurious richness and lift to the topping; provide fat necessary for texture and volume. Keep cold until whipping to achieve the best peaks and fold gently with flavorings.
- 2 tablespoons sugar Sweeten and stabilize the whipped cream while enhancing flavor; dissolve into cream during whipping for uniform sweetness. Use measured quantity to avoid overly sweet topping and adjust to taste if needed.
- 1 tablespoon Meyer lemon zest (from about 2 lemons), plus more for sprinkling Provide bright, floral citrus aroma and concentrated lemon oil to the whipped cream, uplifting the cream with a distinct Meyer lemon note; zest from fresh lemons yields the best flavor. Zest carefully to avoid the bitter white pith and sprinkle additional zest for garnish.
- 2 teaspoons meyer lemon juice Add delicate citrus acidity to balance the richness of the whipped cream and pancakes, enhancing brightness without overwhelming; use fresh Meyer lemon juice for a sweeter, more floral lemon flavor. Measure and add sparingly to maintain the whipped cream’s stability.
Instructions
- Add flour, sugar, baking powder, baking soda, cinnamon and sea salt to a large bowl, whisking to combine. In a medium bowl, whisk together buttermilk, eggs and vanilla. Pour the wet ingredients into the dry ingredients, and mix just until combined (you'll still see a few lumps). Fold in the melted butter. If you've got the time, let the batter rest for 30 minutes.: Start with the dry mix because whisking them together distributes the leavening and spice evenly, which prevents pockets of flavor or uneven rise. As you whisk, notice the uniform pale tan color with tiny flecks of cinnamon , and smell the warm spice releasing from the bowl. A good whisk will make the surface look slightly aerated, which helps the wet ingredients incorporate without overmixing. Common mistake to avoid is dumping the wet ingredients into a not well-mixed dry base, which can lead to streaks of baking soda or powder and uneven texture.
- While the batter is resting, preheat a cast-iron skillet over medium-high heat or an electric griddle to 375°F. Brush the skillet lightly with melted butter. Using a ladle, pour pools of batter on the hot skillet. I can get 3 pancakes on a 12-inch skillet or 6 on a rectangular electric skillet. Adjust the size of your pancakes based on taste (I like mine not too small, but not too big). When the pancakes have bubbles on top and are slightly dry around the edges, about 1 to 2 minutes, flip over. Cook on the other side for an additional minute, until golden. Repeat with the remaining batter. You can keep the finished pancakes on a baking sheet in the oven at 175°F covered with a clean kitchen towel.: The wet mixture should look homogeneous and slightly frothy, with the yolk fully broken down so there are no streaks of yellow. The acid from the buttermilk will perfume the mix and the whipped surface indicates air that will yield tender pancakes. Use a fork or small whisk and blend until smooth, then sniff: the tang should be bright but not sharp. A typical slip is underwhisking, leaving lawns of separate whites and yolks that will not distribute evenly in the batter.
- While the pancakes are cooking, prepare the whipped cream. Add the cream, sugar, lemon zest and lemon juice to the bowl of a stand mixer fitted with the whisk attachment. Whisk on high until soft peaks form.: When you combine them, you want to stop while the batter still shows a few small lumps, because overmixing develops gluten and makes pancakes tough. Visually, the batter will change from powdery to a cohesive, slightly thick batter that flows slowly off your spoon. The surface should be matte, not glossy. One mistake is aggressive stirring to remove lumps, which yields rubbery pancakes; instead use a few folds until the major dry streaks are gone.
- To serve, fan out or stack up pancakes on a plate, then top with chopped Autumn Glory apples tossed in a little Meyer lemon juice. Finish with a drizzle of honey (or maple syrup) and a dollop of Meyer lemon whipped cream dusted with some fresh lemon zest. Enjoy warm!: Adding the cooled melted butter at this point enriches the batter and keeps it tender without cooking the eggs. As you fold, you will see the batter take on a silkier sheen and a faint buttery aroma. Use a spatula and gentle folding motions to avoid deflating the incorporated air. Avoid adding very hot butter which can scramble the eggs and create grainy bits.
- If you've got the time, let the batter rest for 30 minutes: Resting allows the flour to hydrate fully and the bubbles to relax, producing lighter pancakes with a more uniform crumb. During this time the batter may thicken slightly and the scent of cinnamon will deepen. If you are short on time you can skip this, but the texture will be a touch less tender. A common oversight is leaving batter to sit uncovered where it forms a skin; cover it lightly so the top stays moist.
- While the batter is resting, preheat a cast-iron skillet over medium-high heat or an electric griddle to 375°F: Preheating is crucial because a properly hot surface creates immediate contact browning and those desirable edges. You will hear a faint sizzle when batter meets the pan and see rapid bubble formation. Aim for a surface that yields a single steady sizzle, not a screaming hiss which indicates too-high heat. A frequent error is starting on a cold skillet which gives flat, pale pancakes.
- Brush the skillet lightly with melted butter: Butter in the pan browns and flavors the pancake edges; it also helps the batter release cleanly. The butter should foam lightly but not smoke. Visual cue: a shimmering coat across the skillet. Too much butter pools and fries the batter edges, so apply just a thin film.
- Using a ladle, pour pools of batter on the hot skillet: Ladling gives control over pancake size and ensures even cooking. As the batter hits the surface it should spread into a round and begin to form small bubbles within seconds. If it spreads too thinly the heat is too high or you used too much butter; if it barely moves the skillet is not hot enough. A common misstep is crowding the pan which lowers the temperature and steals color from the pancakes.
- When the pancakes have bubbles on top and are slightly dry around the edges, about 1 to 2 minutes, flip over: Look for bubble crowns and a drier ring at the edges as the signal to flip, rather than relying only on time. The underside should be golden, not pale. When you flip, listen for a confident sizzle and feel the lightness as the pancake releases from the pan. Flipping too early yields raw centers, while flipping too late risks burning the bottom.
- Cook on the other side for an additional minute, until golden: The second side cooks faster and sets the interior. Watch for a uniform golden brown and a slightly springy center when gently pressed. The aroma will shift from raw batter to toasted butter and cinnamon. Avoid extended cooking which dries the pancake out; a quick finish preserves a tender crumb.
- Repeat with the remaining batter: Maintain a steady pan temperature, adding a light brush of butter as needed between batches. Transfer finished pancakes to a rimmed baking sheet and keep them warm in a 175°F oven under a clean towel if you are making multiple batches. This prevents cold, soggy stacks. A pitfall is piling hot pancakes directly together which traps steam and softens the edges.
- While the pancakes are cooking, prepare the whipped cream: Cold heavy cream whisked with sugar, Meyer lemon zest, and lemon juice will transform into soft peaks that smell bright and floral. The sound changes as it whips from liquid sloshing to a heavier, thicker whip, and the bowl will show soft, billowy peaks when you lift the whisk. Overwhipping creates grainy butter; stop when the peaks barely hold their shape.
- To serve, fan out or stack up pancakes on a plate, then top with chopped Autumn Glory apples tossed in a little Meyer lemon juice: The apples add crisp freshness and a cold counterpoint to the warm stack. Tossing them in lemon juice prevents browning and adds brightness. Arrange them artfully so each bite includes fruit and pancake. A common mistake is chopping apples too large, which makes them dominate the bite instead of complementing it.
- Finish with a drizzle of honey and a dollop of Meyer lemon whipped cream dusted with some fresh lemon zest: The final touches bring balance, the honey melts into warm crevices while the whipped cream adds cool, bright creaminess. A light dusting of zest on top gives an aromatic flourish. Resist drenching the stack with syrup which masks the nuanced lemon and cinnamon interplay.
Notes
- Swap the fruit Use thinly sliced pears instead of apples for a softer, more delicate fruit note that pairs beautifully with cinnamon and Meyer lemon. Pears will soften quickly, so toss them in lemon juice and add them right before serving to keep a little texture.
- Use a different sweetener If you prefer a deeper flavor, try maple syrup in place of honey on the finished stack. I find maple brings a woodsy note, but honey emphasizes the floral and citrus interplay so choose based on what you want to highlight.
- Make them ahead Prepare batter and keep it refrigerated for a few hours, but bring it back to room temperature before cooking so the pancakes brown evenly. Resting longer can deepen flavor, just give it a quick stir before ladling.
- Change the grain Swap half of the all purpose flour for whole wheat pastry flour for a nuttier flavor and slightly heartier crumb, while maintaining tender pancakes. Expect a marginally denser texture and adjust liquid if needed.
- Adjust lemon intensity Increase the Meyer lemon zest by a half teaspoon for a brighter aroma, or reduce the juice slightly if you prefer a subtler acidity in the whipped cream. Fresh zest is the most impactful adjustment.
- Plate for brunch Serve pancakes stacked with apple slices fanned on top and a small ramekin of extra whipped cream on the side so guests can customize each bite. This makes the presentation feel intentional and interactive.