Christmas Cheesecake
Christmas Cheesecake is a creamy, festive dessert layered with bright cranberry compote and a crunchy pecan graham crust. Rich cream cheese filling meets white chocolate whipped cream for an elegant holiday centerpiece, perfect for special dinners and easy to prep ahead. Make it for gatherings to impress guests with seasonal flavor and silky texture.
Equipment
- 9-inch Springform Pan
- Aluminum Foil
- Large oven-safe dish for water bath
- Medium Saucepan
- Handheld Mixer
- Mixing Bowls
- piping bag with star tip
Ingredients
- 2 cups fresh cranberries Provide tart, juicy flavor and bright color to sauces or toppings; simmered down they release pectin to thicken a fruit compote. Pair with sugar and citrus to balance acidity and create a festive cranberry topping for the cheesecake.
- 3/4 cup water Add liquid to simmer cranberries and dissolve sugar; helps create a syrupy consistency for compotes or sauces. Use sparingly to control final thickness and prevent dilution of flavor.
- 1 1/2 cups granulated sugar (divided) Sweeten and balance cranberry sauce and batter; divided to sweeten different components without overpowering tartness. Adjust amounts slightly for preferred sweetness and texture in fillings and toppings.
- 2 tablespoons fresh orange juice Contribute fresh citrus acidity and aromatic brightness; enhances cranberry flavor and lifts sweetness in sauces or fillings. Use freshly squeezed for best flavor impact in compotes and glazes.
- 14 ounces whole berry cranberry sauce Provide a ready-made textured cranberry component with whole fruit; can be used as a shortcut layer or stirred into sauces for body. Use to add both sweetness and tart bursts in the cheesecake assembly.
- 1/3 cup granulated sugar Add controlled sweetness to whipped or cooked mixtures; dissolves reliably to balance tart ingredients. Use for moderate sweetness in fillings, sauces, or whipped components.
- 2 tablespoons fresh orange juice Introduce fresh citrus flavor and brightness to balance sweetness; enhances fruity notes and aroma in compotes and glazes. Use freshly squeezed to retain natural oils and freshness.
- 1 teaspoon fresh orange zest Provide concentrated citrus oils and aroma; zest adds fragrant, bright notes without extra acidity. Finely grate to avoid bitter pith and distribute flavor evenly.
- 1/4 teaspoons salt Enhance and balance flavors by reducing overall sweetness perception; small amounts heighten other flavors and stabilize mixtures. Dissolve completely to avoid gritty spots in fillings or toppings.
- 2 cups graham cracker crumbs Form the crumb base structure and provide crunchy texture; crumbs bind with butter to create a crisp, cohesive crust. Press firmly into the pan for an even foundation that supports the cheesecake filling.
- 1/2 cup finely chopped pecans Contribute nutty flavor and crunchy texture to the crust or topping; finely chopped pecans add richness and contrast. Toast lightly for deeper flavor before mixing into crumbs.
- 1/2 cup unsalted butter (melted) Bind crust ingredients and add fat for tenderness; melted butter helps set the graham cracker mixture when chilled or baked. Pour warm and mix thoroughly for an even coating of crumbs.
- 1/3 cup granulated sugar Sweeten the crust or topping mixture; balances cracker and nut flavors and can aid in browning if baked. Measure precisely to avoid an overly sweet base that competes with the filling.
- 1/2 teaspoon cinnamon Add warm, aromatic spice to the crust or filling; cinnamon pairs well with nuts and graham crackers to evoke holiday flavors. Use ground cinnamon sparingly to avoid overpowering the overall profile.
- 1/2 teaspoons salt Enhance overall flavor balance and stabilize components; a pinch of salt brightens sweetness and deepens other flavors. Distribute evenly in dry mixtures to avoid concentrated salty spots.
- 16 ounces cream cheese (room temperature) Provide creamy, tangy structure and richness to the cheesecake filling; room-temperature cream cheese whips smoothly for a silky texture. Beat thoroughly to remove lumps and ensure a homogeneous filling.
- 1 cup granulated sugar Sweeten and stabilize the filling; sugar helps create a smooth, set texture while balancing tanginess from cream cheese. Add gradually while beating to ensure full dissolution.
- 3 eggs (room temperature) Incorporate structure and richness while helping to set the cheesecake; eggs provide protein that firms the custard during baking. Use room-temperature eggs to blend evenly and minimize curdling risk.
- 1/3 cups sour cream Introduce tangy creaminess and contribute to smooth texture; sour cream lightens richness and adds a slight acidity that balances sweetness. Fold gently to maintain loft and prevent deflating the batter.
- 2 tablespoons all-purpose flour Add slight structure and help stabilize the filling; a small amount of flour can prevent weeping and give a silkier mouthfeel. Whisk in to avoid lumps and ensure even distribution.
- 1 1/2 teaspoons vanilla extract Enhance overall flavor with warm, sweet vanilla notes; vanilla extract rounds and deepens the taste of the cheesecake. Use pure extract for best aromatic complexity.
- 2 1/2 cups heavy cream (very cold, divided) Provide richness, creaminess, and volume to fillings and toppings; very cold heavy cream whips into stable peaks for mousses or whipped toppings. Reserve part for whipping and chill tools for best results.
- 1/2 cup powdered sugar Sweeten and stabilize whipped cream or mousses; powdered sugar dissolves quickly and prevents graininess. Sift if necessary to ensure smooth incorporation into cold cream.
- 4 ounces white chocolate baking bar (broken into smaller pieces) Add smooth, sweet white chocolate flavor and body when melted into creams or glazes; chopped pieces melt evenly and integrate into warm mixtures. Use high-quality baking bars for best texture and flavor.
- 1 tablespoon water Loosen melted chocolate and adjust consistency for glazes or sauces; small amounts of water help achieve a glossy finish without seizing. Add gradually and stir until homogeneous.
- 1 teaspoon unflavored gelatin Thicken and stabilize warm or cold gels and some whipped components; unflavored gelatin sets sauces, glazes, or mousse layers without altering flavor. Bloom properly in cold liquid before dissolving to ensure full gelling power.
Instructions
- In a medium saucepan on medium heat, add the water, 1/2 cup sugar, and orange juice. Bring to a simmer to dissolve the sugars. This will take 2 to 3 minutes. Turn off the heat and pour the sugar water over the fresh cranberries in a medium bowl. Cover with plastic wrap and refrigerate overnight. You will use the remaining 1 cup of sugar to coat the cranberries after their overnight soak.: As the syrup heats you will notice steam rising and the sugar fully dissolving creating a clear, fragrant liquid that smells citrusy. Once poured over the fresh cranberries they will begin to soften slightly and take on a glossy sheen, signaling they are absorbing the sweet orange syrup. This overnight soak mellows the berries and prevents them from becoming rock hard when sugared later. A common mistake is using hot syrup that is too warm when poured over the fruit, which can cause premature softening; let the syrup cool slightly if needed before pouring. The reason for this gentle soak is to infuse flavor without breaking the berry structure, preserving those pretty jewel like berries for garnish.
- Preheat the oven to 350°F. Wrap the outside of a 9-inch springform pan with aluminum foil. In a large, oven-safe dish, add 1 to 2 inches of water and set aside. You will NOT place your springform pan into the dish with the water. The dish with the water will go onto the lower rack in your oven, while the cheesecake will cook on the middle rack. This will create a moist baking environment for your cheesecake to cook evenly without risking water seeping into your springform pan while your cheesecake bakes.: Preheating fills the oven with consistent heat and the wrapped springform pan prevents leaks. The water in the separate dish will steam gently, producing a humid atmosphere that yields a silky texture and helps prevent cracking. You will hear a faint hiss as moisture circulates and notice a gentle warmth rather than dry heat. A frequent oversight is forgetting to seal the pan sufficiently, which risks water intrusion; ensure the foil is snug and double layered. This moist bake matters because it keeps the edges from overcooking while the center slowly firms.
- First, you will make your cranberry compote by adding the whole berry cranberry sauce, granulated sugar, orange juice, orange zest, and salt to a medium saucepan. Bring to a simmer on medium heat, and cook for 5 minutes or until the sugars are dissolved and the cranberry compote has thickened. Remove from the heat and cool while making the other components of the Christmas cheesecake.: As the compote simmers the aroma of citrus and berries will rise, and the sauce will bubble gently, reducing into a glossy, jam like texture. Watch for a rolling simmer and stir occasionally to prevent sticking; the mixture should thicken enough to coat the back of a spoon. If you over reduce it, the compote will become too stiff and can dry out in the finished cake, so pull it off the heat when it is still slightly loose; it will thicken as it cools. Cooling the compote before assembly prevents heat from loosening the crust and keeps the filling layers distinct.
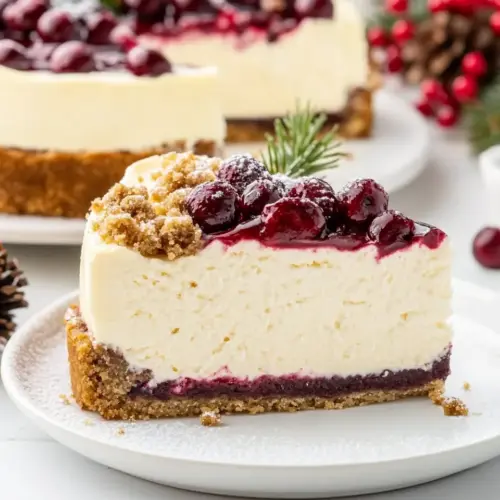
- In a large bowl, combine the graham cracker crumbs, finely chopped pecans, sugar, cinnamon, salt, and melted butter until completely incorporated. Pack the bottom and up the sides of the springform pan with the crust mixture. You can use the bottom of a flat dry measuring cup to press the crumbs into a thick, tight crust. Place the springform pan, with the crust pressed in, into the freezer to chill while you make the cheesecake filling.: When the crumbs and melted butter bind, the mixture will clump when pressed, and you will feel the compacted texture under your hand. Pressing firmly creates a dense base that will hold up to the wet filling without crumbling when sliced. Chilling the crust firms the butter and prevents the crust from shrinking during baking. A common error is underpressing the crumbs which can lead to a loose, crumbly edge; apply steady pressure for a tight seal. Freezing briefly also helps the crust keep its shape while you prepare the filling.
- In another large mixing bowl, with a handheld mixer on medium speed, add the cream cheese and beat for 1 to 2 minutes to get all the lumps out of the cream cheese before adding the granulated sugar. Continue to beat for another minute to incorporate the sugar into the cream cheese.: As you beat the cream cheese , it will go from lumpy to smooth and glossy, with a faint tang in the air. Removing lumps at this stage ensures a silky filling without grainy pockets. If the cream cheese is not room temperature, you will see stubborn lumps; always bring it to room temp first to avoid overbeating which can incorporate excess air. Properly smoothing the cream cheese sets the stage for a uniformly textured batter and prevents a curdled appearance during baking.
- With the mixer on low, add the eggs one at a time, being sure to fully incorporate each egg before adding the next, then add the sour cream, all-purpose flour, and vanilla extract and mix just until all the ingredients are fully incorporated. Be sure not to beat too much air into the cream cheese mixture.: The sugar will dissolve into the cream cheese , slightly thinning the mixture and adding a soft sheen. Keep the mixer at medium to avoid whipping too much air into the base, which can cause cracking as the cake bakes. A telltale sign of overmixing is an overly fluffy texture; stop once the sugar is fully incorporated and the mixture is smooth. This step sweetens uniformly and creates a stable foundation for the eggs to suspend in the batter.
- Take the crust out of the freezer and add the cooled cranberry compote mixture to the bottom of the crust in an even layer.: Adding eggs slowly creates a cohesive, dense batter and prevents over emulsification. You will notice the texture become silkier with each egg while remaining thick. Once you add sour cream and flour , the batter will smooth out and smell lightly tangy with vanilla. Avoid high speed mixing which whips air and leads to cracks; keep to low speed and stop as soon as the components are combined.
- Very slowly, add the cream cheese mixture on top of the cranberry compote layer. Be careful not to mix the compote into the cream cheese.: Spreading the compote creates a vivid, ruby layer that should sit flat in the chilled crust. The cool compote will feel tacky and glossy, and a flat bed ensures the filling will sit evenly. If the compote is too warm it will loosen the crust, so confirm it is cooled before layering. This separate compote layer gives each slice a burst of cranberry flavor instead of the flavor being mixed into the filling.
- Place the water-filled dish onto the bottom tray of the oven, then place the Christmas cheesecake on the middle rack and bake for 50 to 60 minutes. Your cheesecake is done when the center is just barely jiggly when you move your springform pan.: Pouring or spooning the batter gently prevents swirls that would muddle the layers, preserving the visual and textural contrast. You will see the thick batter nestle over the compote without sinking entirely, and the surface should be smooth after gentle taps. A common slip up is stirring the layers together which reduces the intended tart heart; take your time and smooth with gentle strokes only.
- Turn off the oven and crack the door open a couple of inches to allow your cheesecake to cool in the oven for 1 hour. Remove and allow to cool on the counter before placing it into the refrigerator to cool completely.: As it bakes, the edges will set and take on a faintly golden hue while the center remains slightly wobbly, a sign of perfect doneness. The humid oven will prevent crust drying, and you may notice a subtle aroma of dairy and citrus. Overbaking will make the cake dry and prone to cracks, so rely on the gentle jiggle test rather than strictly timing alone. The slight wobble indicates the center will finish setting as it cools, giving a creamy outcome.
- While your cheesecake is baking and cooling, you can make the white chocolate whipped cream by adding 2 cups of heavy cream to a large bowl and beating it on low speed for 2 minutes. Add the powdered sugar and increase the speed to medium-high and continue to beat it until it is thick with just slightly stiff peaks. Do not overbeat.: Slow cooling prevents thermal shock which causes cracking. You will feel a gradual reduction in warmth and notice the surface settle without collapsing. Leaving the door ajar creates a gentle descent in temperature and helps maintain smoothness. A common mistake is rushing to refrigerate a hot pan which traps steam and can lead to moisture problems, so let the cake rest at room temperature first.
- Heat the remaining 1/2 cup of heavy cream in a microwave-safe, large-sized bowl for 1 minute. Once hot, add the white chocolate bar that has been broken into smaller pieces. Allow the hot heavy cream to cover the chocolate and let it sit for 2 minutes, then stir until smooth.: As you whip the heavy cream , it will transition from glossy liquid to soft, billowy peaks that cling to the whisk. Adding powdered sugar sweetens and stabilizes the cream, and you will hear a change in the mixer tone as the cream thickens. Overwhipping will cause the cream to break into butter; stop when you see just slightly stiff peaks that hold shape but still look silky.
- In a small dish, add the 1 tablespoon of water and sprinkle over the unflavored gelatin. Once the gelatin has absorbed the water, heat it for 20 seconds in the microwave, then add it to the bowl of melted white chocolate. Stir to completely incorporate.: After a minute the cream should be steaming and the white chocolate will soften under the heat, melting into a glossy, pale sauce when stirred. The aroma will be sweet and milky. Stir patiently until the chocolate is fully incorporated to avoid grainy spots. If the chocolate does not fully melt, heat in short bursts and stir; overheating can separate the chocolate and ruin the emulsion.
- Add about 1 cup of the whipped heavy cream to the white chocolate and stir to combine. Add another 1 cup of whipped cream, but this time you will gently start to fold the whipped cream into the white chocolate. Repeat until you have gently folded all the whipped cream into the white chocolate. Be sure to be gentle while folding the whipped cream into the white chocolate, as you do not want to deflate your white chocolate whipped cream.: Blooming the unflavored gelatin ensures it dissolves completely and sets the whipped topping. After heating the gelatin briefly it will liquefy and blend into the white chocolate mixture without clumps. If you skip this blooming step, you risk grainy gelatin bits in your topping. Fully incorporating the gelatin stabilizes the cream so the piped decoration holds between slices.
- Transfer half of your white chocolate whipped cream to a large piping bag fitted with a large star tip, and store the piping bag and bowl of whipped cream in the refrigerator until your cheesecake has cooled completely.: The first portion of whipped heavy cream loosens the white chocolate, and subsequent gentle folding maintains volume while creating a homogeneous, silky mixture. You will notice a smooth, pale pinkish white color and a satiny texture when combined properly. Vigorous mixing will deflate the cream, leading to a flat topping; fold with broad strokes, turning the bowl as you go to preserve air and lightness.
- Once your cheesecake has cooled to room temperature on the counter, you can top it with the other half of the white chocolate whipped topping that is not in the piping bag. You want a nice thick layer.: Chilling the topping firms it slightly and makes piping easier, producing crisp shells that hold detail. The cream should feel cool and slightly firm when pressed. If it is too soft, the piped shapes will collapse; if too stiff, they will crack. Keeping one portion ready to pipe ensures a neat finish when your chilled cheesecake is ready to decorate.
- Place your cheesecake into the refrigerator to cool for a minimum of 8 hours, but an overnight chill is ideal.: Spreading the topping creates a silky cap that visually unites the cake. The surface should look smooth and inviting, with a gentle shine. A thin layer will not hide small imperfections and will make the cake taste unbalanced, so aim for a generous spread. This thick layer also provides a stable base for piping and the sugar coated cranberries.
- For the sugar-coated fresh cranberries, you will drain the liquid off them and, using a slotted spoon, toss a handful of the sweetened cranberries into a bowl of the 1 cup granulated sugar and coat them in the sugar. Remove the sugar-coated cranberries with the slotted spoon, allowing any excess sugar to filter back into the bowl, and place the coated berries onto a plate. Repeat until all the cranberries have been coated.: Extended chilling allows the filling to firm to a sliceable consistency and helps meld the flavors, resulting in a denser, clean slicing texture. You will notice the aroma becomes more integrated after resting. Cutting too soon yields weeping or a soft center, so patience here directly improves presentation and mouthfeel.
- Once your cheesecake has completely chilled and set, you can remove the outer form from the springform pan, place your cheesecake onto a serving plate and garnish the center with the sugar-coated cranberries and pipe the remaining white chocolate whipped cream around the edges for a beautiful finish.: The sugaring process creates a sparkling, crunchy exterior on the fresh cranberries , and you will see the crystals cling and glitter. Work in small batches for even coating and let them dry briefly so the sugar sets. Avoid oversoaking the berries or they will become syrupy rather than crunchy; drain thoroughly before tossing in sugar. These sugared berries make a dramatic, festive garnish.
- Once your cheesecake has completely chilled and set, you can remove the outer form from the springform pan, place your cheesecake onto a serving plate and garnish the center with the sugar-coated cranberries and pipe the remaining white chocolate whipped cream around the edges for a beautiful finish: Releasing the outer ring reveals smooth sides and a neat crust; if the pan resists, run a thin knife around the edge first. Arrange the sugar coated cranberries in the center like holiday jewels and use the piped whipped cream to create a decorative border. The final presentation should look polished and festive. If the cake stuck to the pan, chilling longer would have helped; always allow full refrigeration time before unmolding.
Notes
- Chill times matter Letting the cake rest overnight in the refrigerator yields a firmer texture and cleaner slices, and it allows flavors to marry for a more pronounced cranberry and orange profile.
- Prevent cracks Use a water bath in a separate dish on the lower rack to provide humidity in the oven; it helps the cake cook gently and keeps the surface smooth and crack free.
- Room temperature ingredients Bringing cream cheese, eggs, and sour cream to room temperature prevents lumps and reduces mixing time, producing a silkier filling.
- Stabilize the topping Blooming the unflavored gelatin and incorporating it into the melted white chocolate creates a stable whipped topping that pipes cleanly and holds shape on slices.
- Prep ahead Make the compote and crust a day early and store them separately; assemble the next day for a relaxed schedule and a more rested flavor profile.