Christmas Candy Cane Bark
Christmas Candy Cane Bark is a creamy, colorful holiday treat with crunchy peppermint, nutty pistachios, and chewy cranberries. This easy festive candy is perfect for gift giving, cookie exchanges, or last minute parties, delivering vibrant swirls and satisfying texture in just minutes. Make it for holiday guests and enjoy a sweet, minty crowd pleaser that looks like you spent hours crafting it.
Equipment
- Aluminum Baking Sheet (2 pack)
- Parchment Paper
- Keep Calm And Bake On Spatula
Ingredients
- 12 ounce white candy melts Melted and silky, provides the sweet, creamy white base for the bark and helps bind toppings; temper gently to maintain a smooth glossy finish and prevent graininess. Adds sweetness and visual contrast against red and green swirls, making the finished bark look festive and polished.
- 4 ounce red candy melts Vibrant and smooth, offers concentrated red color and sweet flavor for festive swirls or stripes; melt carefully and spoon or pipe to create candy cane patterns. Enhances visual appeal and balances the white base while contributing a slightly firmer texture when set.
- 4 ounce green candy melts Bold and colorful, supplies the green accent for holiday-themed swirls or stripes and adds bright contrast to the white base. Melts to a smooth consistency suitable for decorating; use sparingly to control overall sweetness and color intensity.
- 1/4 cup pistachios (chopped) Crunchy and nutty, contributes texture and a mild savory note that contrasts the sweetness of the candy melts; chop uniformly to ensure even distribution across the bark. Adds visual green flecks and enhances mouthfeel, helping to balance the overall flavor profile with a toasty finish.
- 1/4 cup cranberries (dried, chopped) Chewy and tart, provides bursts of cranberry flavor and a chewy counterpoint to the smooth chocolate-like melts; chop into small pieces so they incorporate evenly. Introduces red color specks and a pleasant acidity that cuts through the sweetness for a well-rounded treat.
- 1 ounce candy cane pieces (crushed) Icy and brittle, supplies classic peppermint flavor and crunchy texture when sprinkled on top; crush finely for even coverage and to prevent large shards. Reinforces the candy cane theme and leaves aromatic peppermint notes that brighten each bite.
Instructions
- Line a 9 x 13 baking sheet with parchment paper.: I love the crisp sound parchment makes as I smooth it into the pan, and it creates a nonstick surface so the bark peels away cleanly. Make sure the sheet lies flat, without folds that can imprint the candy. If the parchment shifts while you pour the melted candy, it can create waves in the surface, so press it into the corners firmly before you begin.
- Place the white candy melts, red candy melts and green candy melts in 3 different microwavable bowls. Microwave the bowl with candy melts for 1 minute at 50% power. Stir, they won’t look melted, but stir anyway. Place back in the microwave for another 30 seconds at 50% power. Stir again. The candy melts should begin to melt. Place back in the microwave and melt for another 30 seconds at 50% power. Stir again until smooth. Repeat if candy melts are not completely melted.: You will notice the smooth plastic glint on the bowls as you set them out, and separating colors prevents cross contamination and dulling of hues. Use shallow bowls so the candy melts heat evenly. A mistake here is crowding too much candy into a small bowl, which leads to uneven melting and hot spots.
- Pour the melted white chocolate onto the prepared baking sheet and spread it evenly with a spatula over the entire baking sheet, leaving a couple inches around the edges.: After the first minute, the surface will look glossy with small pools forming, and there may be unmelted bits that look opaque. Let the bowl rest for a few seconds, then stir to promote even melting. Overheating is the most common error, it can make the candy grainy and clumpy, so always use reduced power and short intervals.
- Spoon a couple tablespoon dollops each of the melted red and green chocolate candy melts, alternating colors, three across and about four rows if you can fit them in.: You will feel the texture change as the warmth softens the candy, and stirring helps residual heat finish the job. The candies will loosen and start to become smooth, but you may still see a few solid pieces. If you skip stirring, pockets of unmelted candy remain, which causes uneven spreading later on.
- Take a skewer stick and swirl the red dollops, spreading them out and do the same with the green dollops.: The second burst often brings the candy closer to a pourable consistency, with a gentle sheen and thicker ribbons when you stir. Use a clean spatula to mix and avoid splashing. If you rush and use full power, the candy can scorch or seize, becoming grainy and unusable.
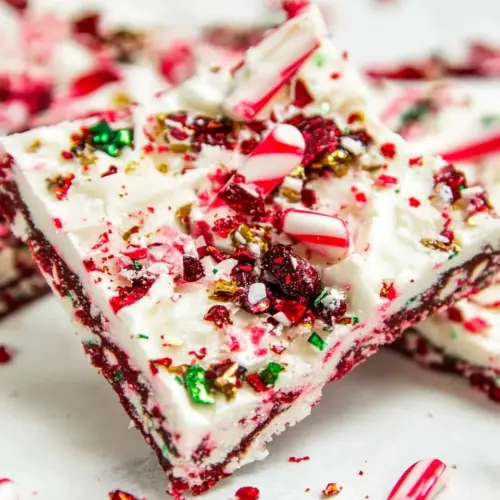
- Sprinkle the crushed pistachios over the top, then the chopped cranberries and top off by sprinkling the crushed candy cane pieces overtop.: The bowl will begin to release fragrant hints from the added coloring and flavorings, and the movement makes the mixture glossy. Stir until the texture is smooth and runny, but still viscous enough to stay where you place it. Be mindful that overmixing does not harm the candy, but excessive heat does, so keep the microwave time minimal.
- Refrigerate again until cool enough to break the bark into pieces. Should harden pretty quickly, in about 10 to 20 minutes.: Now you will see ribbons of melted candy and a few soft lumps; this is the perfect cue to continue in short intervals. The smell is sweet and slightly buttery, signaling that the candy is nearing readiness. If it looks grainy rather than smooth, stop microwaving and whisk gently to see if it smooths out, otherwise return in very short bursts.
- Place back in the microwave and melt for another 30 seconds at 50% power: By this point the candy should be mostly fluid, with a shiny, uniform surface when stirred. If a couple stubborn bits remain, chop them with your spatula and gently warm again. The biggest mistake is overheating to force complete melting in one blast, which can ruin the glossy finish.
- Stir again until smooth: A smooth, luscious flow is what you want for easy spreading and pretty swirls. Use long strokes with your spatula to incorporate all lumps, and watch for a satin sheen that indicates proper melting. If the mixture starts to look matte or crystallized, it may have overheated previously and could set with a grainy bite.
- Repeat if candy melts are not completely melted: Patience pays here, and repeating short heat-and-stir cycles will preserve texture. The candy should never be aggressively hot to the touch, only pleasantly warm and spreadable. If you try to rush it, the result can be seized candy which becomes thick and unpleasant to spread.
- Pour the melted white chocolate onto the prepared baking sheet and spread it evenly with a spatula over the entire baking sheet, leaving a couple inches around the edges: As you pour, you will hear a quiet settling sound, and the glossy white will flow like cream across the parchment. Use a firm, flat spatula to coax it into an even layer, looking for uniform thickness so pieces break consistently. Leaving space around the edges prevents overflow, and if you press too hard you can create ridges that will show up in the finished bark.
- Spoon a couple tablespoon dollops each of the melted red and green chocolate candy melts, alternating colors, three across and about four rows if you can fit them in: The contrast of bright red and green dollops against the white is visually striking, and arranging them in rows helps achieve a patterned swirl. Use the back of a spoon to form tidy dollops, and place them promptly before the white starts to cool and set. If the base has already stiffened, your dollops will sit unevenly and resist swirling properly.
- Take a skewer stick and swirl the red dollops, spreading them out and do the same with the green dollops: The motion creates marbled ribbons of color, and you will see thin veins of red and green weave through the white base. Work gently so the colors mingle without mixing into brownish streaks, and aim for graceful arcs rather than frantic scribbles. Overworking the surface can muddy the colors, so stop when you like the pattern.
- Sprinkle the crushed pistachios over the top, then the chopped cranberries and top off by sprinkling the crushed candy cane pieces overtop: This is where texture comes alive, with the nutty crunch, chewy fruit, and peppermint shards combining into festive bites. Scatter evenly so every piece gets a little of each topping, pressing lightly so toppings adhere but do not sink. A common misstep is waiting too long to add toppings, which can prevent them from sticking properly.
- Refrigerate again until cool enough to break the bark into pieces: Place the sheet in the fridge and listen for the quiet hum as the candy firms. It should harden in about 10 to 20 minutes; you want it set through but not cold to the point of condensation when removed. If you leave it too long in a humid fridge, moisture can form, so pop it into an airtight container soon after breaking to preserve texture.
Notes
- Melting power matters, always microwave at reduced power in short intervals to maintain a glossy finish rather than a grainy texture.
- Separate bowls for colors, keep each color in its own bowl to preserve vibrant hues and avoid accidental color blending.
- Prepare toppings ahead, have pistachios, cranberries, and crushed candy cane ready so you can sprinkle immediately once the base is spread.
- Work quickly when swirling, the white base firms as it cools, so create your swirls while the surface is still soft and glossy.
- Storage, keep finished bark in an airtight container with layers separated by parchment, and it will remain fresh for a couple weeks.