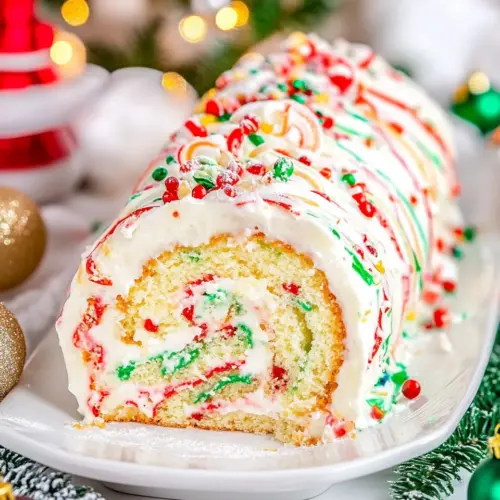
Christmas Cake Roll
Christmas Cake Roll is a tender, festive sponge rolled with a creamy, tangy cream cheese filling and finished with glossy white chocolate and colorful sprinkles. This easy to slice dessert delivers soft sponge, smooth filling, and playful crunch, perfect for holiday gatherings and easy weeknight celebrations. Make ahead friendly and crowd pleasing, it is a joyful reason to bake this season.
Equipment
- Jelly Roll Pan
- Parchment Paper
- Handheld electric mixer
- Mixing Bowls
- Cooling rack
- Microwave-safe Bowl
Ingredients
- 3 large eggs Whisk vigorously to incorporate air and provide structure for the cake batter, creating a light and tender crumb when beaten with sugar.
- 1/2 cup granulated sugar Sweeten evenly and help with aeration when creamed with eggs, contributing to tenderness and caramelization during baking.
- 1 tablespoon vegetable or canola oil Bind and add moisture while contributing a subtle richness and tenderizing effect to the cake batter without overpowering flavor.
- 1 teaspoon vanilla extract Impart a warm, familiar aroma and enhance other flavors in the batter, balancing sweetness and rounding the overall taste profile.
- 3/4 cup all-purpose flour Provide the primary dry structure and bulk for the cake, supplying gluten and starch that form the cake’s framework.
- 1 teaspoon baking powder Leaven gently to create lift and fine crumb by releasing gases during baking, ensuring the roll rises properly without heavy texture.
- 1/4 teaspoons salt Enhance overall flavor balance and strengthen gluten control in small amounts to prevent the cake from tasting flat or overly sweet.
- 1 tablespoon Christmas sprinkles, or as desired Add colorful festive crunch and visual appeal, offering slight texture contrast and a celebratory look when folded into the batter.
- 8 ounces cream cheese, softened to room temp (use brick style cream cheese, nothing lite or spreadable) Cream until smooth to create a rich, tangy filling base that adds moisture, stability, and depth of flavor to the frosting.
- 6 tablespoons unsalted butter, softened to room temp Soften and whip with cream cheese to create a smooth, stable, and creamy filling that contributes richness and structure.
- 1 cup confectioners’ sugar, sifted Sweeten and stabilize the cream cheese filling while ensuring a silky, spreadable texture; sifting prevents lumps for a smooth finish.
- 1 teaspoon vanilla extract Flavor and scent the filling with warm, familiar vanilla notes that amplify sweetness and complement the cream cheese.
- 2 tablespoons Christmas sprinkles, or as desired Provide festive color and a light crunchy texture to the filling, enhancing appearance and delivering small bursts of sweetness.
- 1/2 cup Ghirardelli White Chocolate Melting Wafers Melt to create a glossy, sweet coating or drizzle that adds sweetness and visual contrast with a creamy white chocolate flavor.
- OR 1/2 cup white chocolate chips + 1 teaspoon coconut oil, oil is optional but highly recommended if using chocolate chips Melt with optional oil to create a smooth drizzle; oil helps lower viscosity for easier coating and a shiny finish if using chips.
- 2 tablespoons Christmas sprinkles, or as desired Decorate and finish the roll with additional festive color and crunch, creating a celebratory appearance and slight texture contrast.
Instructions
- Preheat oven to 375 F and line a 10 x 15 x 1-inch jelly roll pan with parchment paper, making sure to keep an overhang of 1 to 2 inches. I spray the parchment paper with cooking spray but it's optional. Set pan aside.: The oven warming fills the kitchen with a faint dry heat and signals you to prepare the pan right away. You want a dark golden sponge so the 375 F setting provides quick lift without drying the cake. The parchment overhang is crucial for lifting the hot cake off the pan without tearing it, and spraying the paper lightly can help the cake release. A common mistake is using a pan of different size, which alters baking time and leads to underdone or overbaked sections, so confirm pan dimensions before starting.
- Cake – To a large bowl, add the eggs, sugar, oil, vanilla, and whisk or beat with a handheld electric mixer until smooth and pale yellow; set aside momentarily.: As you beat these, the mixture will transition from syrupy to pale and airy, with ribbons forming when you lift the beaters, indicating good incorporation of air. This aeration is what gives the sponge its delicate crumb. Avoid overbeating to the point of drying out the mix, and do not add cold ingredients because that can reduce volume. If the batter looks too thin, rest for a minute to let air pockets stabilize before combining with the dry mix.
- To a separate bowl, add the dry ingredients, including the flour, baking powder, salt, and whisk to combine.: Whisking creates an even distribution of leavener and salt, so there are no pockets that make the cake rise unevenly. The combined dry mixture should smell faintly of grain and have a uniform sandy texture. A common oversight is failing to remove lumps in the flour, which can cause dense pockets; a quick sift or vigorous whisk eliminates this risk.
- Add the dry ingredients to the wet, whisking or mixing just enough to combine, but don't overmix.: As you fold, the batter should become homogenous and slightly thicker, with no streaks of flour showing. Overmixing develops gluten and will result in a tougher cake, so stop as soon as the mixture looks smooth. If you see long elastic strands, you likely overworked it, and the sponge may be less tender once baked.
- Add the sprinkles and stir to combine.: Fold in the Christmas sprinkles gently so they disperse without melting into the batter, which keeps the color bright. The batter will look festive with tiny flecks throughout, and those flecks add pockets of extra texture after baking. Avoid vigorous stirring which can crush delicate sprinkles and cause color bleeding into the batter.
- Turn the batter out into the prepared pan and bake for 10 to 12 minutes, or until cake bounces back slightly when touched.: The oven will release a warm, sweet aroma as the cake sets, and the top should feel lightly springy to the touch when done. A toothpick test can be misleading with such a thin cake, so rely on that gentle bounce and a pale golden color. Overbaking will dry the sponge and increase the chance of cracking when you try to roll it.
- Roll Up (First Time) – Immediately (use hot mitts) lift the entire sheet of parchment paper off the jelly roll pan, place it on the counter, and from the short side (10 inch side), roll up the cake as tightly as you can. Note – You are rolling up the cake WITH the parchment paper in it; this comes out later, don't worry. * (See Notes for Rolling Tips): Immediately use hot mitts lift the entire sheet of parchment paper off the jelly roll pan place it on the counter and from the short side roll up the cake as tightly as you can : When you lift the pan the steam will escape and the cake will still be pliable, making the initial roll smooth and forgiving. Rolling with the parchment paper protects the cake surface and helps shape it into a neat spiral, like curling a warm ribbon. If you wait too long and the cake cools, it becomes brittle and is likely to crack during rolling, so act promptly but carefully.
- Place the rolled cake, seam side down, on a cooling rack to cool for 1 to 2 hours, or until it's fully cooled. Tips – Don't rush the cooling process because you want the cake to really set, kind of like your hair in hot rollers, don't remove until fully cooled for best results. Plus, a warm cake will melt the filling in the next steps, which is also undesirable.: As it cools the cake settles and firms up, and you will notice a slight reduction in steam and the sponge becoming less springy. Cooling fully ensures the filling does not melt later and helps the roll hold its shape. Rushing this step risks a warm interior that will cause the cream cheese filling to become runny when applied.
- Cream Cheese Filling – While your cake is cooling in the final moments, you can make the cream cheese filling. To a large mixing bowl, add the cream cheese, butter, and beat with a handheld electric mixer, until smooth and fluffy. Tip – Make sure you are starting with very well-softened, room temperature ingredients, or this is nearly impossible to achieve.: While your cake is cooling in the final moments you can make the cream cheese filling to a large mixing bowl add the cream cheese butter and beat with a handheld electric mixer until smooth and fluffy : As you whip these together the mixture will transform from chunky to glossy and pillowy, with a soft dairy scent lifting as air is incorporated. Using truly room temperature cream cheese and unsalted butter makes this process fast and results in a silky texture. If either ingredient is too cold you will struggle to blend them and risk lumps in your filling.
- Add the sifted confectioners' sugar, vanilla, and beat until smooth and fluffy. Tip – Make sure to use sifted confectioners' sugar or your cream cheese filling may look lumpy.: The filling will thicken and become spreadable, smelling sweet and creamy with a hint of vanilla. Sifting prevents grainy pockets and ensures the filling passes the knife test smoothly. If the mixture seems too loose, refrigerate briefly, but avoid overchilling which can make spreading difficult.
- Unroll the cooled cake.: The unrolling reveals a smooth interior surface ready for filling, and you should do this gently to avoid tearing. The cake will feel cool and slightly elastic, and the parchment will peel away cleanly if you rolled with it the first time. If the cake resists unrolling, it probably needs a bit more time to cool fully, so be patient to prevent ripping.
- Spread the cream cheese filling evenly over the interior flat surface. Spread it nearly to the perimeter but not quite, and leave a 1/2-inch bare margin.: As you spread, the filling should glide and leave a glossy, even layer that comes close to the edge without touching it, leaving a 1/2 inch margin. The filling's texture will be smooth and slightly dense, providing contrast to the light sponge. Piling too much filling on the first roll can make the second roll loose or cause the filling to squeeze out when you roll.
- Evenly sprinkle the sprinkles over the cream cheese filling.: The sprinkles add pops of color within the spiral and a faint crunch against the soft filling. Scatter them consistently for an even visual when sliced. Concentrating them in one spot will create an uneven cross section and distract from the clean swirl.
- Roll Up (Second Time) – Roll up the cake again, this time do NOT roll it up with the parchment paper. Roll just the cake itself.: Roll up the cake again this time do NOT roll it up with the parchment paper roll just the cake itself : This second roll forms the dessert's final shape, and you will feel the filling compress slightly as it nests into the spiral. Rolling without parchment gives a cleaner exterior for glazing. If you roll too loosely the cake may unspool when resting, so keep steady tension.
- Allow the cake roll to rest and set for about 30 minutes, seam side down. Tips – I personally wrap it with plastic wrap and place it in the fridge to really set it with the cool air. This also helps set the cream cheese filling.: Resting helps the filling set and the sponge relax, and placing the roll in the refrigerator speeds this process while firming the filling. You will notice the roll becoming more stable and the seam adhering. Skipping this rest can make slicing messy because the filling will not be fully set.
- White Chocolate – After the cake has rested/chilled, to a medium microwave-safe bowl, add the Ghirardelli White Chocolate Melting Wafers (strongly recommended) and heat in the microwave according to package directions, and the white chocolate can be stirred smooth. Alternatively, add white chocolate chips plus coconut oil (or shortening like Crisco) to a microwave-safe bowl, and heat in 15 second bursts, until the white chocolate can be stirred smooth; do not overheat because the chocolate will have a tendency to seize and you will have to start over.: After the cake has rested chilled to a medium microwave safe bowl add the Ghirardelli White Chocolate Melting Wafers and heat in the microwave according to package directions and stir smooth : The melted wafers will be glossy and fluid, releasing a sweet milky aroma that complements the tang of the filling. If using chips plus coconut oil warm in short bursts stirring frequently until smooth, and be vigilant to avoid overheating which causes seizing. If the chocolate thickens or becomes grainy it has likely been overheated and will not set properly.
- Evenly spread or drizzle the melted white chocolate over the top of the cake roll.: The warm chocolate will coat the surface with a creamy sheen and begin to set within minutes, sealing in the look and creating a contrast between the cake and glaze. Work quickly for an even finish, and use a spoon or offset spatula for control. Pouring too much at once can create pools that take longer to set and may attract stray sprinkles into clumps.
- Evenly add more sprinkles sprinkles.: Press the sprinkles lightly into the warm chocolate so they adhere as it firms, adding the final festive touch. The sprinkle texture with the smooth white chocolate gives a pleasing interplay in each bite. Be mindful that some sprinkles may bleed color if wet, so choose stable varieties for the cleanest appearance.
- Allow the white chocolate to fully set before slicing and serving. Christmas cake roll will keep airtight in the refrigerator for up to 5 days. Note – Depending on the quality of the sprinkles used, they may have a tendency to run and bleed, making the visual appearance not quite as desirable. However, the taste will be fine.: Once the glaze is set you will have a firm outer shell and a creamy interior that slices cleanly, revealing the spiral inside. The cake keeps airtight in the refrigerator for up to 5 days, and the resting period lets flavors meld for a more cohesive taste. Cutting too soon risks smearing the glaze and compressing the roll into an uneven slice.
Notes
- Measure carefully: Use proper measuring cups for dry and liquid ingredients so the sponge bakes evenly and the texture is predictable.
- Room temperature dairy: Let the cream cheese and unsalted butter come fully to room temperature to ensure the filling whips smooth and lump free.
- Work quickly with chocolate: Melt the white chocolate in short bursts and stir frequently to prevent overheating and seizing, keeping a small bowl of warm water nearby to gently warm the bowl if needed.
- Choose sturdy sprinkles: Pick non dyed or high quality sprinkles so colors do not bleed into the batter or filling, preserving the cake's visual appeal.
- Wrap while resting: After the second roll, wrap the cake in plastic wrap and refrigerate for about 30 minutes to help the filling firm and make slicing easier.
- Lift with parchment: Ensure the parchment overhang is at least 1 to 2 inches so you can lift the hot cake without tearing it, which is a lifesaver for neat presentation.