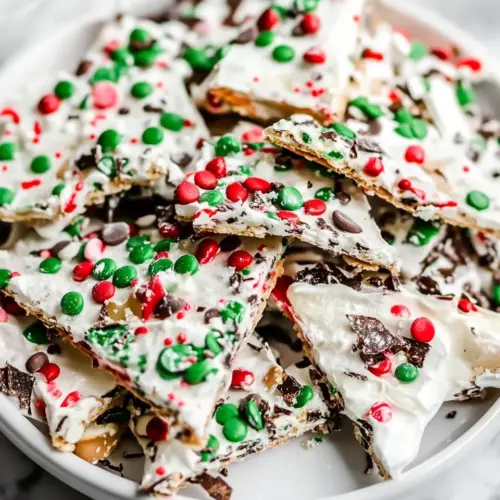
Christmas Bark
Christmas Bark is a creamy, colorful holiday treat with crispy pretzels, crunchy cookies, and minty candies combined in glossy white chocolate. This easy make ahead confection is perfect for gifting or serving at parties, delivering bright festive looks and a satisfying textural contrast. It is a simple crowd pleaser you will want to make every season.
Equipment
- Kitchen Scale
- Baking Sheet
Ingredients
- 7 Red Holiday Oreos 79 grams, broken into pieces Broken into pieces and scattered throughout the bark to provide crunchy chocolate cookie bits and festive red color contrast; pairs well with white chocolate for textural interest. Enhances holiday theme and adds familiar Oreo flavor that complements mint elements in the recipe.
- 7 Cool Mint Oreos 79 grams, broken into pieces Broken into pieces and folded into the melted chocolate for refreshing minty cookie crunch and vibrant green accent. Balances sweetness with cool mint flavor and contributes visual contrast against the white chocolate base.
- 11/2 cups stick pretzels 60 grams Used whole or halved to add salty crunch and a sturdy base texture that contrasts with sweet chocolate and candy inclusions. Provides a salty-sweet component that helps break up richness and adds a pleasing crunch in every bite.
- 1/2 cup peppermint baking chips 85 grams — Andes recommended Melted or sprinkled over the bark to deliver concentrated peppermint flavor and smooth melting chips ideal for embedding other mix-ins. Adds authentic peppermint taste and helps bind toppings while offering small bursts of mint.
- 1/2 cup mint M&M's 85 grams, divided Divided so some pieces are mixed into the chocolate and some are reserved for decorating the top, supplying minty candy crunch and colorful green accents. Contributes both texture and festive visual appeal while reinforcing mint flavor.
- 1/2 cup peanut M&M's 85 grams, divided Divided so some are folded into the white chocolate and some are used as surface decoration to add peanut flavor and crunchy texture. Introduces a nutty, savory element that balances sweetness and increases the variety of bite experiences.
- 1 pound white chocolate baking bars 454 grams — Ghirardelli recommended Melted into a smooth base to coat and bind all mix-ins, delivering creamy sweetness and a pale canvas for colorful toppings; high-quality bars ensure a glossy finish and stable set. Forms the primary structural component of the bark and carries flavors evenly.
- 2 tablespoons red and green sprinkles 24 grams Sprinkled over the finished bark to provide bright red and green finishing touches for holiday presentation and a slight crisp texture. Enhances visual appeal and signals festive flavor expectations while adding tiny crunchy bursts.
Instructions
- Cover a large baking sheet with wax paper (I recommend wax paper, but parchment sprayed with nonstick spray will work in a pinch!): The wax paper provides a nonstick surface that allows the completed Christmas Bark to release cleanly when set. As I lay the sheet down there is a tactile comfort to creating a workspace, and the thin layer of paper prevents the chocolate from bonding to metal, which would make removal messy. If you use parchment sprayed with nonstick spray instead, expect a slightly firmer grip, so check edges carefully when lifting. A common mistake is skipping the liner, which can result in pieces that tear when you try to remove them.
- Spread the broken cookies, pretzels, peppermint chips, and about 3/4 of the M&M's onto the baking sheet.: When you scatter the mix, aim for an even layer so each bite has a mix of textures. I like to press larger pieces into the paper slightly so they do not float when the chocolate is poured. Visually you should see a colorful, textured bed that invites the chocolate. Avoid piling too high in one spot, which can lead to uneven coverage and pockets of unmelted chocolate later.
- Place the white chocolate in a microwave-safe container and microwave for 1 1/2 minutes on medium power. Stir and then microwave for another minute until melted and smooth. Watch it carefully to make sure it doesn't burn.: Melting the white chocolate gently is key for a smooth glossy finish. Start at medium power and stir after the first interval to distribute heat, then continue as directed until silky. The aroma will deepen from a faint milky scent to a warm, sweet perfume as it melts. Watch carefully because white chocolate burns quickly, developing a grainy texture and odd smell if overheated. A common error is rushing at high power, which risks scorching and ruining the texture.
- Pour the melted chocolate over the cookie/candy mixture, spreading with a spatula if needed to coat completely.: Stirring is where the melt becomes uniform; you will see a glossy sheen develop as remaining chunks dissolve. The sound is silent but the visual cue is unmistakable, a smooth, satin surface. If you encounter stubborn bits, rest the bowl for 30 seconds off the heat and stir gently, the residual warmth will finish the melt. Watch for signs of seizing when bits harden, which indicates overheating or moisture contact, and stop microwaving immediately if that happens.
- Sprinkle the rest of the M&M's and red and green sprinkles over the still-wet chocolate. This won't work if it has hardened.: As you pour, the warm chocolate will envelop the scattered pieces, creating ribbons that settle and flow around them. Use a spatula to encourage even coating, spreading until items are just covered but still visible. The smell will turn fuller and you may notice glossy swirls forming across the surface. Avoid over spreading to the point where the chocolate is too thin, which can make the bark brittle and less satisfying to bite.
- Chill the tray of bark until set and firm, about 1 hour. Remove and gently break bark into small pieces.: Timing is everything here, because the candies must adhere to wet chocolate to stay in place. The visual effect of bright candies on the glossy white surface is immediate, and the sprinkles add a festive crunch. If you wait too long and the chocolate begins to set, the toppings will not stick and will roll off when broken. A frequent oversight is topping after the chocolate is cool, which ruins presentation.
- Chill the tray of bark until set and firm: Cooling the sheet in the refrigerator firms the chocolate so it breaks cleanly. I usually let it chill for about 1 hour, during which the kitchen cools slightly and the scent of peppermint calms into a more subtle note. When fully set, the surface loses its high gloss and feels firm to the touch. Avoid rushing this step as partially set chocolate will yield messy, sticky pieces when broken.
- Remove and gently break bark into small pieces: When you lift the wax paper, you should hear a crisp snap as larger sections break into pieces. Use both hands to gently bend and break along natural seams, and vary piece sizes for a rustic presentation. The texture should offer audible crunch and a creamy bite from the white chocolate . One misstep is forcing pieces apart too soon, which produces ragged edges and sticky shards.
Notes
- Swap Cookies: Try using plain chocolate Oreos or other sandwich cookies to change cookie intensity while keeping the same assembly method.
- Change Candy: Replace one type of M&M's with chocolate chips or holiday colored candies to alter sweetness and texture balance.
- Flavor the Chocolate: Fold a small amount of crushed peppermint into the melted white chocolate for a more uniform mint note throughout the bark.
- Make It Nutty: Increase the proportion of peanut M&M's if you want more crunch and a savory counterpoint in each bite.
- Adjust Salt: Add a light sprinkle of flaked salt on top just before chilling to heighten contrast between sweet and salty.