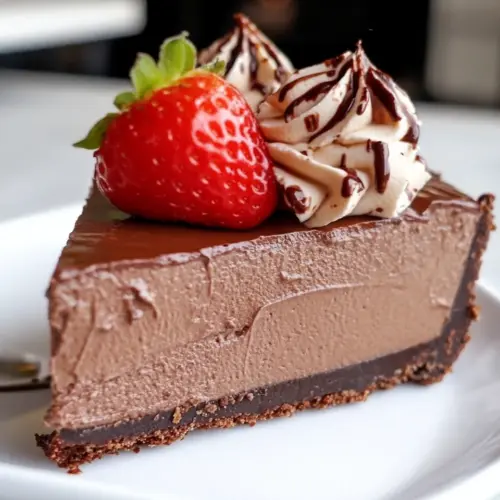
Chocolate Truffle Pie
Chocolate Truffle Pie is a creamy, silky no bake dessert that tastes like a rich chocolate mousse but slices like a tart. Made with soaked cashews or macadamias, concentrated cocoa powder, and a touch of maple syrup, it is an easy make ahead treat for special occasions and weeknight indulgence. Try it for a show stopping dessert that is simple to prepare.
Equipment
- High-Powered Blender
- Bowl
- Spoon
- Pan or crust
Ingredients
- 1/4 cup cocoa powder Provide rich chocolate flavor and deep color while balancing sweetness; helps create the dry chocolate base for the truffle filling and crust components when combined with fats and sweeteners in the recipe.
- 2 tbsp dutch (or additional regular) cocoa powder Add intensified chocolate richness and a slightly different cocoa character; useful for layering cocoa flavors and offering a more rounded, less acidic chocolate note compared to regular cocoa powder.
- 1 1/2 cups raw cashews or macadamias (nut-free option: Vegan Chocolate Pie) Offer creamy body, natural richness, and structure to the truffle filling; when soaked and blended they create a smooth, nutty texture that replaces dairy while contributing healthy fats.
- 2 1/2 cups strawberries or pitted cherries (250 g) Contribute natural sweetness, bright fruit acidity, and moisture to the filling or topping; can be used fresh or blended to add a juicy contrast to the dense chocolate layers.
- 1/2 tbsp pure vanilla extract Impart warm aromatic complexity and enhance perceived sweetness; a small amount rounds out flavors and lifts the chocolate and fruit components in the pie.
- 1/8 tsp salt Balance and heighten overall flavor while controlling sweetness; a pinch sharpens chocolate notes and helps bind other flavors together without adding saltiness.
- 1/3 cup virgin coconut oil (coconut-free option linked above) Provide solid fat that sets the ganache-like truffle filling as it cools; lends a smooth mouthfeel and helps the pie hold shape once refrigerated or chilled.
- 1/3 cup pure maple syrup, honey, agave OR 1/8 tsp uncut stevia Supply sweetness and liquid to sweeten and loosen the blended filling; choice of sweetener adjusts flavor profile and texture while also influencing sweetness intensity and setting.
- optional 3 oz chocolate chips melted with 1 tsp oil Optionally intensify chocolate depth and add glossy finish when melted with oil; useful for drizzling or glazing to create a richer, more decadent chocolate coating.
Instructions
- Put the nuts in a cereal bowl and cover with water. Let soak 4-8 hours (this makes them much smoother to blend). Drain and pat fully dry. Combine all ingredients (except optional chips and oil) in a very high powered blender or food processor (I used a Vitamix blender). Only if using stevia, add 1/4 cup water. Blend until completely smooth. Taste, and add more sweetener if needed. Pour into a prepared crust (I listed a few crust options above in this post), or keep it crustless. If desired, smooth melted chocolate on top. Freeze to set.: The moment the nuts sink into the water you can see them begin to plump, and that immersion softens them so they blend into a silk rather than remain grainy. Soaking for the full 4 to 8 hours hydrates the nuts evenly, which prevents gritty pockets in the filling. A common mistake is under soaking, which leaves a coarse texture; if you notice resistance while blending, soak longer. Avoid using very hot water, as scorching can alter flavor. Keep them submerged so they rehydrate uniformly, and cover the bowl to prevent dust or odors from settling on them.
- Let soak 4 to 8 hours this makes them much smoother to blend: Over those hours the kitchen will smell neutral, and the texture change is subtle but critical, going from stiff to plump. For me, planning this step the night before removes pressure and ensures the right consistency in the morning. If you try to rush it by blending unsoaked nuts , the motor will strain and the texture will be grainy. Drain them fully and pat dry to avoid adding excess water into the blender, which would thin the mixture and require compensating with more fat.
- Drain and pat fully dry: Hearing the towel absorb the last moisture feels satisfying, and a completely dry nut surface helps the blender produce a thick, creamy emulsion rather than a loose puree. If you skip drying, the filling can become runny and may not set properly in the freezer. Use a clean towel and press gently but thoroughly. This step also reduces the chance of water affecting melting points when you stir in the coconut oil later.
- Combine all ingredients except optional chips and oil in a very high powered blender or food processor: When you add everything into a powerful blender like a Vitamix, you will hear the motor hum steadily as the mixture turns glossy and cohesive. The blades will pull the mixture into a vortex then smooth it into a creamy swirl, a visual confirmation that you are approaching the right texture. If your blender struggles, pulse and scrape down the sides frequently to avoid overheating the motor. Low power blenders may require longer blending and occasional additions of liquid to keep movement, but avoid adding too much liquid because it alters final set.
- Only if using stevia add 1/4 cup water: The moment you introduce water the mixture loosens, which is why the tiny measured amount is important when using stevia. This dilution prevents concentrated bitterness and helps stevia integrate evenly, making the texture more palatable. A common slip is adding water unnecessarily when using syrup sweeteners, which thins the mixture. If you are using a liquid sweetener instead, skip this water step entirely.
- Blend until completely smooth: As you blend, watch the surface transition from grainy to glossy, and note how the sound of the blender evens out; that is the cue it is nearly done. Complete smoothness creates that truffle like mouthfeel and ensures the pie slices cleanly after freezing. If you stop too early you will feel tiny grit on the tongue. To avoid overheating, pulse and scrape, then blend in short bursts until the texture is perfectly even and velvety.
- Taste and add more sweetener if needed: Sampling a spoonful lets you calibrate sweetness, acidity, and salt balance. The cold, set pie will taste slightly less sweet than the raw batter, so I sometimes aim for a touch more sweetness now than I might want in the finished slice. Avoid oversweetening, because you cannot remove sugar later; add incrementally, tasting between adjustments. If you prefer a brighter profile, a few extra berries can be stirred in at this point.
- Pour into a prepared crust or keep it crustless: Watching the filling cascade into the crust is satisfying, and if you choose a crust it will provide textural contrast that makes the dessert feel more composed. For a crustless version, pour into a lined pan for easier removal. If the filling is too thin it may seep into crusts with larger crumbs, so press the crust firmly and consider chilling it briefly before filling. Ensure the pan is level so the pie sets evenly in the freezer.
- If desired smooth melted chocolate on top: Drizzling or spreading the melted chocolate creates a glossy, professional looking finish and adds an extra layer of texture that cracks slightly under the fork. Melt the chips gently with the oil and work quickly while warm for a smooth sheen. A common error is overheating the chocolate which causes graininess, so melt over low heat or in short intervals in the microwave, stirring frequently. The warm chocolate also helps temper sweetness and ties the topping to the filling.
- Freeze to set: Placing the pie flat in the freezer allows it to firm to a dense, truffle like texture that slices cleanly. I usually let it set overnight for best results, and you can remove it 10 to 15 minutes before serving to make slicing easier. A frequent mistake is cutting while too frozen which can be hard on knives and may shatter the slice; a slight thaw improves mouthfeel. Store leftovers covered to prevent freezer odors from affecting the delicate chocolate notes.
Notes
- Swap the nuts — Use cashews for a neutral, creamy base or macadamias for a richer, buttery result; each will change mouthfeel subtly, so choose based on desired richness.
- Adjust the sweetener — Maple syrup gives caramel like depth, while honey or agave shift sweetness and texture slightly, so taste and tweak sparingly.
- Make it fruit forward — Use the suggested strawberries or cherries to lighten chocolate intensity and add bright acidity that complements the dense filling.
- Go crustless or add crunch — Choosing a crust adds texture contrast, while a crustless pie highlights the silky filling; both present beautifully depending on the occasion.
- Add a glossy finish — Melt the optional chocolate chips with a teaspoon of oil for a smooth top that visually elevates the pie and adds a slight snap.