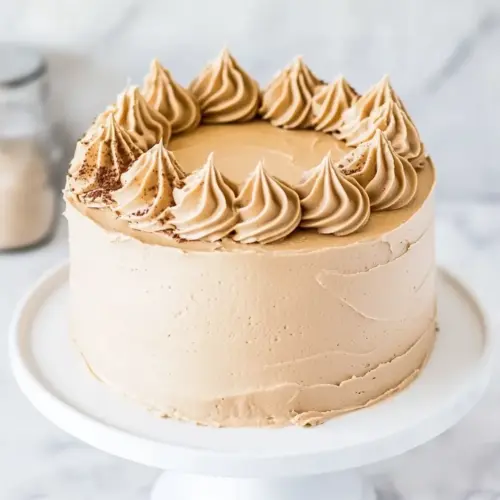
Chocolate Sweet Potato Layer Cake with Molasses Buttercream
Chocolate Sweet Potato Layer Cake with Molasses Buttercream is a moist, spice-kissed layer cake combining creamy sweet potato puree and rich chocolate with a silky molasses Swiss style buttercream, perfect for special dinners and holiday gatherings. The cake offers a tender crumb, layered ganache, and a fluffy buttercream finish, delivering complex fall flavors in a comforting, crowd pleasing dessert you will want to make again.
Equipment
- Stand mixer or large mixing bowls
- 8 inch round cake pans
- Offset Spatula
- Wire cooling racks
- heat proof bowl
- Saucepan for double boiler
- Instant read thermometer
Ingredients
- 2 cups granulated sugar Provide sweetness and structure to the batter while helping with browning and moisture retention; granulated sugar also aids in creating a tender crumb and stabilizing egg foams during mixing.
- 1 3/4 cups all-purpose flour Contribute bulk, gluten structure, and texture to the cake while interacting with leaveners to create crumb and rise; all-purpose flour also helps absorb liquids for proper batter consistency.
- 3/4 cup dark or Dutch-processed cocoa powder, sifted Add deep chocolate flavor, color, and slight bitterness while contributing to dry structure; sifting removes lumps and ensures even incorporation into the batter.
- 2 teaspoons baking soda React with acidic components to produce carbon dioxide for lift and tender crumb; baking soda also helps neutralize acidity from cocoa and sweet potato puree.
- 1 teaspoon baking powder Provide additional leavening power to produce controlled rise and fine crumb; baking powder complements baking soda to ensure reliable aeration throughout the cake.
- 1 teaspoon fine sea salt Enhance overall flavor balance by bringing out sweetness and reducing bitterness; fine sea salt also strengthens gluten and improves taste perception in the finished cake.
- 1 1/2 teaspoons ground cinnamon Introduce warm, aromatic spice notes that complement sweet potato and chocolate while contributing complexity to the cake's flavor profile.
- 1/4 teaspoon ground cloves Contribute a pungent, warm undertone that intensifies the spiced character of the cake and balances sweetness in the batter.
- 1/4 teaspoon ground nutmeg Bring nutty, warm aromatic accents that reinforce the spice blend and add depth to the overall flavor without overpowering other ingredients.
- 1 cup sweet potato puree (canned or fresh) Provide moisture, natural sweetness, and a silky texture while lending subtle earthy flavor that complements spices and chocolate in the cake.
- 3 large eggs Incorporate structure, richness, and emulsification while trapping air during beating to help create lift and a tender crumb.
- 1/2 cup vegetable oil Add fat for moistness and tenderness while contributing to mouthfeel and richness; vegetable oil also helps keep the cake soft and pliable.
- 1 1/2 teaspoons vanilla extract Deliver aromatic sweetness and flavor depth while rounding out other flavors; vanilla extract enhances perceived sweetness and aroma.
- 1 cup full-fat buttermilk Contribute acidity and tenderizing enzymes that react with leaveners for lift while adding a tangy richness that brightens the cake's flavor.
- 3.5 ounces dark or semisweet chocolate, finely chopped Impart concentrated chocolate flavor and richness when melted into batter or used as filling; finely chopping ensures smooth, even melting.
- 1/3 cup heavy cream Provide richness and help create a glossy chocolate ganache or sauce when heated with chocolate to improve texture and shine.
- 1 tablespoon unsalted butter, cut into cubes Add silkiness and flavor to ganache or fillings while contributing small amounts of fat for a smooth, cohesive texture.
- 10 large egg whites (about 10 ounces) Foam to create volume and stability when whipped, providing lift for mousses or swiss meringue buttercream; egg whites also dry into a stable aerated structure.
- 3 cups granulated sugar Sweeten and stabilize swiss meringue-style preparations while creating glossy, stable peaks when cooked into a syrup before whipping.
- 1/4 cup plus 2 tablespoons molasses, divided Introduce deep, robust sweetness and complex molasses notes when divided between batter and frosting; molasses also contributes color and slight acidity.
- 2 pounds (8 sticks or 4 cups) unsalted butter, room temperature Provide large amounts of fat for a rich, creamy, and stable buttercream; unsalted butter at room temperature creates smooth texture and aeration when whipped.
- 1 teaspoon vanilla extract Enhance and round flavors in frostings and fillings while adding a familiar aromatic note that heightens chocolate and spice nuances.
Instructions
- Preheat oven to 350ºF, position oven racks at 1/3 and 2/3 positions. Butter and line the bottoms of three 8-inch round cake pans with parchment paper; butter parchment.: You will notice the oven warming and a cozy heat that readies the air for even baking, which is essential for consistent rise. Positioning the racks at the lower and upper thirds helps accommodate three pans with balanced heat exposure, so layers bake evenly. Buttering and lining the pans ensures the cakes release cleanly; a properly greased edge will develop a slight pull away from the pan as it cools. A common mistake is under-greasing or skipping parchment, which can cause sticking and torn layers. If your oven runs hot on one side, rotate pans midway through to prevent domed or uneven tops.
- To prepare cake layers, whisk together sugar, flour, cocoa, baking soda, baking powder, salt, and spices in a large bowl or the bowl of a stand mixer.: The dry mix should smell of chocolate and warm spice, with the cocoa powder showing a rich, dusty aroma. Sifting or whisking ensures there are no clumps of cocoa or leavening, and it distributes the cinnamon , cloves , and nutmeg so every bite is balanced. Properly aerated dry ingredients help the batter incorporate smoothly when wet ingredients are added. Avoid overworking the dry mix which can compress the flour; a light, thorough whisk is all you need.
- In a separate bowl, whisk sweet potato puree with eggs until smooth. Whisk in oil and vanilla extract.: As you combine these, the mixture should become glossy and homogeneous, the sweet potato puree smoothing out and the eggs adding a sheen. This emulsion stage helps the oil disperse evenly throughout the batter, keeping the cake moist. If the mixture appears curdled or lumpy, keep whisking; the eggs will bring it together. A frequent mistake is using cold eggs or puree, which can slow emulsification; room temperature components blend more readily.
- Make a well in the bowl with the dry ingredients and add sweet potato mixture and buttermilk. Mix on low speed until dry ingredients are just incorporated, scraping down the sides of the bowl as necessary.: You should see a uniformly colored batter with no streaks of flour, and it will have a thick, velvety texture that flows slowly. Mixing on low reduces gluten development, keeping the crumb tender. Scraping down ensures no dry pockets remain, which can create dense bits in the cake. Overmixing here will yield a tighter crumb, so stop as soon as incorporation is complete.
- Divide batter among prepared baking pans; you’ll use approximately 2 cups of batter per pan. Bake for 30 to 40 minutes, rotating pans halfway through baking, until a toothpick inserted near the center comes out clean. Place pans on wire baking racks and let cool to room temperature.: As the pans bake, you’ll hear a gentle settling and may see the tops crack slightly as steam escapes. The scent will deepen into a warm chocolate spice aroma. A clean toothpick indicates doneness; if it comes out wet, add more time. After removing from oven, cooling on racks prevents steam from softening the base. Avoid opening the oven too often during baking, which can cause uneven rise.
- Run a knife around the edge of each cake pan then invert onto a wire rack. The cake should come out cleanly. Remove parchment and let cool completely before assembling, or ideally, wrapping each layer with two layers of plastic wrap and sealing in a zip-top bag and freeze (frozen layers will be easier to level and assemble later).: When inverted, the cakes should release smoothly; the bottoms will be slightly textured from the parchment. Cooling completely prevents melting your buttercream when assembling. Freezing is a smart trick because slightly frozen layers are firmer and slice more predictably when leveling; they also reduce crumbs while you frost. A typical slip is attempting to frost warm layers, which can lead to sliding or a collapsed frosting finish.
- To prepare ganache, place chopped chocolate (the finer the better) in a heat-proof bowl. Warm cream over medium-low heat until it just starts to steam (do not let it boil). Pour over chopped chocolate and let sit for 30 seconds. Slowly and gently whisk, starting with small concentric circles in the center of the bowl, until chocolate is melted and ganache is smooth. Add butter, a little bit at a time, gently whisking until incorporated. Refrigerate for 30 to 40 minutes or until thickened and spreadable.: As you pour the steaming heavy cream over the chocolate, you’ll smell an intense chocolate aroma; after whisking, the ganache should be glossy and viscous. Adding the butter rounds the mouthfeel and gives a satiny finish. Cooling it briefly turns it into a spreadable consistency that won’t sink into the frosting. Avoid overheating the cream which could scorch or cause separation; gentle heat is key.
- Meanwhile, to prepare buttercream, combine egg whites, sugar, and 2 tablespoons molasses in a heat-proof bowl set over (but not touching) a pot of boiling water. Or if you have a large double boiler pot you can use that instead. The idea is to gently heat the egg so it is warm but not scrambled, as it would if you heated it directly. Whisk until sugar is completely dissolved and mixture is warm to the touch (it should measure 140ºF on an instant-read thermometer). Transfer to the bowl of a stand mixer fitted with the whisk attachment. Beat on medium high speed until the meringue is completely cool; bowl should not have even a hint of heat at the base when you touch it. This can take quite a while, upwards of 45 minutes even, so just keep mixing until it’s completely cool.: You’ll watch the mixture transform from glossy and warm to a voluminous, snowy meringue with satiny peaks, and the sound changes to a whisper as it aerates. The molasses adds depth and a touch of acidity that balances sweetness. Patience is crucial; if you move too quickly and add butter while the meringue is warm, the mixture can break. A frequent error is underheating the egg syrup which leaves grainy sugar in the meringue; ensure it reaches about 140ºF.
- Once cool, switch to the paddle attachment and begin to add butter, 1 tablespoon at a time, mixing well after each addition. Do this slowly, as adding the butter too quickly could cause your buttercream to separate. Once all the butter has been added increase speed to high and beat until thickened and fluffy (you’ll see a visible change in the consistency as you add the last bits of butter). Add vanilla and additional 2-4 tablespoons of molasses (to taste) and mix thoroughly. Use immediately, or cover and refrigerate until ready to use. If refrigerated, let the buttercream warm to room temperature before using and beat it again until the fluffy texture returns.: The buttercream will evolve from silky to pillowy as butter incorporates. Adding butter slowly ensures a smooth emulsion; you want a stable, glossy spreadable frosting. Taste as you add the extra molasses so the flavor isn’t overpowering; it should be a background note that complements the spices. A common problem is a broken or soupy buttercream, which usually means the meringue was not cool enough or the butter was too cold. Recover by bringing temperatures in line and beating patiently.
- To assemble cake, level each cake layer by cutting of the domed top with a long serrated knife. Place one cake layer on a cake stand or serving plate. Top with 1/2 cup of buttercream and spread to edges with an offset spatula. Top with half of ganache, spreading into a smooth layer. Place second layer on top, gently pressing to adhere. Repeat with another 1/2 cup of buttercream and remaining ganache, then top with third and final layer, flat side up.: When layering, you should feel a gentle give as each tier meets the next, and visually you’ll see distinct, even strata of cake, buttercream, and ganache. Leveling produces clean, flat surfaces for uniform stacking. The offset spatula helps you spread smoothly to the edges. Pressing lightly ensures the layers bond without squeezing out fillings. Beware of overfilling which can cause the cake to bulge; use measured amounts so the cake remains stable.
- Cover the entire cake with a thin layer of buttercream. This “crumb coat” will keep the stray crumbs in place and make frosting the cake easier. Refrigerate for about 15 minutes to allow this crumb coat to set, then spread the thicker final layer of buttercream on top of that, smoothing out top and sides as best you can. There will be a good amount of buttercream left, which you can use to pipe decorative details onto your cake if desired. Optionally top cake with meringue cookies and a dusting of cocoa powder before serving at room temperature.: The crumb coat should feel slightly firm to the touch after chilling and will trap crumbs so your final layer looks clean. Smoothing the buttercream can be done with an offset spatula or a bench scraper for sharp sides. Leaving extra buttercream is wonderful because it allows for decoration without scarcity. One error is skipping the crumb coat; this often results in crumb specks in the final finish. Allow the assembled cake to rest at room temperature before serving so the buttercream softens slightly for clean slices.
Notes
- Chill layers before leveling to ensure smooth, even cuts and to reduce crumbs. Slightly firm cake layers respond better to a long serrated knife, so a 15 to 30 minute chill makes trimming easier.
- Room temperature butter is essential for the buttercream; cold butter can cause lumps and too soft butter will make the frosting runny. Aim for a consistency where the butter gives under gentle pressure but still holds shape.
- Heat the egg white mixture gently over simmering water and test the temperature with an instant-read thermometer. Reaching about 140ºF melts the sugar but avoids cooking the egg, creating a safe and silky meringue base.
- Fold batter gently and stop as soon as ingredients are incorporated to keep the crumb tender. Overmixing develops gluten, which tightens the crumb and yields a denser cake.
- Cool ganache until spreadable but not rock hard; it should hold shape while still being pliable. If it becomes too firm, warm it gently in short bursts until spreadable again.