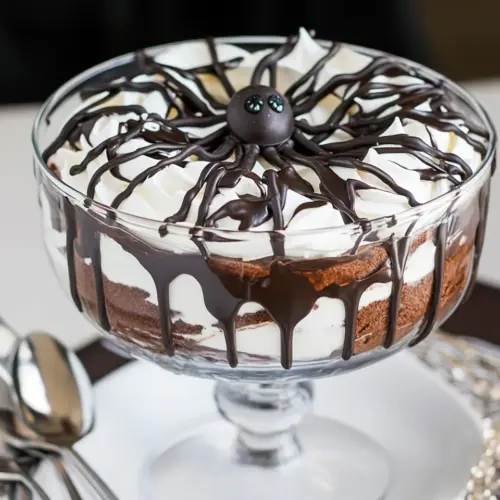
Chocolate Spider Trifle
Chocolate Spider Trifle is a creamy, crunchy, and easy dessert that layers chocolate cake, silky pudding, airy Cool Whip, and crunchy Oreos. Perfect for Halloween parties and family gatherings, this show stopping dessert is simple to assemble and scales effortlessly to feed a crowd, making it a top pick for an easy festive treat you will want to make again.
Equipment
- Trifle dish
- Mixing Bowl
- Whisk
- Rubber spatula
- Toothpick
- Knife
- Cooling rack
Ingredients
- 1 box chocolate cake mix plus ingredients on back Prepared by following box instructions to create a moist chocolate cake layer; provides structure and rich cocoa flavor for the trifle. Acts as the base and one of the primary textured components, absorbing moisture from pudding and whipped topping. Can be baked in a sheet or pan, cooled, then crumbled to layer evenly through the dessert.
- 6.6 oz instant chocolate pudding mix Mixed quickly with milk to form a smooth, thick chocolate pudding; contributes concentrated chocolate taste and creamy consistency. Serves as a binding, flavor-forward layer that contrasts with the cake and whipped topping. Instant preparation keeps assembly simple and provides a stable filling.
- 3 cups milk Combined with pudding mix to hydrate and achieve creamy texture; delivers dairy richness and helps set the pudding layer. Also lightens the overall dessert when integrated with cool whip, balancing sweetness and thickness. Temperature of milk can affect final consistency, so use cold for instant pudding.
- 1 large container cool whip 16 oz. Folded or spread as a light, airy topping to add creaminess and volume to the trifle. Provides sweetness and a fluffy contrast to denser cake and pudding layers, making each spoonful smooth and indulgent. Ready-to-use container speeds assembly and maintains consistent texture.
- 1 package Oreos Crushed to create crunchy, chocolate-cookie layers and decorative crumbs that mimic dirt for a spider-themed presentation. Adds textural contrast and extra cocoa flavor, with some whole cookies optionally reserved for garnish. Can be pulsed in a food processor or crushed in a bag for varied chunk sizes.
- Hershey’s Syrup Drizzled over layers or used as a decorative topping to intensify chocolate flavor and create glossy accents resembling webs or drips. Enhances visual appeal and adds a syrupy, sweet chocolate note that complements the cake and pudding. Can be applied sparingly to avoid over-sweetening the trifle.
- Plastic spider Placed as a themed decorative element to complete the spider motif and add playful visual interest without being edible. Provides a focal point for presentation and can be removed before serving if desired. Lightweight and reusable, it helps convey the spooky concept of the dessert.
Instructions
- Make cake as directed on box. Let cool and cut into cubes.: The aroma of chocolate cake baking fills the kitchen with warmth, deep cocoa notes rising as the batter puffs and sets. Visually you want a springy top and clean edges when a toothpick comes out mostly clean, which indicates doneness. Allow the cake to cool fully on a rack before cutting, otherwise the crumb will be gummy and compress when cubed. A common mistake is slicing the cake while it is still warm, which causes it to fall apart when layered.
- Make pudding by mixing pudding mixes and milk. Add half the Cool Whip and mix well. Set aside.: As the cake cools, the texture firms and the steam dissipates, preventing the pudding from becoming watery when layered. Cut deliberately into uniform cubes so each layer is even and stacks neatly in the trifle dish. If cubes are too large they can dominate a bite, so aim for bite sized pieces that sit comfortably on a spoon. Avoid cutting right away; impatience leads to a soggy assembly.
- Add half the cake cubes to the bottom of the trifle dish and add half the crushed Oreos. Spread on half the pudding cream mixture and repeat layers.: When whisking the pudding mix into the milk , you will notice the mixture thicken quickly, going from glossy liquid to a more cohesive custard texture. Whisk briskly to dissolve any lumps and stop when the pudding looks uniformly smooth and slightly shiny. Over stirring will cause the texture to break down, while under mixing leaves grainy pockets, so pay attention to the change in viscosity as your cue.
- Top with remaining Cool Whip.: Folding half of the Cool Whip into the pudding lightens the filling into a mousse like consistency, creating airy pockets that offset denser cake pieces. Use a rubber spatula and fold gently with wide strokes to maintain the whipped air. If you whisk too aggressively you will deflate the mixture and lose that fluffy contrast, so be patient at this stage.
- Carefully add Hershey's Syrup to the top starting in the middle and swirl around in circles until you get to the edges. Using a toothpick, draw out lines from the center to create syrup web. Add spider. ENJOY!: Letting the filled pudding rest briefly allows the structure to stabilize and the flavors to meld, giving you a firmer, creamier layer for building. While it sits, the surface will look slightly taut and chilled, an indication it is ready to be layered. Do not skip this rest, as layering immediately can result in slipping and uneven distribution.
- Add half the cake cubes to the bottom of the trifle dish and add half the crushed Oreos: The first layer is where the foundation is set, and you will hear the soft thud of cubes settling into the dish as you arrange them. Sprinkle the crushed Oreos evenly so each section of the first layer has some crunchy contrast. Pressing too hard can compact the cake and squeeze out air, so arrange gently for a light, balanced base.
- Spread on half the pudding cream mixture and repeat layers: When you spoon the pudding mixture over the cake and cookies, it should spread smoothly like glossy velvet, surrounding each cube without displacing them. Build another identical tier so the structure is symmetrical; this creates visual appeal and ensures every scoop includes multiple textures. A common error is piling too much pudding in one spot, which causes the layers to slide and look messy, so distribute evenly.
- Top with remaining Cool Whip: The final blanket of Cool Whip should be airy and uniform, covering the top with a soft plateau. Smooth it gently for a canvas that will accept the syrup design, and chill briefly if it seems too loose to hold the pattern. If the topping looks weepy or grains appear, a short chill helps stabilize it.
- Carefully add Hershey's Syrup to the top starting in the middle and swirl around in circles until you get to the edges: As you drizzle the Hershey s Syrup from the center outward, you will see concentric rings form on the white surface, glossy and reflective. The syrup should flow smoothly, not in globs, so a steady hand and slow motion are key for clean rings. Too heavy a hand makes thick pools that will not pull into fine web lines with a toothpick.
- Using a toothpick, draw out lines from the center to create syrup web: Dragging the toothpick from the center to the edge creates radial web lines that pull the dark syrup into delicate strands, giving the trifle its spiderweb look. Move deliberately and do not overwork the pattern, a single stroke per line yields crisp definition. If you swirl too many times the lines will blur and the effect is lost.
- Add spider: Placing the plastic spider at the center is the final theatrical touch, and it instantly signals the theme of the dessert. Make sure the decoration is clean and positioned securely so it does not topple when transferring the dish. If you add it too early the spider can sink into softer layers, so place it last for best presentation.
- ENJOY!: The first spoonful should reveal cake, pudding, cookie, and whipped topping in a perfect mosaic, each component contributing its part to the overall mouthfeel. Serve chilled so the layers hold and the textures remain distinct. A common mistake is leaving the trifle at room temperature too long, which can soften the structure and mute the contrast between layers.
Notes
- Swap Oreos with chocolate sandwich cookies if you prefer a different brand or a slightly different filling ratio, the texture will remain crunchy and complementary to the pudding.
- Use homemade chocolate cake for a deeper, more complex cocoa flavor, which adds an extra layer of richness but requires a bit more hands on time than a box mix.
- Layer with additional cookie crumbs between pudding layers for more pronounced contrast if you love a crunchier mouthfeel with each bite.
- Chill longer for firmer slices when you want neat servings for a party, a few hours in the refrigerator helps the trifle hold shape when scooped.
- Adjust the pudding to milk ratio to control firmness, a touch less milk yields a denser set while more milk makes the pudding silkier and softer.