Chocolate Peanut Butter Christmas Trees
Chocolate Peanut Butter Christmas Trees combine creamy peanut butter filling and glossy chocolate shells for a crispy and rich holiday treat. These easy to make, freezer friendly bites are perfect for gifting or cookie swaps, offering a delightful textural contrast and festive presentation. Make a batch for gatherings and watch them disappear, they offer a satisfying snap and melt in your mouth moment that everyone will love.
Equipment
- Hand Mixer
- Jelly Roll Pan
- Parchment Paper
- Cookie Cutter
- Microwave-safe Bowl
- Fork
- Plastic baggy or piping bag
Ingredients
- 1/2 cups salted butter melted and cooled Melted and cooled to provide a smooth, rich fat base that binds dry ingredients and adds moisture to the dough; contributes a tender texture and helps the trees hold their shape once chilled. Use salted butter for a subtle savory balance that contrasts the sweetness of the filling and chocolate coating.
- 2 cups creamy peanut butter Creamy peanut butter supplies concentrated nutty flavor and creamy body, forming the main structure of the filling when combined with sugar and powdered sugar. It contributes both taste and binding properties so the mixture can be rolled or shaped into tree forms before dipping in chocolate.
- 1/4 cup granulated sugar Granulated sugar adds straightforward sweetness and helps dissolve into the butter and peanut butter to slightly firm the filling; it also contributes a minor granular texture that balances the powdered sugar. Adjusting this amount can alter overall sweetness and the firmness of the dough.
- 1 tablespoon vanilla extract Vanilla extract provides aromatic depth and enhances the overall flavor profile by rounding out the nuttiness and chocolate notes; a small amount brightens the mixture without overwhelming it. It helps create a more complex, bakery-style taste in the finished treats.
- 4 cups powdered sugar Powdered sugar thickens and sweetens the peanut butter mixture to a pliable, dough-like consistency ideal for shaping; it also gives a smooth texture that contrasts with any coarser granulated sugar. Adding enough powdered sugar is key to achieving firm trees that hold up during dipping and display.
- 3 cups semi-sweet chocolate chips or a combination of semi and milk chocolate chips Semi-sweet chocolate chips (or a semi/milk combination) are melted to create the primary chocolate coating, offering a pleasant bittersweet balance to the sweet peanut butter center. The chocolate sets into a glossy shell that provides structure, snap, and flavor contrast for the cookies.
- 2 tablespoons shortening Shortening stabilizes melted chocolate, improving its sheen and preventing bloom, which results in a smoother, more workable coating for dipping the shaped trees. It also thins the chocolate slightly so it coats evenly without seizing or becoming too thick.
- 1/2 cup milk chocolate chips or pieces Milk chocolate chips or pieces are used for additional coating or drizzle and bring a sweeter, creamier chocolate note that complements the semi-sweet base. Employing milk chocolate can create visual and flavor contrast when layered or swirled with darker chocolate.
- 1/2 cup white chocolate chips or pieces White chocolate chips or pieces supply a sweet, creamy element ideal for decorative drizzles or accents that stand out against darker coatings; they melt to a pale, glossy finish that enhances presentation. Use them sparingly for snowy highlights or to pipe small details on the trees.
- 1 teaspoon shortening (divided in half) Shortening (divided in half) helps temper and smooth both white and milk chocolate when melted, ensuring consistent drizzling and preventing premature setting; dividing it makes it easier to control the amount used for each type of chocolate. Incorporate only as needed to achieve the desired dipping and decorative texture.
Instructions
- Line a jelly roll or half sheet pan with parchment paper and set it aside.: The aroma of freshly laid parchment is subtle but it signals organization in the kitchen, which makes the process calmer. Using parchment prevents sticking so the chilled peanut butter layer lifts cleanly, preserving sharp edges for cutting. A common mistake is skipping this step, which can make removal difficult and tear the layer; always smooth the parchment flat to avoid air pockets.
- Using a hand mixer, beat together melted butter, peanut butter, granulated sugar, and vanilla extract until smooth and creamy. Beat in powdered sugar.: Right away you will notice the mixture becoming glossy and homogenous, with the nutty scent of peanut butter filling the air. The hand mixer ensures there are no lumps and that the butter incorporates evenly for a silky base. If you underbeat, the filling can be uneven and grainy, so mix until smooth but avoid overheating the bowl which can make the fats too loose.
- Press peanut butter mixture into a sheet pan, spreading to about 1/2-inch thickness.: As you add the powdered sugar , the texture will thicken and the sound of the mixer will change from a light whirl to a denser thrum, indicating the mixture is firming up. The powdered sugar is crucial to create the pliable, sliceable texture, and you should stop when the mixture holds shape. Overworking can dry it out, while under mixing leaves it too sticky to press neatly into the pan.
- Place sheet pan in the freezer for 15 minutes.: Pressing the mixture creates an even canvas for cutting. You will feel the resistance under your palms as the filling compresses and smooths, and visually you want a uniform, flat surface. Avoid leaving gaps or thin spots, which lead to fragile cutouts; take your time to press firmly and evenly across the entire pan.
- Lift the parchment paper to remove the chilled peanut butter layer from the pan. Place a new sheet of parchment paper on the pan.: The cold snaps the filling firm, and after chilling the scent becomes subdued while the texture stiffens. Freezing is a quick lock step that makes cutting precise shapes possible. A typical error is under chilling; if not firm enough, the shapes will deform while cutting, so be patient and confirm the middle is firm before proceeding.
- Use a cookie cutter to cut out 1/2-inch thick Christmas tree shapes from the chilled peanut butter layer.: When you lift the chilled layer it should feel dense and cool to the touch, with clean edges. Transferring it to fresh parchment ensures a clean working surface for cutting and prevents refreezing on sticky spots. If the layer cracks while lifting, it likely needed a bit longer in the freezer; rejoin pieces gently and re chill briefly.
- Place cutouts on a parchment-lined sheet pan. Freeze for 30 minutes.: As you press the cutter, you might hear a faint snap as the chilled layer gives way, and the trees should pop out with defined edges. Cutting when the layer is at the right temperature creates sharp silhouettes that look professional. A common slip is using a cutter that is too large for your pan, which wastes dough and may lead to uneven thickness; choose a size that fits comfortably with room to spare.
- Scoop up the remnant peanut butter mixture, repress to 1/2-inch thickness, and cut out additional shapes.: The short freeze firms the shapes so they hold up when dipped; the surface will feel frosty and the edges crisp. Freezing at this stage prevents softening during chocolate coating. Avoid stacking the cutouts; they should lie in a single layer to chill evenly, otherwise you risk misshapen trees.
- After cutouts have chilled for 25 minutes, prepare the chocolate coating.: This is where efficiency comes in, as you gather scraps and form additional trees. Re pressing reduces waste and yields more treats, though the texture of re pressed pieces may be slightly denser. If the remnant becomes too soft while handling, pop it back in the freezer to firm before recutting, since warm filling will not cut cleanly.
- Combine milk chocolate chips and 2 tablespoons of shortening in a heatproof bowl. Heat and stir in 30-second increments in the microwave until the chocolate is smooth and melted completely.: As you set up the coating, the scent of melting chocolate will begin to mingle with the peanut butter aroma, creating an irresistible aroma. Preparing the coating at the right moment ensures the cutouts are fully chilled and ready to be dipped. Avoid preparing the chocolate too early where it can thicken; keep it warm and smooth but not hot.
- Using a fork, lift one peanut butter cutout at a time and coat it completely with the melted chocolate. Tap excess chocolate off the cutout and place it back onto the cookie sheet.: You will see the chips soften and then gloss over as they melt, and the small amount of shortening helps the chocolate flow like silk. Stirring between bursts prevents scorching and encourages a glossy finish. Microwaves vary, so short increments prevent burning; if you overheat, the chocolate can seize and become grainy.
- Work in batches if the peanut butter cutout becomes soft quickly.: As you dip, the chocolate should envelop the tree and glisten, creating a thin, even shell. The action is tactile and satisfying, and tapping the fork lets excess chocolate drip off in a steady rhythm. If the cutout becomes too soft to handle, return it to the freezer briefly; dipping warm cutouts can cause misshapen or soggy shells.
- Allow chocolate to harden.: Tapping produces a little plink and helps the coating thin and set without pooling, leaving a smooth surface. Laying them back on parchment keeps the bottoms clean and allows the chocolate to solidify uniformly. Rushing this can leave thick bottoms that take longer to set and look uneven.
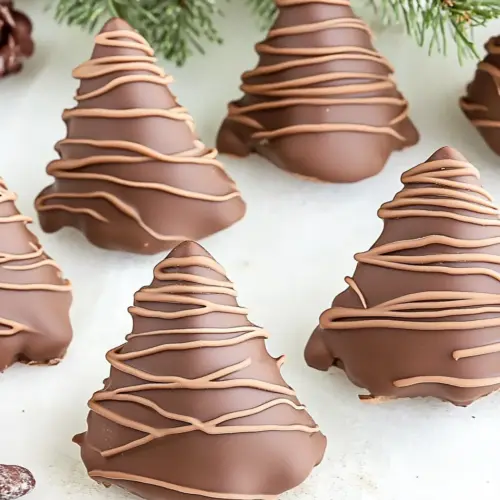
- For optional drizzle, microwave chocolate chips or chopped pieces and shortening (1/2 teaspoon per 1/2 cup) in 30-second increments until melted and smooth.: Working in small groups prevents the filling from warming up, and you will hear the faint snap of set chocolate as each batch finishes. This batching keeps your workspace tidy and preserves shape integrity. A common mistake is attempting to dip too many at once, which increases the chance of soft, misshapen trees.
- Scoop melted chocolate into a plastic baggy or piping bag. Snip a tiny corner off the baggy and drizzle in a zigzag motion over chocolate-coated trees. Allow chocolate to set, about 5 minutes.: Patience here rewards you with a crisp, glossy shell that sounds like a delicate snap when bitten. Let them rest at room temperature or briefly in the fridge to speed setting, but avoid dramatic temperature swings that can cause bloom. If the chocolate dulls, it may have been reheated too many times or exposed to moisture.
- For optional drizzle, microwave chocolate chips or chopped pieces and shortening (1/2 teaspoon per 1/2 cup) in 30-second increments until melted and smooth: The drizzle should be fluid and silky, and adding that tiny bit of shortening creates fine, even lines when piped. Transfer to a bag for a controlled drizzle, and test on parchment to adjust flow. If the drizzle seizes, gently stir in a small warm spoonful of neutral oil or reheat briefly to smooth it out.
- Scoop melted chocolate into a plastic baggy or piping bag. Snip a tiny corner off the baggy and drizzle in a zigzag motion over chocolate-coated trees. Allow chocolate to set, about 5 minutes: Drizzling adds contrast and personality, and watching the lines set creates a satisfying finish. The drizzle should cool to a matte sheen while the underlying coating stays glossy, giving visual depth. Avoid over decorating which can mask the neat silhouette of the trees; keep the design light and intentional.
Notes
- Swap chocolate ratios: Combine semi sweet and milk chocolate to vary sweetness and color contrast, which can transform the overall flavor profile.
- Make mini trees: Use a smaller cookie cutter for bite sized treats that are perfect for party platters and easier for kids to handle.
- Alternate drizzle colors: Use white chocolate for bright decorative lines, which creates a striking look against a darker coating.
- Adjust salt level: Increase or decrease the salted butter to fine tune how savory the filling plays against the sweet chocolate.
- Freeze before gifting: Store in an airtight container layered with parchment and freeze, then thaw in the fridge before serving to maintain shape during transit.