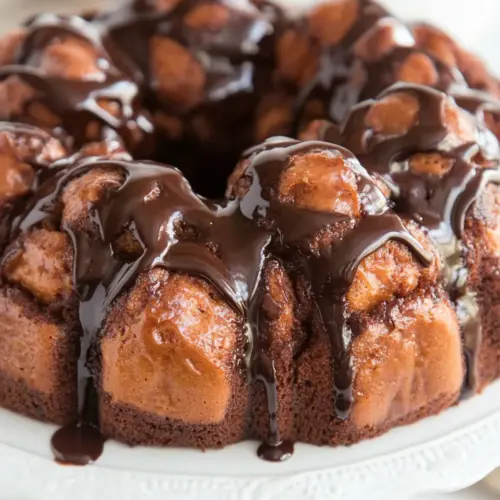
Chocolate Monkey Bread
Chocolate Monkey Bread is an easy, gooey pull apart treat with pockets of melted chocolate and caramelized brown sugar. Soft biscuit pieces coated in cocoa and brown sugar bake into a tender, indulgent loaf that is perfect for brunch or dessert. This crowd pleasing recipe is quick to assemble and delivers a warm, chocolatey experience that makes it worth trying this weekend.
Equipment
- 12 cup fluted bundt pan
- Nonstick cooking spray
- large gallon size ziploc bag
- Small Bowl
Ingredients
- 2 cans (8-count each) Pillsbury Grands Biscuits Provide soft, pre-portioned dough pieces that form the base of the monkey bread; work as easy-to-handle dough bites that bake into tender, pull-apart pieces and deliver a light, pillowy texture throughout the pastry.
- 1/3 cup (67 g) granulated sugar Add sweetness and assist in caramelization when combined with butter; dissolve into the coating to create a crisp, sugary exterior and balance the chocolate bitterness for a well-rounded flavor.
- 3 tablespoons (15 g) unsweetened cocoa powder, divided Contribute concentrated chocolate flavor and deepen color; divide usage so some intensifies the biscuit coating while the remainder can be mixed into the sauce for a layered cocoa profile.
- 1/2 cup (113 g) unsalted butter, melted Supply rich fat needed for browning and moisture; melt to form a glossy coating that helps the sugars and cocoa adhere to the biscuits and produces a tender, buttery crumb.
- 3/4 cup (150 g) packed brown sugar Provide molasses-rich sweetness and contribute to a sticky, caramelized glaze; packed brown sugar combines with butter to create the gooey interior layers and adds depth of flavor.
- 1/4 teaspoons salt Enhance overall flavor balance by suppressing sweetness and accentuating other notes; a small amount of salt rounds the taste and brings out the chocolate and butter nuances.
- 1/2 cup (85 g) chocolate chips Introduce melty pockets of chocolate that create bursts of intense flavor; sprinkle throughout the layers so chips soften into gooey centers and increase the overall chocolate impact.
Instructions
- Preheat oven to 350°F. Spray a 12-cup fluted bundt pan with nonstick cooking spray (I like using the kind with flour in it).: As you warm the oven to 350°F , you will notice a dry warming smell from the oven which primes it to create a steady, even heat. Preheating is crucial because it ensures the exterior begins to caramelize as the center sets, preventing the bread from becoming soggy. A common mistake is placing the pan in a not fully heated oven which can lead to uneven rising and underbaked pieces. If your oven runs hot, consider reducing the temperature slightly or rotating the pan halfway through baking for even browning.
- Open the cans of biscuits and slice each biscuit into 6 pieces. Place the granulated sugar and 1 tablespoon of cocoa powder in a large gallon size ziploc bag. Add the biscuit pieces, seal the bag, and shake to coat.: When you coat the bundt pan you should feel the slight texture from the spray; this helps the sticky caramel release after baking. The flour in the spray creates a thin buffer so the caramel does not lock to the pan forever. If you skip this step or under-spray, the bread can cling and break apart when inverted, which can be frustrating. I recommend a generous coating, and if your pan seems dry in spots, spray again to ensure easy release.
- Mix melted butter, brown sugar, salt (if using) and remaining 2 tablespoons of cocoa in a small bowl.: As you slice each Pillsbury Grands Biscuits , you can notice the soft dough giving slightly under the knife, which is perfect. Smaller bite sized pieces help them cook through and allow the coating to envelope each piece. One trap is cutting pieces inconsistently which leads to uneven baking, so aim for uniform pieces for even texture. Keep the pieces in a bowl or on a tray to prevent sticking as you continue preparing.
- Place half the coated biscuit pieces in the prepared pan. Top with half the chocolate chips and half the butter mixture. Repeat a second layer of biscuits, chocolate chips, and butter mixture.: When you combine granulated sugar and unsweetened cocoa powder in the bag you will smell the chocolate even before you add the dough, a sign the flavor is concentrated. This dry mix helps the cocoa adhere to the biscuit surfaces and give a subtle chocolate coating. An easy mistake is using too much cocoa here which can make the coating dry and bitter, so stick to the measured amount. Seal the bag securely to avoid spilling when you shake it.
- Bake for about 30-40 minutes until the top is very brown and the center isn’t too jiggly. The top will get crusty so you’ll want to take it out when it’s still a little jiggly in the center so the top doesn’t burn.: As you shake the bag, you will hear a soft rustling and see the dough pieces become lightly dusted with the sugar cocoa mix, which feels tactile and fun. This coating forms a base layer that the butter sugar mixture will cling to later, creating texture. Avoid over shaking which can mash the biscuits; gentle, thorough tosses are enough. If any pieces remain bare, you can quickly toss them with a spoon to finish the job.
- Let cool in the pan for about 5 minutes. Place a serving plate over the pan and invert the pan, tap the top a few times and pray that the whole thing comes out in one piece. If it doesn’t, just stick the pieces back together, no one will know!: The melted unsalted butter with brown sugar will smell rich and toffee like as you whisk, and the added unsweetened cocoa powder deepens that aroma. This mixture becomes the caramel coating that binds the pieces and creates glossy, sticky pockets. If the butter is too hot when mixed, it may dissolve the sugar unevenly, so let it cool slightly before combining. Whisk until smooth to prevent grainy spots of sugar in the batter.
- Note: do not let this cool completely in the pan or it becomes like a rock and it will be very hard to clean your pan!: As you layer, you will feel how the coated pieces nestle into each other and begin to form structure. This first layer sets the foundation for even distribution of chocolate chips and butter mixture. Packing too tightly can prevent heat from circulating, leading to underbaked centers, so leave small gaps for steam to escape. Press gently to compact without squashing the pieces flat.
- Serve as an indulgent breakfast or dessert. For extra chocolate flavor, top with chocolate sauce.: When you sprinkle chocolate chips and pour half the butter sugar mix, the chips will sink slightly and the butter will glisten as it soaks into the coated pieces. This layering creates alternating bursts of chocolate and caramel. A common misstep is pouring all the butter in one spot which can oversaturate the dough there; distribute it evenly with a spoon to ensure balanced flavor.
- Repeat a second layer of biscuits, chocolate chips, and butter mixture: Building the second layer gives the loaf height and ensures chocolate throughout. You will notice the top layer looks glossy and the chips peek through, promising pockets of melt. If pieces rise unevenly, a gentle rearrange before baking helps them settle. Avoid overfilling the pan which can cause spillover and sticky messes in the oven.
- Bake for about 30 to 40 minutes until the top is very brown and the center isn’t too jiggly: As the bread bakes you will hear faint crackles and smell a deep caramel aroma, the top turning a rich brown. The center will remain slightly jiggly when done so you should resist baking until it is rock solid, because that risks drying it out. A mistake here is waiting until the top looks completely set, which can cause the edges to overbrown. Watch for a glossy, deeply browned top and test gently with a skewer for slight jiggle.
- Let cool in the pan for about 5 minutes: Cooling briefly allows the caramel to set just enough to hold the loaf together, but not so long that it hardens into a brick. You will feel the pan become cooler to the touch and the aroma will intensify. If you let it sit too long, removal becomes difficult, so aim for the five minute window. If you pull too early, the loaf may still be loose, so a short rest is the sweet spot.
- Place a serving plate over the pan and invert the pan, tap the top a few times and pray that the whole thing comes out in one piece: The moment of inversion is thrilling, you will hear a subtle thud and then the reveal of the glossy, caramelized top with melted chips. Tapping helps release any stubborn spots. If pieces stick or it breaks apart, simply press them back together on the plate; the flavor is what matters and it will still taste amazing. Avoid jerking the pan, a gentle confident flip works best.
- Note do not let this cool completely in the pan or it becomes like a rock and it will be very hard to clean your pan: Leaving the loaf in the pan too long lets the caramel solidify and adhere strongly, which makes cleaning a chore and can cause pieces to tear when removed. If any residue remains, soak the pan in warm soapy water to loosen the sticky bits. Do not try to pry the loaf out once fully cooled, as it will likely crumble; warm water soak is the key to an easier cleanup.
- Serve as an indulgent breakfast or dessert: Serving warm amplifies the sensory experience, the aroma of chocolate chips and caramel rising as you pull apart pieces. Presentation is informal, hands on, and celebratory, perfect with coffee or milk. Avoid serving it cold if you want the chips gooey, because chilling firms the caramel and reduces that melty texture people love. For extra drama, drizzle warm chocolate sauce just before serving.
Notes
- Choose the right biscuit Use soft, large biscuits like Pillsbury Grands Biscuits to achieve the classic pull apart texture and even browning.
- Evenly coat pieces Toss biscuit pieces gently but thoroughly in the sugar cocoa bag so every bite gets a balanced dusting and the butter mixture clings properly.
- Moderate the butter temperature Let melted butter cool slightly before mixing with brown sugar so it dissolves the sugar evenly without making it grainy.
- Layer intentionally Spread the chocolate chips and butter mixture across the layer instead of dumping in one spot to avoid oversaturated pockets.
- Watch the bake time Remove the bread when the top is very brown but the center still has a slight jiggle to keep the interior soft and gooey.
- Invert with care Let the pan rest about five minutes, then flip with confidence and some light taps to release the loaf intact.