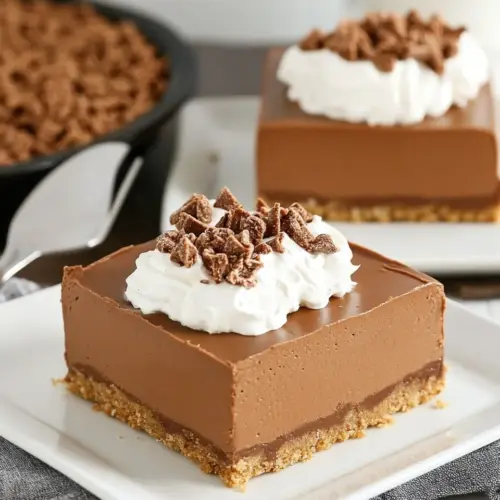
Chocolate French Silk Pie Bars with Graham Toffee Crust
Chocolate French Silk Pie Bars with Graham Toffee Crust delivers creamy, airy chocolate filling atop a crispy, toffee studded graham base. These easy to share bars offer a rich, silky texture and buttery crunch, perfect for gatherings or a special treat. Make ahead friendly and crowd approved, they are a decadent reason to bake and share.
Equipment
- Food Processor
- 8-inch square baking pan
- Electric Stand Mixer
- Microwave-safe Bowl
- Wire Rack
Ingredients
- 1 cup graham cracker crumbs Provide a crisp, buttery base by combining into crumbs that bind with melted butter and form the structural foundation for the crust when pressed into the pan and baked briefly.
- 1 tablespoon sugar Add a touch of sweetness to the crust mixture to balance the savory graham flavors and enhance caramelization during baking for a more complex crust profile.
- 1/8 teaspoon kosher salt Contribute subtle seasoning to the crust mix to heighten overall flavor and balance the sweetness, preventing the crust from tasting flat or overly sweet.
- 1/4 cup toffee bits (I used Heath Bits ‘O Brickle Toffee Bits) Introduce crunchy pockets of toffee throughout the crust to deliver bursts of caramelized sweetness and textural contrast against the smooth filling.
- 4 tablespoons unsalted butter melted Melt to bind the crumbs and toffee together, creating a cohesive, sliceable crust while providing rich, buttery flavor and aiding browning.
- 2 ounces bittersweet chocolate (I used Ghirardelli 60% Cacao Bittersweet Chocolate Baking Bar) Melt and incorporate into the filling to provide deep chocolate intensity and slightly bitter notes that balance the dessert's sweetness and enrich mouthfeel.
- 2 ounces semi-sweet chocolate (I used Ghirardelli Semi-Sweet Chocolate Baking Bar) Melt and combine with bittersweet chocolate to add sweetness and rounded chocolate flavor, supporting a silky, creamy filling texture when tempered into the batter.
- 1 cup unsalted butter softened Soften to room temperature to allow easy creaming with sugar, contributing richness, structure, and a stable emulsion that creates the filling's airy, mousse-like texture.
- 1.5 cups powdered sugar Cream with the softened butter to sweeten and stabilize the filling, helping to create a smooth, lofty confection that holds shape once chilled.
- 1 teaspoon pure vanilla extract Add aromatic complexity and enhance the chocolate flavor by providing warm, floral vanilla notes that round and lift the overall profile of the filling.
- 1 teaspoon espresso powder Dissolve to intensify and deepen chocolate flavors with a subtle espresso bitterness that amplifies cocoa notes without making the filling taste like coffee.
- pinch of kosher salt Season lightly within the filling to brighten and balance sweetness, enhancing perceived flavor depth and preventing the dessert from tasting cloying.
- 4 large pasteurized eggs at room temperature Bring body and aeration when incorporated properly, creating the light, mousse-like silk texture of the filling while contributing richness and structure when tempered correctly.
- freshly whipped and sweetened cream Top with billowy texture and mild sweetness, adding creaminess and visual contrast that complements the dense chocolate filling without overpowering it.
- bittersweet chocolate shavings Garnish with curled chocolate for an elegant finish, adding slight texture, intensified chocolate aroma, and visual appeal to each slice.
Instructions
- For the graham toffee crust: Preheat oven to 325° F. In the bowl of a food processor, combine the graham cracker crumbs, sugar, salt, and toffee bits. Pulse a few times to combine and to break down the toffee bits just a bit. Add the melted butter and pulse a few times, until mixture is combined and evenly moistened by the butter.: Preheat oven to 325° F. In the bowl of a food processor, combine the graham cracker crumbs, sugar, salt, and toffee bits. Pulse a few times to combine and to break down the toffee bits just a bit. Add the melted butter and pulse a few times, until mixture is combined and evenly moistened by the butter : Right away you will notice the sweet, toasty aroma of the graham cracker meeting butter, and the tiny flecks of toffee will glint in the bowl. Use short pulses so the toffee keeps some texture but integrates with the crumbs, creating a uniform sandy mixture that will compact easily. The reason we pulse and not over-process is to preserve little pockets of toffee, which caramelize when baked and provide contrast to the filling. A common mistake is running the processor too long, which turns the toffee into dust and removes crunch, so stop once the mixture looks evenly moistened and holds together when pinched between fingers. Keep the butter warm enough to blend but not boiling hot, because overly hot butter can melt the toffee prematurely and change the crust's texture.
- Pour mixture out into an 8” x 8” pan, and firmly press into an even layer onto the bottom of the pan. Bake for about 10 minutes, until fragrant and slightly golden. Remove to a wire rack to cool completely.: As you press the crumbs into the pan you should hear a faint compacting sound and see the surface smooth under pressure; this compression prevents a crumbly finished crust. Bake until the aroma becomes deep and toasty and the edges take on a light golden hue, which indicates enough structure to hold the filling. Cooling on a wire rack prevents steam from softening the crust and keeps it crisp. A frequent error is not pressing the crust firmly enough, which results in bars that fall apart when cut. Use the base of a measuring cup to press evenly and compact thoroughly for a sturdy foundation.
- For the chocolate French silk pie filling: In a small microwave-safe bowl, gently melt chocolates in the microwave, taking care to not scorch. Set aside and let cool until chocolate mixture is at room temperature.: In a small microwave-safe bowl, gently melt chocolates in the microwave, taking care to not scorch. Set aside and let cool until chocolate mixture is at room temperature : When melting, use short bursts at low power and stir frequently; the smell should be richly cocoa and slightly toasted. Allow the chocolate to cool until it will not melt your butter or eggs on contact, because adding warm chocolate will deflate the whipped texture. The reason for controlled melting is to preserve smoothness and shine. Overheated chocolate may seize and become grainy, which will ruin the silk texture, so test with a fingertip for warmth before proceeding. If it feels too warm, let it rest in a cool spot until it reaches room temperature.
- In the bowl of an electric stand mixer, using the paddle attachment, cream together butter and sugar on medium-high speed until fluffy, about 1 to 2 minutes. Drizzle chocolate over butter/sugar mixture and beat on medium-low speed until thoroughly combined. Add vanilla, espresso powder, and salt, and beat until combined.: You'll see the butter lighten in color and increase in volume as it whips, and the sugar will dissolve into a pale, aerated base that smells sweet and buttery. Drizzling the cooled chocolate in slowly helps it emulsify with the butter rather than creating streaks or lumps, and the mixture should look glossy once combined. Adding vanilla and espresso deepens the chocolate perfume and rounds the flavor profile. One pitfall is working with butter that is too soft, which yields a greasy rather than fluffy texture, so aim for butter that yields slightly to pressure but retains structure.
- Switch to the whisk attachment. Then add one egg and beat for 5 minutes on medium speed. Repeat with remaining three eggs, beating the mixture for an additional 5 minutes with each egg addition, for a total of 20 minutes of beating.: This long, staged whipping is critical for the French silk character; you'll notice the mixture lighten and become aerated with each egg, producing a glossy, mousse like consistency. The sound of the mixer will change to a higher pitch as air is incorporated, and the texture should be smooth and satiny to the touch. The technique creates stability and volume so the filling will set firm yet tender in the fridge. A common error is adding eggs too quickly or all at once, which prevents proper emulsification and yields a runny or separated mixture. Patience here rewards you with the signature silkiness.
- Pour chocolate filling into cooled graham toffee crust, spreading evenly with a spatula. Refrigerate for at least 3 hours or until thoroughly chilled before serving.: As you spread the filling, notice how it levels easily and takes on a mirror like sheen before it sets. Chilling firms the texture so that clean slices are possible, and resting time allows flavors to meld, with the chocolate and toffee notes deepening. Place the pan on a flat shelf in the fridge to avoid sloshing, and cover lightly to prevent absorbing other odors. A typical mistake is cutting too soon; insufficient chilling causes squishy bars that will not slice cleanly. Wait the full time for best results.
- To serve, top with freshly whipped, sweetened cream. Garnish with chocolate shavings.: The cool, lightly sweetened whipped cream adds an airy contrast to the dense filling and tempers the chocolate intensity. Chocolate shavings introduce an elegant bitter edge and visual drama. When applying whipped cream, spread gently so you do not press into the filling, and grate chocolate directly over the top for immediate visual impact. Avoid heavy toppings that overwhelm the delicate balance, and use a warm knife for slicing if you want very clean edges, wiping between cuts to keep slices immaculate.
Notes
- Line the pan for clean removal: Fold a 16 inch strip of foil into an 8 inch by 16 inch strip and press into the 8 inch square pan leaving two overhangs. This allows you to lift the bars from the pan for neat slicing and presentation, preventing smashed edges when trying to flip them out.
- Warm knife for slicing: Dip a long, thin, non serrated knife in a tall glass of warm water and wipe it clean between cuts. The warmed blade glides through the chilled filling, producing smooth edges and preventing crumb drag that ruins the appearance of each bar.
- Short pulses for toffee: When pulsing the toffee bits with the graham crumbs, use short bursts to break them down just a bit while retaining texture. Over processing removes the delightful toffee crunch that makes the crust special.
- Monitor mixer speed: Start whipping at lower speeds when incorporating chocolate and then increase as needed to avoid splatter and ensure even emulsification. Too high a speed at the wrong moment can over aerate and destabilize the mixture.
- Sift powdered sugar: If your powdered sugar has lumps, sift before adding to prevent grit in the filling. A fine, lump free sugar dissolves quickly, creating a silkier mouthfeel in the finished filling.