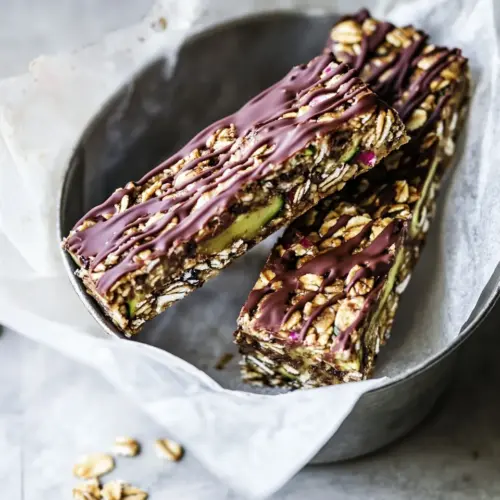
Chocolate Dipped Zucchini Granola Bars
Chocolate Dipped Zucchini Granola Bars are chewy, crispy, and satisfyingly chocolatey with a subtle veggie boost. These bars combine zucchini, hearty oats, crunchy almonds, and a glossy chocolate coating for an easy make ahead snack. Perfect for lunchboxes, picnics, or an easy afternoon pick me up, they are delicious and worth making again and again.
Equipment
- 9 x 13 inch baking dish
- Parchment Paper
- Large Bowl
- Measuring Cup
- Baking Sheet
Ingredients
- 2 cups freshly grated zucchini squeeze out excess water 1 med or 2 sm Grate finely and squeeze out excess moisture to keep bars from becoming soggy; provides subtle vegetal sweetness and bulk while adding moisture and nutrients like vitamin C.
- 3 cups old fashioned oats use gluten free if needed Bind and add hearty texture to the bars while providing whole-grain fiber and chew; use gluten-free oats if accommodating sensitivities to keep structure intact.
- 1 tablespoon butter or coconut oil melted Melt gently to add richness and help bind dry ingredients; contributes a subtle buttery flavor and aids in browning the bars during baking or pressing.
- 1 cup brown rice krispies Introduce light crispness and a familiar cereal crunch that balances the chewiness of oats; helps maintain a pleasant, airy texture throughout.
- 1 cup whole grain Cheerio's use more brown rice krispies for gluten free Add additional whole-grain crunch and slightly toasted flavor while supporting bulk and texture; can be swapped as noted for dietary needs without altering method.
- 1/2 cup almonds roughly chopped Roughly chop to retain noticeable nutty bites and a satisfying textural contrast; contribute healthy fats, protein, and a toasty flavor when lightly toasted or raw.
- 1 tablespoon chia seeds Sprinkle in to boost binding through gel-forming soluble fiber and provide a mild nutty taste; improves moisture retention and adds omega-3-rich benefits.
- 1 tablespoon ground flax seeds flax meal Stir in as a fine binder to thicken mixtures and add subtle nuttiness; supplies fiber and plant-based omega fatty acids to enrich nutrition profile.
- 1/4 teaspoons salt Season lightly to enhance overall flavors and balance sweetness; small amounts sharpen taste and help bring out the other ingredients without being salty.
- 1/2 cup creamy peanut butter or almond any nut/seed butter works too Soften and stir in to create creamy cohesion and a rich mouthfeel while contributing protein and healthy fats; can be swapped with other nut or seed butters.
- 1/2 cup honey or maple syrup for a vegan version Sweeten and bind the mixture while adding moisture and chewable stickiness; choose maple syrup for a vegan alternative with similar binding properties.
- 1 1/2 teaspoons vanilla extract Add for aromatic depth and to round out sweetness; a small amount elevates flavor complexity and pairs particularly well with chocolate and nutty elements.
- 12 ounces semi-sweet milk or dark chocolate (for vegan version use dark chocolate, melted) Melt and drizzle or dip to form a glossy, firm chocolate coating that adds sweetness and a contrasting texture; choose dark chocolate for a vegan or less sweet option.
Instructions
- Preheat the oven to 350 degrees F. Line a 9 x 13 inch baking dish or half sheet pan with parchment paper or greased tin foil. In a large bowl toss together the zucchini, oats, coconut oil, brown rice krispies, cheerio's, almonds, chia seeds, ground flax and salt. Give it all a good toss.: As soon as your oven warms, you will notice a faint dry heat that helps set the stage for proper baking, and parchment prevents sticking so the bars release cleanly. The visual cue is steady, even heat from the oven vent; you should not see hot spots or heavy smoke. This ensures even browning during the bake. A common mistake is skipping the lining, which makes it hard to remove the bars without breaking them.
- In a bowl or 2 cup glass measuring cup add the peanut butter and honey. Microwave the mixture on high for 30 second intervals until the mixture is smooth and almost bubbling on top (about 2 minutes). Stir in the vanilla extract. Pour the mixture over the granola and toss well, making sure all the dry ingredients are coated with the wet.: Right away you will sense the contrast in textures, the damp grated zucchini meeting dry oats and crisp cereals, and a faint nutty aroma as the chopped almonds mingle. Tossing ensures even distribution of moisture and binders, so no single patch becomes overly wet. If pieces clump, break them apart with a fork, since uneven mixing causes inconsistent baking later. Avoid overworking the mix which can crush the crisp elements.
- Spread the granola into the pan and press down hard. I used the back of a measuring cup to press the granola into the pan (spray or oil the bottom so it does not stick and press hard!), it works awesome!: When you warm the peanut butter and honey , steam and a sweet, toasty scent will rise, and the mixture becomes glossy and pourable, important for even coating. Stirring in the vanilla while warm helps it bloom into the mixture. Pour over the dry mix and toss so each oat fleck and cereal puff is lightly glazed, which ensures the bars will hold. A frequent error is overheating the nut butter until it scorches, resulting in a bitter taste, so use short intervals and stir between bursts.
- Bake for 20 to 25 minutes. The bars will be golden on top. Remove the bars and let them cool completely before cutting. Once cool, cut into bars.: As you press, you will feel the mixture compact and the surface becomes smooth and slightly glossy from the pressed oils, which signals good adhesion between particles. The sound is a quiet compacting hiss as air pockets collapse, and the visual cue is a uniform dense layer with no loose crumbs. Pressing firmly is essential because loosely packed bars fall apart after baking; one mistake is being too gentle, which yields crumbly bars that crumble when cut.
- Line a baking sheet with wax or parchment paper. Dip the granola bars into the melted chocolate and place them on the baking sheet chocolate side up. Place the pan in the freezer for 10 minutes, remove the bars and flip them over, if desired drizzle with any remaining chocolate. Freeze another 5 minutes. Store in a sealed container or wrapped in plastic wrap. Can be kept in the fridge or in a cool and dark pantry or cupboard.: During baking you will notice a warm baked cereal aroma and gentle browning on the surface, the edges pulling away slightly from the pan. The top should be golden, not dark brown, which indicates caramelization without burning. Cooling is crucial so the matrix sets; cutting while hot invites crumbling and ragged edges. A common misstep is impatience, slicing too soon which ruins the neat bars you want.
- Line a baking sheet with wax or parchment paper. Dip the granola bars into the melted chocolate and place them on the baking sheet chocolate side up. Place the pan in the freezer for 10 minutes, remove the bars and flip them over, if desired drizzle with any remaining chocolate. Freeze another 5 minutes. Store in a sealed container or wrapped in plastic wrap. Can be kept in the fridge or in a cool and dark pantry or cupboard.: When the melted chocolate meets the cool air it will shine briefly and then set to a crisp snap, creating a satisfying contrast to the chewy interior. The temperature difference produces an audible tiny snap when you bite in, and visually you should see a smooth glossy coating before it dulls as it sets. Freezing speeds the setting process, and flipping ensures even coverage; skipping the brief freezer step can result in smeared chocolate and sticky handling. A typical error is overheating the chocolate so it seizes when mixed, so melt gently and stir until glossy.
Notes
- Swap nut butter: If you prefer a different flavor profile, use almond butter instead of peanut butter, it yields a milder, slightly sweeter finish and still binds well when warmed.
- Vegan option: Replace honey with maple syrup and choose dairy free dark chocolate to make these bars vegan friendly while keeping a good set.
- Gluten free: Use certified gluten free old fashioned oats and replace whole grain Cheerios with additional brown rice krispies if necessary for a safe gluten free version.
- Toasting cereal: Toast the old fashioned oats and chopped almonds on a sheet at 350 for 15 minutes, stirring halfway, to amplify nutty aromas and deepen flavor complexity.
- Prevent sticky measuring: Coat measuring cups lightly with oil before measuring sticky ingredients like honey or peanut butter to ease pouring and reduce waste.
- Chocolate melting: Melt chocolate in short bursts over gentle heat, stirring frequently to avoid overheating and preserve a smooth glossy finish.
- Storage: Keep bars in an airtight container in the fridge for firmer texture, or in a cool pantry for room temperature convenience; wrapped bars freeze well for long term storage.