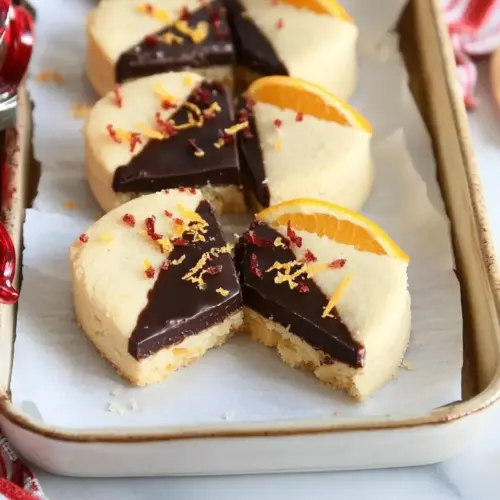
Chocolate Dipped Orange Shortbread Cookies
Chocolate Dipped Orange Shortbread Cookies are buttery, zesty, and elegantly dipped in both white and dark chocolate for visual contrast. The bright orange zest cuts through the rich butter and chocolate, creating a crisp, tender shortbread that is perfect for gifting or holiday trays. This easy to follow cookie blends texture and flavor, making it a must try for cookie lovers.
Equipment
- Stand mixer
- Mixing Bowl
- Baking Sheets
- Parchment Paper
- Microwave safe bowls
- Plastic Wrap
- Wire Rack
Ingredients
- 2.25 c. all-purpose flour Provides the structural base and bulk for the cookie dough, contributing gluten for texture and stability. Measures by cups for consistency and is sifted or whisked with other dry ingredients to prevent lumps. Balances with fats and sugars to create a tender, crumbly shortbread crumb.
- 1.5 T. cornstarch Lightens the shortbread by tenderizing the dough and reducing gluten development, yielding a delicate, melt-in-your-mouth texture. Works with the flour to create a finer crumb and subtle silkiness without adding flavor. Is incorporated into the dry mix to ensure even distribution.
- 1/8 tsp . kosher salt Season the dough subtly to enhance overall flavor and balance sweetness, preventing the cookies from tasting flat. Dissolves into the dough and helps highlight the citrus and chocolate notes. Use sparingly to avoid overpowering the shortbread's delicate profile.
- zest from 2 large oranges Deliver bright citrus aroma and concentrated orange oil that elevates the cookie’s flavor profile with fresh, zesty notes. Added to the dough to infuse both fragrance and subtle acidity that complements brown sugar and chocolate. Zest should be finely grated to distribute evenly without adding moisture.
- 1 c. unsalted butter softened (I used Land O Lakes® European Style Super Premium Butter) Contributes rich fat and moisture that creates a tender, flaky shortbread texture and carries flavors throughout the cookie. Softened butter is creamed with sugar to incorporate air for a light crumb and to bind dry ingredients. Quality butter enhances richness and flavor depth in the finished cookie.
- 1/2 c. packed light brown sugar Adds caramel-like sweetness and moisture that deepens the flavor and produces a chewier, more flavorful shortbread. Creamed with butter, packed brown sugar helps maintain the cookie’s tenderness and complements the citrus zest. Provides subtle molasses notes that pair well with chocolate.
- 2 tsp . pure vanilla extract Imparts warm, sweet aromatic notes that round out the cookie flavor and enhance other ingredients like orange and vanilla. Stirred into the creamed butter and sugar to evenly distribute flavor without affecting texture. Use pure extract for a clean, true vanilla profile.
- 6 oz . white chocolate (I used Ghirardelli white chocolate baking bar) Forms a sweet, creamy coating when melted and used for dipping or drizzling, offering contrast to the crunchy shortbread. Melts smoothly and can be tempered or combined with a bit of shortening for better shine and stability. Pairs with citrus and nuts to create a luscious finishing layer.
- 3 oz . semi-sweet chocolate (I used Ghirardelli semi-sweet chocolate baking bar) Provides a bittersweet chocolate option for dipping or decorating, contributing deeper cocoa notes and structure when melted. Melts to a glossy finish and layers well with white and bittersweet chocolates for varied chocolate intensity. Balances sweetness from white chocolate and acidity from orange zest.
- 3 oz . bittersweet chocolate (I used Ghirardelli 60% cacao bittersweet chocolate baking bar) Adds intense cocoa flavor and firm texture when melted and used in combination with other chocolates, supplying depth and slight bitterness. Helps create a layered chocolate coating with complexity and less sweetness than milk versions. Can be tempered or mixed with shortening for smoothness and shine.
- 1 tsp . vegetable shortening divided Improves the texture and sheen of melted chocolate when used during melting or tempering, preventing graininess and helping achieve a smooth, glossy finish. Divided usage allows small amounts to be added to different chocolate types for better handling. Keeps chocolate workable and enhances mouthfeel after setting.
- 1/4 c. roughly chopped roasted and salted pistachios Introduce a crunchy, savory-sweet counterpoint with roasted, salty notes that contrast the cookie’s sweetness and enhance mouthfeel. Chopped coarsely to provide texture without overwhelming bites, they also add visual color and nutty aroma. Sprinkle or press into chocolate-dipped edges for accent and balance.
- 1/4 c. roughly chopped dried cranberries Contributes chewy texture and bursts of tart-sweet fruit flavor that complement the orange zest and chocolate. Chopped into pieces to distribute fruitiness throughout the cookies or folded into dipped chocolate for contrast. Adds visual color and a pleasant chew to each bite.
- flaky sea salt Adds a final savory crunch and bright mineral flavor when lightly sprinkled on the chocolate-dipped surfaces, elevating the overall taste experience. Used sparingly to accentuate the contrast between sweet chocolate and buttery shortbread, enhancing flavor complexity. Provides an upscale finish and slight texture pop.
Instructions
- In a small bowl, whisk together flour, cornstarch, salt, and orange zest. Set aside.: As you whisk, notice the pale flecks of orange zest dispersing through the powdered flour and cornstarch , releasing a bright citrus scent that signals freshness. The dry mix should look uniform, with no lumps of cornstarch or clumps of zest. This step matters because even distribution prevents pockets of starch or salt in the cookie, which would create uneven texture. If you skip thorough whisking, you might get dense spots or a bitter bite from pithy zest. A common mistake is zesting too aggressively and including white pith, which can add bitterness, so zest gently and inspect your peel.
- In the bowl of a stand mixer, cream together butter and sugar for two minutes on medium speed, scraping down the bowl halfway through. Add vanilla extract and beat until mixed in. Add the dry ingredients in two batches to the butter and sugar mixture, mixing on medium speed until all ingredients are combined. Do not over mix.: When creaming, watch as the unsalted butter and light brown sugar transform into a lighter, slightly fluffy mass, and inhale the caramel notes from the sugar . Scraping the bowl ensures no pockets of butter or flour remain, creating a homogeneous dough. Adding dry ingredients in two batches helps integrate them without overworking gluten, which preserves tenderness. Over mixing at this stage is the most common error, leading to tough cookies, so stop as soon as the mixture looks cohesive. If the dough seems greasy, your butter may have been too soft.
- Divide the cookie dough in half. Add first half to a long piece of plastic wrap. Shape the dough into an 8" long log that is about 1-1/2" thick, and roll up in the plastic wrap, twisting and tucking ends underneath to secure. Repeat with other half of the dough. Chill both wrapped dough logs in refrigerator for at least three hours or overnight.: As you shape the logs, feel how the dough firms slightly from your hands and becomes easier to roll, a tactile cue that it will slice cleanly. Chilling solidifies the butter , preventing the cookies from spreading during baking, and it deepens the flavor as the ingredients relax. A mistake here is trying to slice warm dough, which leads to misshapen rounds, so be patient and chill thoroughly. If pressed for time, a short freeze helps, but do not let the dough freeze solid because that makes slicing uneven.
- Preheat oven to 350° F. Line baking sheets with parchment paper and set aside.: The oven should reach a steady temperature so the cookies bake evenly, and parchment prevents sticking while providing a gentle surface for browning. Notice the faint warmth that fills the kitchen as the oven approaches 350° F, and use an oven thermometer if yours runs hot or cool. Baking on an unlined sheet can cause uneven bottoms and sticking, so take the extra step to line the pans. A typical error is crowding the sheets; give cookies space to breathe.
- Unwrap chilled dough logs, cut dough into 3/8" thick slices, and place on parchment paper lined baking sheets. Bake for about 12 minutes, or until done. Let cookies cool on pan for one minute before removing to wire racks to cool completely.: Watch the edges for the first hint of a pale golden hue, and listen for the quiet settling sound as moisture redistributes in the hot cookie. The centers should remain pale, with firmer edges, which indicates proper doneness for a tender shortbread. Cooling briefly on the pan lets the structure set so cookies transfer cleanly to a wire rack without breaking. Cutting slices too thin will produce crisp cookies, while too thick gives underbaked centers, so aim for that 3 8" thickness and use a sharp knife for clean rounds.
- In a small bowl, gently melt the white chocolate and 1/2 teaspoon of the shortening in the microwave in 30 second increments, mixing thoroughly between each heating so the white chocolate doesn’t scorch. Dip a cooled cookie into white chocolate halfway and allow the excess white chocolate to drip back into the bowl. Very gently scrape the underside of the cookie along the side of the bowl to remove excess chocolate on the underside of the cookie. Place dipped cookie on a wax paper lined baking sheet. Dip a few more cookies and then sprinkle a few chopped cranberries and pistachios on top of the white chocolate. Finish with a sprinkle of flaky sea salt. Repeat until you have dipped half of the baked cookies into the white chocolate.: As you melt the white chocolate , stir and watch for a glossy sheen, which signals smooth, fluid chocolate ready for dipping. The aroma will be sweet and creamy, and the texture should coat the back of a spoon. Dipping halfway creates a pleasing two tone look and keeps a bite of uncoated shortbread. Work in small batches so the chocolate does not cool and thicken, and avoid overheating which causes graininess. If the chocolate seizes, adding tiny amounts of warm shortening while stirring may rescue it, but prevention by gentle heating is best.
- Now repeat this process with the remaining half of the cookies, this time dipping the cookies into a mixture of semi-sweet and bittersweet chocolate. In a small bowl, gently melt the semi-sweet chocolate, bittersweet chocolate, and 1/2 teaspoon of the shortening in the microwave in 30 second increments, mixing thoroughly between each heating so the chocolates don’t scorch. Dip one of the cooled cookies into chocolate halfway and allow the excess chocolate to drip back into the bowl. Very gently scrape the underside of the cookie along the side of the bowl to remove excess chocolate on the underside of the cookie. Place dipped cookie on a wax paper lined baking sheet. Dip a few more cookies and then sprinkle a few chopped cranberries and pistachios on top of the chocolate. Finish with a sprinkle of flaky sea salt.: The mixed dark chocolates will yield a deeper, more complex cocoa aroma as they melt together, and the melt should be glossy and slightly viscous. The darker coating will firm with a pleasant snap once set, providing a nice contrast to the tender shortbread. If the chocolate cools too quickly, place the bowl over a warm water bath for short intervals while stirring, but avoid steam contact. A common mistake is overheating dark chocolate, which can burn and taste bitter, so use gentle, controlled heat.
- Chill dipped cookies in the refrigerator for 15 to 20 minutes to set the chocolate.: Placing the tray in the fridge ensures the chocolate firms evenly and quickly, creating a glossy finish and stable coating. You will hear a faint clink as the tray goes in, and when you remove it the chocolate should be set to the touch and slightly firm. Avoid leaving them in too long, because condensation can form if moved between temperatures abruptly. One mistake is stacking warm cookies, which can mar the chocolate, so wait until fully set before handling or packaging.
Notes
- Measure your flour correctly by spooning it into the cup and leveling with a knife, this prevents dense cookies from too much flour.
- Keep butter at the right softness so it creams well with the sugar, meaning it should yield to gentle pressure but not be greasy.
- Zest just the colored rind to capture bright orange oils without bitter pith, this preserves a clean citrus note.
- Work in small chocolate batches to keep melts fluid and glossy for dipping, stirring between microwave intervals prevents scorching.
- Use wax or parchment lined trays to let dipped cookies set cleanly, which makes them easier to transfer and package.