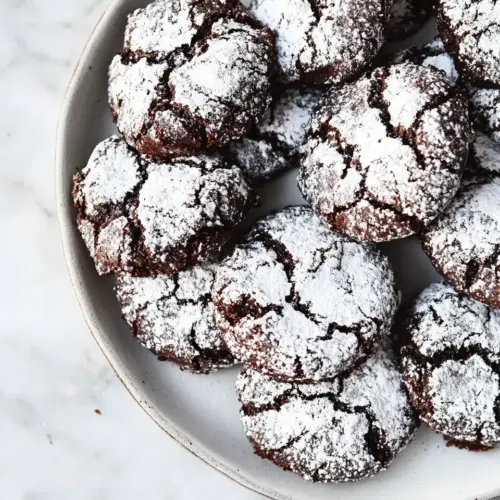
Chocolate Crinkle Cookies
Chocolate Crinkle Cookies deliver a fudgy, rich interior with a crackled powdered sugar top, creating a visually stunning and irresistibly soft cookie. With deep cocoa notes, melty chocolate chips, and a tender crumb, these cookies are perfect for holiday trays or easy weeknight baking. Make them for a reliable crowd pleasing treat that tastes like a bakery classic and keeps well for gifting.
Equipment
- Mixing Bowls
- Whisk
- Rubber spatula
- Spring loaded cookie scoop
- Baking Sheets
- Parchment Paper
- Microwave-safe Bowl
Ingredients
- 2 cups (240 g) all-purpose flour Provide structure and bulk to the dough by forming the gluten network when mixed; measure accurately and sift if needed to avoid lumps and ensure even texture for tender cookies.
- 1/4 cup (21 g) unsweetened 100% cocoa powder* not Dutch-processed Add deep chocolate flavor and color while contributing slight dryness; choose unsweetened, non-Dutch cocoa for brighter acidity and proper leavening reaction with baking powder.
- 1 and 1/2 teaspoons baking powder Leaven the cookies by producing carbon dioxide bubbles during baking; distribute evenly through the dry ingredients to help the cookies rise and maintain a light crumb.
- 1/2 teaspoons salt Enhance overall flavor balance and strengthen gluten slightly while controlling fermentation; dissolve thoroughly in the dry mix to ensure even seasoning throughout the dough.
- 12 ounces 60% cocoa dark chocolate finely chopped Provide concentrated chocolate intensity, fat, and melt-in-mouth pockets; finely chopping ensures rapid melting when combined with warm butter for a cohesive, chocolate-forward dough.
- 12 tablespoons (169 g) unsalted butter Contribute richness, tenderness, and moisture while promoting spread; melt with chocolate to create a smooth base and cool slightly before combining with eggs to avoid scrambling.
- 3/4 cup (159 g) light brown sugar packed Introduce caramel-like sweetness and moisture to the dough while aiding chewiness; pack firmly for accurate measurement and cream with butter and sugars for aeration.
- 1/2 cup (99 g) granulated sugar Offer bulk sweetness and help with cookie spread and crisp edges; combine with brown sugar to balance moisture and assist in creating the crinkle surface.
- 4 large eggs room temperature Bind ingredients, add structure, and provide moisture and richness; using room-temperature eggs helps achieve proper emulsification and consistent dough texture.
- 1/3 cup (76 g) sour cream Add moisture, tang, and tenderness while slightly loosening the dough; sour cream contributes acidity that can activate leaveners and produce a softer crumb.
- 1/4 cup (57 ml) neutral oil vegetable or canola oil recommended Increase tenderness and moisture due to added fat while contributing a neutral flavor; choose a light oil to prevent altering the intended chocolate profile.
- 2 teaspoons vanilla extract Provide aromatic sweetness and depth to complement chocolate and enhance overall flavor; add with other wet ingredients for even distribution throughout the batter.
- 2 cups mini chocolate chips Deliver concentrated pockets of melty chocolate and extra texture throughout the cookies; fold in gently to maintain dough structure and avoid overmixing.
- 1 cup (199 g) granulated sugar Create an outer coating that adds crunchy sweetness and helps form a crinkle when baked; use for rolling dough balls before dusting with confectioners' sugar.
- 1 cup (114 g) confectioners' sugar sifted Produce the signature crinkled appearance and provide a sweet, delicate finish; sift to remove lumps and coat chilled dough balls evenly for best results.
Instructions
- In a medium bowl, whisk together the flour, cocoa powder, baking powder, and salt. Set aside until needed.: The dry mix should smell faintly of chocolate and have an even, cocoa dusted color, which tells me the cocoa is well distributed. Whisking aerates the flour slightly and breaks up any clumps, ensuring every scoop of dough gets the same balance. If you skip whisking you can end up with pockets of baking powder or clumps of cocoa that alter the texture. Watch for any dark streaks or lumps, and rewhisk until the mixture looks uniform.
- In a large, microwave safe bowl, combine the chocolate and the butter. Heat in the microwave, on low power, in 15 second increments, mixing in between each, until butter and chocolate are completely melted and can easily be whisked smooth. Set aside to cool briefly.: As you melt, the aroma should shift to a warm, glossy chocolate scent, and stirring yields a silky, shiny blend. Gentle, incremental heating prevents the chocolate from seizing into a grainy mass, and stirring between bursts lets residual heat finish the job. If the chocolate looks grainy or separated, stop heating and whisk vigorously or add a tiny splash of warm cream to coax it smooth. Avoid overheating which creates burnt notes.
- In a large bowl whisk together both sugars and the eggs, beating until well combined. Beat in sour cream, oil, and vanilla. Then fold in the melted chocolate, stirring until evenly combined.: At this stage the mixture should become glossy and slightly thick, with the sugars fully incorporated into the eggs, giving a sweet, custardy aroma. Folding in the warm chocolate warms the bowl a bit, so let the chocolate cool slightly if the eggs feel hot to the touch. A common mistake is overbeating, which can introduce too much air and change the texture; aim for smooth and cohesive rather than foamy. If the mixture looks curdled, continue stirring gently until it smooths out.
- Using a rubber spatula, fold the dry ingredients into the wet ingredients, stirring just until combined. Do not over mix here! Fold in the mini chocolate chips, stirring until everything is just combined.: The dough will feel dense and slightly tacky, smelling of rich chocolate and butter. Folding preserves a tender crumb by minimizing gluten development; overmixing creates a tougher cookie. Fold with care until you no longer see streaks of flour, then add the chips and fold until evenly scattered. If you see large pockets of dry flour, use a few more gentle folds, but stop once uniform.
- Refrigerate for 2 hours. 30 minutes before baking, preheat the oven to 325 degrees (F). Line two large baking sheets with parchment paper, lightly spray them with non-stick spray, and set aside.: Chilling firms the dough, concentrating flavors and making it easier to scoop. The cold dough also controls spread in the oven, so you get those classic crackles instead of flat cookies. Preheating ensures the oven is ready when the dough comes out; if you skip chilling the cookies may spread too thin. If your dough is too hard after chilling, let it sit a few minutes to soften slightly so it scoops easily.
- Using a medium spring-loaded cookie scoop, scoop out level mounds of the cookie dough (about 65 grams each), and your hands to roll them into balls.: A spring loaded scoop gives consistent sizes so cookies bake evenly, and rolling with your hands smooths any rough edges so the sugar coats cleanly. The dough should be cool and slightly tacky, leaving minimal residue on your palms. If the dough sticks too much, chill it a touch longer or lightly flour your hands to help. Uneven scoops lead to uneven baking, so aim for consistent weights.
- Roll each ball into the granulated sugar first, then roll in the confectioners’ sugar, making sure each ball of cookie dough is well coated. Place balls of cookie dough onto the prepared baking sheets, leaving 2 inches in between each cookie for spreading.: The dual sugar coating creates a crunchy outer layer and that classic snowy finish when the powdered sugar cracks. You should see a clear white halo of powder on the dark dough before baking. If the granulated sugar rubs off too easily, press gently to adhere it, and be sure the confectioners' sugar is sifted to avoid clumps. Crowding the tray will stop proper cracking and produce merged cookies.
- Bake, one tray at a time, for 12 to 14 minutes, or until cookies are puffed and the tops begin to crack. Allow the cookies to cool completely – at least 20 minutes – on the baking sheets before removing.: In the oven you will watch the cookies rise and fissure, releasing a warm chocolate scent. The tops should be set but the centers still soft, as the cookies continue to set while cooling. Removing them too soon will risk breakage and underbaked centers, while leaving them too long can dry them out. If the edges brown too quickly, your oven may run hot, so lower the rack or reduce temperature slightly.
- Pour the granulated sugar into a shallow bowl, set aside until needed.: Preparing the coating bowls ahead keeps your workflow smooth and prevents the powdered sugar from clumping into damp spots. A shallow bowl helps roll the dough evenly and ensures full coverage. If your sugar gets damp or cakey, replace it to keep the coating consistent. Keep bowls covered if you're pausing to avoid dust settling in them.
- Pour the confectioners' sugar into a shallow bowl, set aside until needed.: Sifted confectioners' sugar should be light and cloud like, and having it in a shallow bowl makes rolling effortless. An even coating is essential for the signature crackle contrast; if your sugar compacts, fluff it with a fork before use. Store any leftover sifted sugar in a dry container to avoid clumping for future batches.
Notes
- Chilling Time: If you are short on time, freeze the dough for 30 to 45 minutes instead of refrigerating for two hours, but monitor scoopability so you can still roll neat balls.
- Chocolate Quality: Use a 60 percent cocoa dark chocolate for richness without excessive bitterness, and finely chop it for rapid, even melting and smooth texture.
- Sugar Coating Order: Rolling first in granulated sugar then confectioners' sugar gives a crisp outer layer under the powder that supports dramatic cracking as the cookie expands.
- Tray Rotation: Bake one tray at a time in the center of the oven for even heat, and rotate only if your oven has notable hot spots to avoid uneven browning.
- Storage: Store cooled cookies in an airtight container at room temperature for up to five days, or freeze baked cookies for up to three months, separating layers with parchment.