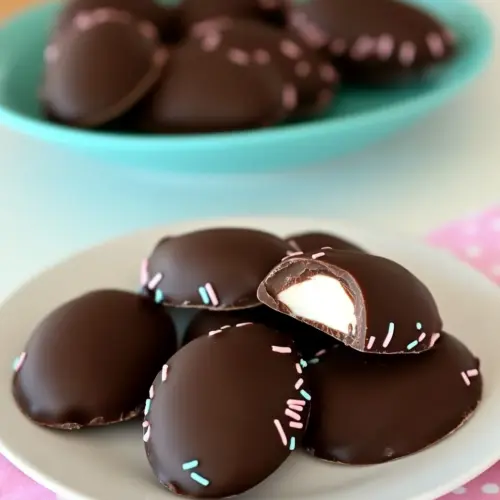
Chocolate Covered Cream Eggs
Chocolate Covered Cream Eggs are creamy, candy coated little bites that combine a smooth, sugary filling with a crisp chocolate shell. Perfect for spring and Easter gatherings, these easy to make treats offer a fun hands on assembly and beautiful results for gifting. They are an ideal sweet to make ahead and share, bringing nostalgic charm and a polished finish to any dessert table.
Equipment
- Electric Mixer
- Double boiler or ceramic bowl
- Egg candy mold or deviled egg plate
- Spatula
- Refrigerator
Ingredients
- 1/2 cup light corn syrup 1/4 cup butter 1 teaspoon vanilla 1/4 teaspoon salt 3 cups powdered sugar, sifted 4 drops yellow food coloring 1-2 drops red food coloring Provide sweetness, chewiness, and binding to the candy center while contributing moisture and gloss; combined with butter, powdered sugar, vanilla, salt, and food coloring to form a pliable fondant-style filling that can be shaped into egg forms and holds its structure when chilled or coated.
- 1 (12 ounce) chocolate chips of your choice (I used dark chocolate, feel free to use semi-sweet or milk chocolate, up to you!) 2 teaspoons vegetable shortening Melt smoothly into a shiny, firm coating that sets to a crisp shell; combined with a small amount of vegetable shortening to improve meltability and sheen, the chocolate creates the outer chocolate-covered layer that protects and complements the sweet filling.
Instructions
- Combine the corn syrup, butter, vanilla and salt in a large bowl. Beat well with an electric mixer until smooth. Add powdered sugar, a little bit at a time and mix by hand after each addition. Mix until creamy.: The bowl will smell subtly buttery and sweet as you add the butter and vanilla , and the glossy, viscous texture of the corn syrup will help bind everything. Use soft butter so it incorporates quickly, and mix until no streaks remain. If the mixture seems oily, it likely means the butter was too warm, chill briefly to firm it up. A common mistake is rushing this step, which can leave lumps, so scrape the sides of the bowl often to ensure even blending.
- Remove about 1/3 of the sugar mixture and place in a small bowl. Add the food coloring and mix well. Cover both mixtures and chill for at least 2 hours or until firm and workable.: You will hear a steady, even whir as the mixer smooths the mixture, and the texture should go from shaggy to silky. Mixing aerates the base slightly, creating a lighter mouthfeel in the finished filling. Avoid overbeating, which can warm the mixture and make it too soft, so stop when the texture is uniformly smooth and glossy.
- Combine the chocolate chips and shortening in a double boiler or ceramic bowl. Slowly melt, stirring gently, until mixture is smooth.: The powdered sugar will create a dense, pliable dough as you fold it in. Pause to press the mixture with your hands when it becomes too stiff for the mixer, because that tactile feedback tells you when to stop. If you dump the sugar all at once the texture will be uneven and crumbly, which is a frequent pitfall, so add it gradually to keep the filling cohesive.
- Prepare an egg candy mold (or you can also used a deviled egg plate lightly greased with shortening).: The finished filling should be creamy and hold shape without crumbling, with a lightly sweet aroma from the vanilla . When you press a small amount between fingers it should form a smooth ball. If it feels sandy, more mixing and slight warming can help, but be careful not to overheat. A mistake to avoid is adding liquid to rescue dryness, which will ruin the consistency.
- Thinly coat the inside of the mold with chocolate coating. Refrigerate or freeze until set.: Separating this portion creates the little yolk centers. The smaller bowl will let you color the mixture more intensely without affecting the larger batch. If you forget to set aside this portion early on, you will not be able to fashion a distinct yolk shade later, so plan ahead.
- Carefully press a layer of white filling into the mold (you may need to grease your hands – this stuff is sticky!) followed by a small oval of orange, and another layer of white. Spread inside mold. Top with more chocolate filling and refrigerate or freeze until completely set before removing from molds. Repeat with remaining chocolate and filling.: As you stir in the yellow food coloring and a touch of red food coloring , you will see the color deepen into a natural orange. Mix until color is uniform, scraping the bowl as needed. Too much coloring can make the filling wet, so add sparingly. People often overdo coloring, which can create an artificial flavor perception, so increment slowly.
- Alternatively, you can also roll a small, marble size from the orange filling. Wrap a small amount of the white filling around the orange. Form into the shape of eggs and place on a lightly greased cookie sheet. Chill for at least 4 hours, or until set, and then coat each cream center with chocolate.: Chilling firms the filling so it is easier to shape and press into molds. You will notice the texture go from tacky to pleasantly firm, and the aroma will mellow. Do not skip sufficient chilling or the filling will be too soft to form neat shapes, a common error that leads to misshapen eggs.
- Combine the chocolate chips and shortening in a double boiler or ceramic bowl: As the chocolate chips soften over gentle heat, you will see them melt into a glossy pool. The shortening adds fluidity, giving the coating a satiny finish. Stir slowly and watch for a smooth shine. Overheating can scorch the chocolate, causing a grainy finish, so keep the heat low and remove from heat at the first sheen of gloss.
- Slowly melt, stirring gently, until mixture is smooth: The sound will be quiet except for occasional gentle stirring, and the aroma will be warm, slightly toasted chocolate. The mixture should flow like thick syrup. If you see any lumps or streaks, pause and stir until they dissolve. A common problem is letting steam or water contact the bowl, which can seize the chocolate, so keep the melting environment dry.
- Prepare an egg candy mold: Grease the mold lightly if instructed, or use a deviled egg plate as an alternative to get the right shape. The mold surface should be cool to the touch, and the cavities clean so the chocolate adheres neatly. If the mold is too warm the chocolate can melt and smear, so chill the mold briefly if needed. Failing to prep the mold is often why coatings come out blotchy, so don’t skip this step.
- Thinly coat the inside of the mold with chocolate coating: Use a spoon or pastry brush to spread a thin, even layer of the chocolate, ensuring full coverage. The sheen should be uniform and there should be no gaps where the filling could leak. Refrigerate or freeze briefly to set. A common misstep is making the layer too thin, which can lead to cracks when unmolding, so err on the side of a slightly thicker coat for durability.
- Refrigerate or freeze until set: The chocolate will go from glossy to firm, and you will feel the shell harden when you gently press the surface. Quick chilling helps the shell set without blooming, but avoid leaving it in the freezer too long as condensation can form when you remove it. Many people leave pieces too long in the freezer and then get moisture on the surface, so monitor closely.
- Carefully press a layer of white filling into the mold: The chilled filling should be firm but malleable; press it gently so it conforms to the chocolate shell. Greasing your hands slightly helps manage the sticky texture. Follow with a small oval of orange filling, then another layer of white to encase the yolk visually. If you press too hard you can crack the chocolate shell, so be gentle. One frequent mistake is not packing the filling tightly enough, which leaves air pockets and can cause collapse later.
- Spread inside mold: Smooth the surface with a small spatula or your fingertip to create a seamless interior. The surface should look even and tidy, with the orange center faintly visible when thinly covered. If you notice gaps, press in a little more filling. Inconsistent smoothing often results in uneven chocolate coverage later, so take your time here.
- Top with more chocolate filling and refrigerate or freeze until completely set before removing from molds: Seal each egg with more of the melted chocolate , creating a full closure that will set firm. The top should look glossy before chilling. Once set, it will snap cleanly when unmolded. A common error is removing the candies too soon, which leads to soft spots, so wait until completely firm for best results.
- Repeat with remaining chocolate and filling: Work in small batches if your workspace warms up, because both the filling and chocolate respond to temperature. Rotate between melting chocolate and chilling shells so everything stays at the right consistency. Trying to do too many at once often produces uneven results, so pace yourself.
- Alternatively, you can roll a small, marble size from the orange filling: If you prefer hand shaped eggs, forming a tiny orange center will give you more control over shape and size. The rolling action firms the filling and creates a distinct yolk. Keep your hands lightly greased to prevent sticking. Rolling too hard will compress the filling excessively, so aim for gentle, even pressure.
- Wrap a small amount of the white filling around the orange: Encase the yolk fully so it looks natural when bitten into, and smooth seams with a fingertip. Chilling these assembled centers on a greased sheet helps them firm uniformly. A common problem is leaving visible seams, which can be minimized by smoothing carefully before chilling.
- Form into the shape of eggs and place on a lightly greased cookie sheet: Shape each piece into a tapered oval and set them spaced apart so they do not stick together while chilling. The doughy texture should become slightly firmer as it rests. If pieces flatten, they likely warmed too much, so chill the tray and try again in smaller batches.
- Chill for at least 4 hours, or until set, and then coat each cream center with chocolate: Once chilled, dipping each center into the melted chocolate will create a smooth shell. Use a fork to lower and lift, letting excess chocolate drip back. The dipping should leave a clean finish with a glossy surface after setting. A frequent issue is coating centers that are not fully chilled, which leads to softened interiors and sticky surfaces, so be patient and ensure they are thoroughly cold.
Notes
- Use dark chocolate for contrast. Choosing a darker chocolate balances the very sweet filling and creates a more sophisticated bite. If you prefer sweeter candies, opt for semi sweet or milk, but be mindful that milk chocolate will mask the filling more.
- Sift the powdered sugar. This removes lumps and ensures a silky, uniform filling texture. If you skip sifting you may end up with gritty pockets that detract from the smooth mouthfeel.
- Chill in stages. Alternate between chilling the molded shells and keeping the filling cool to maintain workability. This staged approach prevents the filling from getting too soft or the chocolate from becoming unmanageable.
- Protect your chocolate from moisture. Keep utensils and bowls dry and work in a low humidity environment when possible, because moisture will seize the melted chocolate.
- Use a small paintbrush for precise coating. For neat seams and even coverage inside the molds, a pastry brush gives you control. This helps avoid pooling and creates a professional finish.
- Label and date your gifts. These candies keep well refrigerated for up to two weeks, and labeling lets recipients know they were handmade with care and when to enjoy them.