Chocolate Covered Apple Lollipops
Chocolate Covered Apple Lollipops bring crunchy apples and silky chocolate together in an easy to assemble, crowd pleasing snack. These handheld treats are great for fall gatherings and kid friendly parties, offering endless topping variations for texture and flavor. Make a batch in minutes and chill for glossy, festive pops that disappear fast, perfect for an easy weekend project or party platter.
Equipment
- Microwave-safe Bowl
- Parchment Paper
- Baking Sheet
- Popsicle sticks
Ingredients
- 2 apples Provide firm, crisp fruit on a stick that forms the base of each lollipop; choose apples that are slightly tart for flavor contrast and slice or halve them to create stable dipping surfaces. Wash and dry thoroughly so coatings adhere well, and remove cores or seeds as needed for safety and presentation.
- 1 cup semi sweet chocolate chips or chunks Melt into a smooth, glossy coating that hardens slightly around the apple for a rich chocolate layer; semi-sweet chips or chunks deliver balanced sweetness and chocolate intensity. Stir gently while melting to avoid seizing and use enough to fully cover each apple piece for an even finish.
- 1 tablespoon coconut oil optional Help thin and smooth melted chocolate when added sparingly, producing a shinier, more pourable coating; coconut oil is optional but useful for achieving a glossy set and easier dipping. Keep usage minimal to maintain chocolate flavor, and add just before dipping to maintain good consistency.
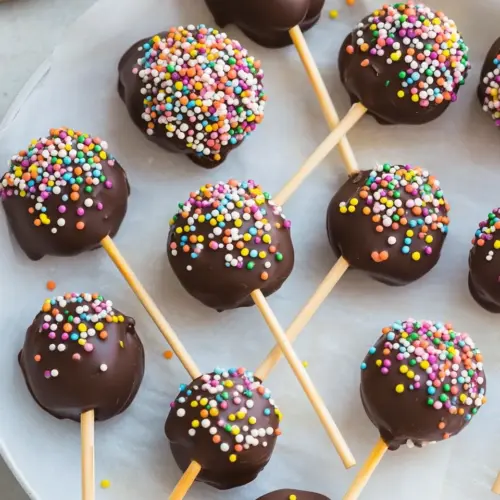
- topping ideas: caramel, chopped nuts or seeds, sprinkles, cookie crumbles, mini chocolate chips or candies, chopped dried fruit, flaky sea salt Provide texture, flavor contrast, and visual appeal when sprinkled onto wet chocolate; options like caramel, chopped nuts, sprinkles, or flaky sea salt allow customization for sweetness, crunch, or saltiness. Prepare toppings in small bowls for easy decoration immediately after dipping so they adhere before the coating sets.
- popsicle sticks Anchor the apple pieces and create handheld lollipops that make dipping and eating simple; choose sturdy popsicle sticks that are long enough to insert securely without splitting the apple. Insert sticks firmly into the fruit before dipping and chill briefly after coating to set the chocolate around the stick.
Instructions
- Thoroughly wash and dry the apples. With the apples standing upright, cut into 1/2" slices.: When you begin, expect a crisp, fresh aroma from the apples , and run your fingers over them to ensure there are no waxy residues. Drying is crucial because surface moisture prevents the chocolate from adhering, and droplets can cause the coating to seize. Use a clean towel to pat each apple dry, and inspect for blemishes you might want to trim. A common mistake is hurrying this step, which leads to patchy coating and shorter-lasting pops.
- Carefully stick popsicle sticks into one side of the apple slice. The apples can split in half, so do this delicately.: You will hear a satisfying snap as you slice through firm apples , and the exposed flesh should look dense and juicy. Using a steady, even motion creates uniform thickness so each pop chills and sets at the same rate. If slices are uneven, some may bend or split when the stick is inserted, so aim for consistency. Avoid sawing quickly as that can bruise the flesh and make the presentation sloppy.
- Microwave chocolate chips and coconut oil in microwave safe bowl in 30 second intervals until smooth.: As you insert the popsicle sticks , you may feel resistance and a little give from the core area. Push gently until the stick feels secure without forcing it through the slice, because applying too much pressure can split the apple or create hairline cracks. Rotating the slice slightly while inserting can help seat the stick. The danger here is overenthusiastic pushing, which leads to broken, unusable pops.
- Dip each apple slice in chocolate, using a spoon to coat the entire slice. Allow excess chocolate to drip off, then place on a parchment lined baking sheet.: If a slice starts to split, set it aside and use it as a tasting piece instead, because once split it will not hold toppings well. The sound of a split slice is subtle, but you will notice a change in texture when handling it. Being patient and using steady hands prevents this; cold apples slice more cleanly. Avoid pushing sticks into slices that are already softened from sitting out.
- Top with any desired toppings like sprinkles, nuts, etc and freeze or refrigerate until solid.: The chocolate will first look glossy then thicken as it cools, and the smell becomes deeply cocoa rich. Stir between each 30 second burst to distribute heat and prevent hotspots. If you add coconut oil , it will melt into the chocolate , giving a silkier texture and sheen. The main risk is overheating, which causes the chocolate to seize into grainy clumps; if that happens, a teaspoon of warm oil and patient stirring can sometimes rescue it.
- Dip each apple slice in chocolate, using a spoon to coat the entire slice: As you dip, watch the way the chocolate flows and listen for a faint drip as excess runs off. Tilt the bowl and use a spoon to push the coating around so you get full coverage without making the pop heavy. The temperature matters here, if the chocolate is too warm it will run thin and swallow toppings, if too cool it will clump. A frequent error is double dipping too soon, which creates uneven layers.
- Allow excess chocolate to drip off, then place on a parchment lined baking sheet: The sound of chocolate landing on parchment is soft and reassuring, and visually you want a smooth, even shell without puddles. Give each pop a gentle shake over the bowl to remove excess, then set it down spaced apart so edges do not stick together. If you leave them too close, they might fuse when setting. Temperature and spacing are the usual culprits when coatings end up misshapen.
- Top with any desired toppings like sprinkles, nuts, etc and freeze or refrigerate until solid: When you add toppings, press lightly so they adhere. The immediate contrast of crunchy nuts or chewy caramel against the cooling chocolate is delightful, and you can see colors pop visually right away. Transfer the sheet to the fridge for a faster, glossy set, or to the freezer if you need them firm quickly. Avoid waiting too long to top them, because once the chocolate begins to set, toppings will not stick well and may fall off during storage.
Notes
- Select firm fruit: Choosing crisp apples ensures each pop holds the stick and stays fresh longer, with a satisfying snap when bitten.
- Measure the oil: If using coconut oil, stick to the suggested amount to keep the chocolate glossy without thinning the coating too much.
- Temperature matters: Let melted chocolate cool slightly before dipping, as overly hot coating can slide off or cause toppings to sink.
- Quick topping trick: Have toppings ready in shallow bowls and press them gently onto the coating to help them stick before setting.
- Storage method: Store finished pops in a single layer in the fridge or freezer, separated by parchment, to maintain appearance and texture.