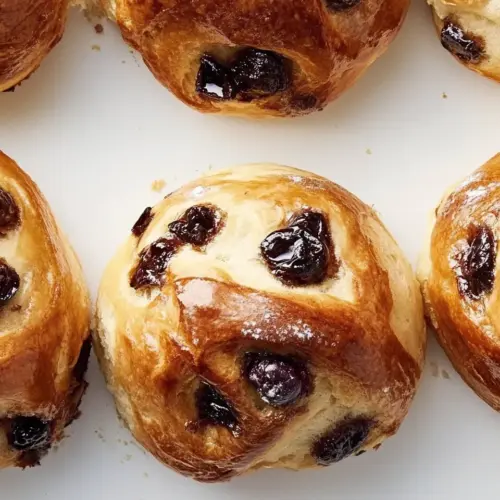
Chocolate Cherry Brioche Buns
Chocolate Cherry Brioche Buns are pillowy, buttery enriched rolls studded with bittersweet chocolate and dried cherries, with a silky crumb thanks to a tangzhong starter. These slightly sweet buns are perfect for an indulgent breakfast or a festive snack, offering creamy interior contrasted by chocolate pockets and chewy fruit, making them an irresistible reason to bake this weekend.
Equipment
- Stand mixer
- Dough Hook
- Paddle attachment
- Mixing Bowls
- Baking Sheets
- Parchment Paper
- Wire Rack
- Instant read thermometer
Ingredients
- 2 cups (333 grams) all-purpose flour, plus more for dusting Provide structure and bulk to the dough, developing gluten when mixed and kneaded to create a soft, elastic brioche crumb; measure precisely and dust surfaces lightly to prevent sticking during shaping and rolling.
- 3 tablespoons (36 grams) granulated sugar Add gentle sweetness and help tenderize the dough by slightly weakening gluten strands; dissolve into liquids to ensure even distribution and encourage proper browning of the crust.
- 1 (0.25-ounce) package (7 grams) instant yeast Leaven actively and quickly when mixed into warm liquids, producing carbon dioxide that lightens the brioche; sprinkle into dry flour and proof in a warm environment for predictable rise.
- 2 1/4 teaspoons (6.75 grams) kosher salt Season the dough and balance flavors while strengthening gluten formation control; dissolve into the mixture to regulate yeast activity and enhance overall taste.
- 1/2 cup (120 grams) warm whole milk (120°F/49°C to 130°F/54°C) Provide moisture, fat, and warmth to activate yeast while contributing richness; keep at specified temperature range to avoid killing yeast and to ensure proper proofing.
- 3 large eggs (150 grams), room temperature and divided Bind ingredients and enrich the dough with fat and proteins, contributing tenderness, color, and structure; separate and use parts as directed for dough enrichment and egg wash if required.
- Tangzhong (recipe follows) Create a pre-cooked flour paste (tangzhong) that gelatinizes starches to retain moisture and extend softness, producing a fluffier, longer-lasting brioche interior; prepare per recipe and incorporate into dough for improved texture.
- 1/2 cup (113 grams) unsalted butter, cubed and room temperature Enrich the dough with butterfat for tenderness, flavor, and a glossy crumb; add at room temperature and incorporate gradually to achieve smooth, elastic dough.
- 1/2 cup (85 grams) coarsely chopped bittersweet chocolate Contribute concentrated chocolate flavor and pockets of bittersweet intensity that melt into the dough, offering texture contrast and richness when coarsely chopped and mixed in.
- 1/2 cup (64 grams) finely chopped dried cherries Provide bursts of bright, tart-sweet fruit flavor and chewy texture; hydrate slightly if desired and fold evenly into dough to distribute cherry pieces without overworking.
- 1 tablespoon (15 grams) water Moisten surfaces and help dissolve small amounts of sugar or assist in egg wash mixtures; use sparingly for brushing or combining with other finishing ingredients as directed.
Instructions
- In the bowl of a stand mixer, whisk together 1 1/4 cups (208 grams) flour, sugar, yeast, and salt. Add warm milk, 2 eggs (100 grams), and Tangzhong; using the paddle attachment, beat at low speed until combined, about 1 minute. With mixer on low speed, gradually add remaining 1 cup (125 grams) flour, beating until a shaggy dough forms; scrape sides of bowl.: The aroma at this stage is faintly bready and slightly sweet, and whisking dries the ingredients so they disperse evenly. Starting with a smaller portion of the flour allows for better hydration when the wet ingredients are added. A common misstep is lumping dry ingredients in one corner of the bowl, which leads to uneven rising. Make sure the instant yeast is evenly distributed so every bit of dough gets an even lift.
- Switch to the dough hook attachment. Beat at medium-low speed until dough becomes smooth, elastic, and slightly tacky, 8 to 11 minutes. (Dough should pull away from sides of bowl.) With mixer on medium-low speed, add butter, 1 tablespoon (14 grams) at a time, beating until combined after each addition (7 to 8 minutes total). Increase mixer speed to medium, and beat until a smooth, elastic dough forms, about 10 minutes. Reduce mixer speed to low; add chocolate and cherries, beating until well combined.: You will notice the mixture loosen and begin to look more cohesive; the scent of warm milk becomes more pronounced. This step hydrates the flour and activates the gluten network. If you overwork the dough on the paddle it can become gummy, so keep speed low and time short. Ensure the milk is not too hot or it will weaken the yeast .
- Lightly oil a large bowl. Place dough in bowl, turning to grease top. Cover and let rise in a warm, draft-free place (75°F/24°C) until doubled in size, 1 to 1 1/2 hours.: As you add the rest of the flour the mixture will change from a batterlike texture to a rough, shaggy mass. That sound shift, a slow rumble from the mixer, tells you gluten is beginning to form. Forgetting to scrape the bowl leaves pockets of unmixed flour, which makes uneven dough. Use a spatula to ensure all flour becomes hydrated.
- Line baking sheets with parchment paper.: You will feel the dough begin to climb and then settle onto the hook as it kneads. Switching attachments is important because the hook develops gluten more effectively than the paddle. A mistake is continuing with the paddle which delays proper gluten development. If the dough sticks to the bowl too much, give it a minute, it will tighten up as gluten forms.
- Turn out dough onto a clean surface, and punch down dough. Press dough into a 10 x 8-inch rectangle. Divide dough into 20 portions (about 45 grams each). Using your hands, gently roll each portion into a smooth ball, lightly flouring your hands as needed. Place 3 to 4 inches apart on prepared pans. Cover with lightly greased plastic wrap, and let rise in a warm, draft-free place (75°F/24°C) until doubled in size, about 1 hour.: The dough will go through visual changes, from shaggy to a cohesive, shiny ball that stretches without tearing. Pressing it gently should leave a slight indentation that slowly bounces back. Under kneading leaves a coarse, crumbly dough, while over kneading can make it too tight. Watch for the dough to pull away from the sides of the bowl as the key cue.
- Preheat oven to 375°F (190°C).: Adding unsalted butter bit by bit creates a silky, glossy dough. Each addition will temporarily make the dough look greasy before it absorbs the fat and becomes pliant again. If you add the butter too quickly the dough may separate; patience results in an even, enriched texture. Scrape frequently so no sticky butter pockets remain.
- In a small bowl, whisk together 1 tablespoon (15 grams) water and remaining 1 egg (50 grams); brush onto dough.: At this stage the dough should hum with life, stretching and folding, becoming satin in appearance. The gluten will be resilient, and you may hear a soft tearing sound as strands realign. Overlooking this step risks a dense crumb; it is why you should allow the mixer to fully bring the dough together. If the dough feels overly soft, let it rest for a few minutes and then continue.
- Bake until golden brown and an instant-read thermometer inserted near center registers 190°F (88°C), 8 to 10 minutes. Let cool on pans for 5 minutes. Remove from pans, and let cool completely on a wire rack. Store in an airtight container for up to 3 days.: When the bittersweet chocolate and dried cherries weave into the dough you get bursts of scent, chocolatey and fruity, as the mix turns speckled. Folding these inclusions gently keeps them distributed without overworking the dough. A common error is adding extras too early in the knead, which can damage chocolate texture. Ensure even distribution so each bun has a good ratio of mix ins.
- Lightly oil a large bowl: The faint smell of oil and the slick surface help prevent sticking during the rise. Coating the bowl ensures the dough can expand freely without tearing against the sides. Too much oil can create a slippery surface that makes handling messy, so use just enough to coat.
- Place dough in bowl, turning to grease top: Turning the dough to coat it gives the exterior a thin protective layer, which keeps the surface from drying out while proofing. You will notice the dough come to rest smoothly, ready for rise. If you skip greasing the top, a skin can form and hinder expansion, so be sure the surface is lightly oiled.
- Cover and let rise in a warm, draft free place (75°F/24°C) until doubled in size, 1 to 1 1/2 hours: As it proofs the dough will nearly double, and the scent will evolve into a richer, fermented aroma. Gently pressing a finger should leave an indentation that slowly springs back. Overproofing causes collapse and large irregular holes, so keep an eye on the dough as it nears the visual doubling.
- Line baking sheets with parchment paper: Preparing pans ahead ensures a smooth transfer and even browning. Parchment prevents sticking and makes cleanup simple. Using unlined pans risks sticking and uneven bottoms, so take this small step seriously.
- Turn out dough onto a clean surface, and punch down dough: The act of punching down releases some gas and evens out the temperature, making shaping predictable. You will feel the dough relax under your palms, and it will handle easily. If you skip this, the dough may be overly gassy, making shaping awkward.
- Press dough into a 10 x 8 inch rectangle: Pressing evens the thickness and allows for uniform division. The surface should feel smooth and slightly tacky. If the dough springs back too much, let it rest briefly to relax the gluten; that will make shaping effortless.
- Divide dough into 20 portions (about 45 grams each): Precise portions bake evenly and present consistently. Weighing each piece pays off in uniform color and interior bake. Rushing this step and eyeballing portions often leads to mixed results with some buns underdone and others overdone.
- Using your hands, gently roll each portion into a smooth ball, lightly flouring your hands as needed: Rolling creates surface tension that helps buns rise tall and form a glossy crust. You will feel the dough smooth beneath your palms, and a slight tack indicates proper hydration. Over flouring will make the surface dry, preventing a glossy finish after the egg wash.
- Place 3 to 4 inches apart on prepared pans: Spacing gives buns room to expand without merging into one another, yielding even crusts around each bun. If placed too close they will bake into one large mass, affecting texture and appearance. Ensure even spacing for consistent browning.
- Cover with lightly greased plastic wrap, and let rise in a warm, draft free place (75°F/24°C) until doubled in size, about 1 hour: The second rise puffs each roll to pillowy perfection and produces a light crumb. You will notice a gentle jiggling when moving the pan. Underproofing here gives a tight crumb, while overproofing can cause collapse during baking, so watch for a gentle doubling.
- Preheat oven to 375°F (190°C): The oven will radiate a dry heat that sets the crust and drives color. Preheating ensures the buns begin to bake immediately, aiding oven spring. Starting with an under heated oven reduces rise and leads to dull color, so confirm temperature before baking.
- In a small bowl, whisk together 1 tablespoon (15 grams) water and remaining 1 egg (50 grams); brush onto dough: The egg wash gives a shiny, golden top and enhances visual appeal while adding a slight savory balance. You will see the surface go from matte to glossy. If you brush too heavily the wash can pool and create uneven browning, so apply a thin, even coat.
- Bake until golden brown and an instant read thermometer inserted near center registers 190°F (88°C), 8 to 10 minutes: As the buns bake you will hear faint crackles and smell the butter and chocolate intensify. The tops will deepen to an even golden color and the internal temperature will confirm doneness. Opening the oven early can cause collapse, so rely on visual cues and thermometer readings.
- Let cool on pans for 5 minutes: The buns continue to set as they cool slightly, and the crumb firms up just enough to handle. You will notice a soft steam lift away, bringing a last hint of aroma. Cutting too soon will yield a gummy interior, so allow this brief rest.
- Remove from pans, and let cool completely on a wire rack: Cooling on a rack prevents condensation from making the bottoms soggy, preserving the crispness of the crust. The final flavor and texture develop as they cool. Storing while warm traps moisture and will soften the crust undesirably.
- Store in an airtight container for up to 3 days: Proper storage keeps the crumb soft and prevents staling. If you plan to keep longer, freeze and reheat briefly in a warm oven. Leaving them exposed will dry them out quickly, so seal them well.
Notes
- Use different chocolate textures to change the eating experience, such as larger chunks for molten pockets or smaller chips for even distribution, which alters how each bite releases chocolate flavor.
- Swap dried cherries size by using finely versus coarsely chopped dried cherries, which adjusts the chew and sweetness in the crumb to suit your preference.
- Make mini buns by dividing into smaller portions for tea time; they bake faster so watch the oven closely to maintain a tender interior.
- Freeze before the second rise to bake fresh later; thaw and allow to finish proofing before brushing with egg wash so they rise properly.
- Create a marbled effect by folding in larger ribbons of chopped bittersweet chocolate near the end of kneading for visual contrast and pockets of melted goodness.