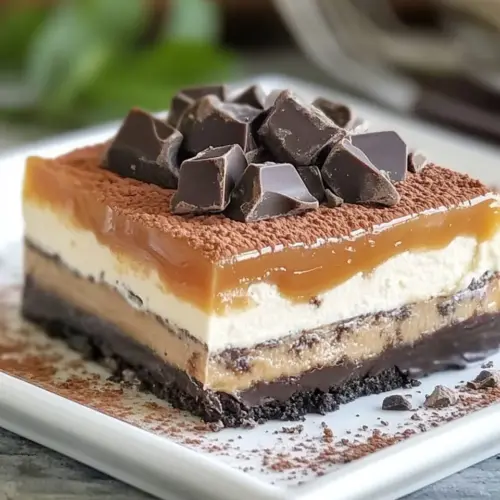
Chocolate Caramel Layered Dessert
Chocolate Caramel Layered Dessert is a creamy, layered treat with a tender crust, gooey caramel, and silky chocolate pudding. This easy to share dessert is ideal for parties and potlucks, offering a contrast of textures from crunchy to cloudlike. Make it ahead for a stress free finish, and enjoy the crowd pleasing appeal that makes guests ask for seconds.
Equipment
- 9 X 13 baking dish
- Small Saucepan
- Mixer
- Mixing Bowls
- Measuring Cups
Ingredients
- 1 cup all-purpose flour Provide structure and bulk to the dessert by forming the base or cake-like layer; sifts easily to ensure even texture and combines with wet ingredients to create a tender crumb. Absorbs flavors and balances sweetness while supporting layers above without becoming soggy when baked or pressed.
- 1/2 cup crushed nuts I like pecans Add crunch and nutty flavor to the crust or topping, offering textural contrast to creamy layers; can be finely chopped or coarsely crushed depending on desired mouthfeel. Toasts nicely to enhance aroma and complements caramel and chocolate notes throughout the dessert.
- 1/4 cup sugar Sweeten the crust or filling mildly while aiding in browning and balance; dissolves readily into butter or melted mixtures to create a cohesive layer. Controls overall sweetness so other components like caramel and pudding remain prominent without being cloying.
- 1/2 cup buttermelted Bind dry ingredients and add moisture and richness when melted, helping form a cohesive crust or base; contributes fat for tenderness and flavor. Works particularly well when combined with crushed nuts and sugar to create a compact, sliceable layer for the dessert.
- 20 KRAFT caramels unwrapped Provide a rich, chewy caramel layer with deep buttery sweetness once melted and smoothed; melts easily into a pourable sauce for even coverage between layers. Adds chewiness and contrasts with creamy pudding and whipped components for a luxurious mouthfeel.
- 3 tbsp heavy whipping cream Loosen and enrich melted caramels into a smooth, glossy sauce when stirred in, adding silkiness and shine to the caramel layer; helps create a pourable consistency for uniform spreading. Enhances richness and prevents the caramel from seizing or becoming too stiff when cooled.
- 8 oz cream cheese softened Contribute tangy creaminess and stable structure to creamy layers by whipping or blending until smooth; helps balance sweetness and provides body for sliceable layers. Softened state allows easy incorporation with powdered sugar and Cool Whip to form a silky cream layer.
- 1 cup powdered sugar Sweeten and stabilize the cream cheese mixture while adding a fine, smooth texture; dissolves completely when whipped to prevent grittiness. Controls sweetness level of the filling and assists in creating a firm yet creamy layer that holds its shape when chilled.
- 1 cup Cool Whip from 8 oz container Lighten the cream cheese and powdered sugar mixture by folding in to create an airy, cloud-like texture; provides volume and a cool finish to creamy layers. From an 8 oz container, contributes stabilized whipped topping that maintains body without deflating rapidly.
- 6.8 oz chocolate instant pudding 2 3.4 oz packages Thicken quickly into a smooth, chocolate-flavored pudding layer that adds intense cocoa taste and silky texture; instant pudding sets without baking when whisked with cold milk. Supplies a dense, flavorful middle layer that contrasts with lighter whipped components.
- 3 cups cold milk Hydrate the instant pudding mix to proper consistency while keeping it smooth and creamy; cold temperature helps the pudding set firmly and maintain a refreshingly cool mouthfeel. Exact volume ensures correct thickness for layering without thinning other components.
- Cool Whip remaining from 8 oz container Top and finish the dessert with additional stabilized whipped topping to add height and a clean, decorative surface; remaining portion provides extra fluff and visual contrast to darker layers. Helps mask edges and creates a cohesive, finished presentation while keeping slices light.
- 1/4 cup chocolate shavings Garnish with fine chocolate shavings to add visual appeal, slight bitterness, and delicate texture to each serving; sprinkles across the top create a professional finish. Complements caramel and cream flavors while offering a crisp, melt-in-the-mouth chocolate accent.
Instructions
- Preheat oven to 375 degrees.: The warm air in the oven should feel steady when you open it, and the rack set in the center helps the crust bake evenly. This temperature encourages a slight browning that yields flavor without drying the base. A common mistake is preheating too briefly, which can lead to uneven baking, so wait until the oven signals readiness before sliding the pan in.
- Combine ingredients and press into a 9 x 13 baking dish.: As you mix the dry and wet components, you will notice the texture shift from loose crumbs to a cohesive mass, and pressing it firmly into the pan creates a uniform crust that bakes consistently. Use the flat bottom of a measuring cup to compact it, feeling for an even thickness across corners and edges. If the crust seems crumbly after pressing, it likely needs a touch more melted butter to bind, so add a teaspoon at a time.
- Bake for 10 minutes.: During baking you will smell a toasty, buttery aroma, and the edges will gain a light golden tone while the center sets. This short bake is just to give the base structure without overcrisping, which preserves a slightly tender bite. Avoid opening the oven repeatedly, which causes temperature swings and can affect the final texture.
- Cool.: Cooling the crust is essential so that when you pour the warm caramel it will sit on top rather than sink in. You want the surface to be warm but not hot, and it should feel room temperature to the touch. If you pour caramel on a hot base, it will liquefy too deeply and the layers will blur, so be patient and allow full cooling.
- Heat unwrapped caramels and whipping cream in a small saucepan over low heat until nice and smooth. Pour over cooled crust. Refrigerate.: As the caramels and heavy whipping cream melt, stir constantly; you should see the mixture become glossy and uniform with a slow ribbon as you lift the spoon. Pouring it evenly across the cooled crust creates a barrier that seals the base and adds rich chew. If the caramel looks grainy, continue stirring over very low heat, as lingering sugar crystals can dissolve with gentle agitation rather than cranking up the temperature which risks scorching.
- Beat cream cheese in a mixer until light and fluffy.: You will notice the cream cheese lighten in color and increase in volume as air incorporates, giving a silky mouthfeel in the final layer. Use medium speed and scrape down the bowl so there are no lumps. Underbeating leaves a dense filling, while overbeating can make it too soft to set properly, so stop when it is airy and smooth.
- Gradually add powdered sugar and mix until thoroughly combined.: Adding the powdered sugar slowly prevents a cloud of dust and allows the mixer to integrate it evenly into the cream cheese . You should smell a gentle sweetness and see a uniform texture without streaks. If the mixture becomes overly sweet or loose, a short chill will help firm it before folding.
- Fold in Cool Whip.: When folding the first portion of Cool Whip in, use a gentle motion to preserve the air, and you will see the filling become lighter and softer in texture. The goal is a mousse like consistency that spreads easily without sliding. Vigorous stirring breaks down the air and makes the layer flat, so use a spatula and fold just until homogenous.
- Spread on cooled caramel layer.: As you spread the filling, the contrast between the glossy caramel and the pale, pillowy filling will be clear. Use smooth, even strokes to create a uniform middle layer, and avoid pressing down which can disturb the caramel beneath. If the filling feels warm, refrigerate briefly, as a chilled top will hold a cleaner shape.
- Combine pudding mix and milk and prepare according to package instructions.: Whisk the chocolate instant pudding with cold milk until it thickens and releases a chocolate aroma, taking on a glossy surface. Let it rest briefly so it fully sets and won't slide when layered. Overwhipping can break the structure, and under mixing can leave lumps, so follow the package timing exactly for a smooth set.
- Spread over third layer.: The pudding should have a dense, satiny texture that layers neatly atop the cream cheese mixture, creating a firm chocolate layer. Use a gentle hand and a spatula to distribute it evenly, listening for the quiet scrape of the blade as it levels the surface. If the pudding seems loose, give it a few extra minutes to set before spreading to avoid bleeding into the layer below.
- Top fourth layer with remaining Cool Whip.: The remaining Cool Whip creates a bright, airy cap that balances the richer layers beneath. Spread it lightly so the dessert looks inviting and clean. If the topping begins to weep, keep the dessert chilled and add the Cool Whip closer to serving time to maintain a pristine appearance.
- Sprinkle on chocolate shavings.: Fresh chocolate shavings add aroma and a delicate crunch, and they should glint on top of the whipped surface. When you shave chocolate, do it directly over the dessert and try to distribute evenly for visual appeal. If you shave too early, the shavings may soften, so add them shortly before serving for best texture.
- Keep refrigerated until ready to serve.: Chilling allows the layers to firm and the flavors to meld, producing clean slices and a pleasant mouthfeel. The dessert should feel cool to the touch and slice cleanly with a sharp knife. Serving it too warm will make layers slump, so keep it refrigerated until the moment you plate.
Notes
- Reduce sweetness: If you prefer less sweetness, slightly cut the powdered sugar in the cream cheese layer by a small amount and taste as you go to maintain balance without losing structure.
- Nuts variation: Swap the pecans for another coarsely crushed nut if desired, but keep the texture coarse so the crust retains crunch rather than turning pasty.
- Caramel consistency: If the caramel seems too thick, stir in an extra teaspoon of warm heavy whipping cream to reach a pourable gloss, rather than reheating which risks scorching.
- Make ahead timing: Assemble the dessert a day ahead and store it covered in the refrigerator to let the layers set and flavor meld; add chocolate shavings just before serving for best appearance.
- Transporting: Chill the dessert fully and carry in a level container with a cooler pack to preserve the whipped topping and prevent slipping during travel.