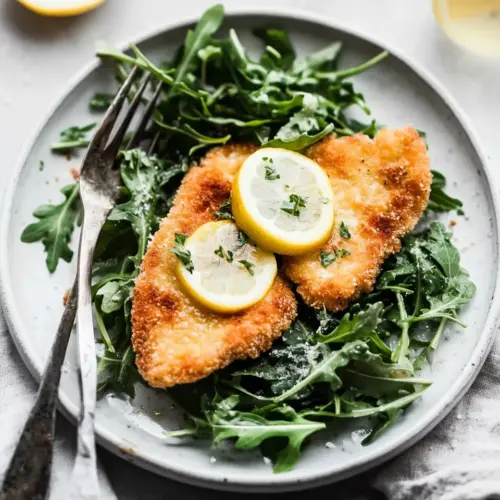
Chicken Milanese With Lemony Arugula Salad
Chicken Milanese With Lemony Arugula Salad delivers crispy, golden chicken paired with a bright, peppery arugula salad. This easy weeknight dinner is crispy, tangy, and elegant, perfect for feeding four and great for casual dinners or small gatherings. Try it when you want a quick, impressive meal that always gets compliments.
Equipment
- Skillet
- Wire Rack
- Baking Sheet
- Shallow Dishes
- Meat Mallet
Ingredients
- 2 boneless, skinless chicken breasts (10 to 12 ounces each) Flatten and pound to an even thickness to ensure quick, uniform cooking; provides the primary protein and substantial texture for the Milanese.
- 1 1/4 teaspoons kosher salt divided, plus a few pinches Season lightly and reserve some for breading and finishing; helps enhance overall flavor and control seasoning balance throughout the dish.
- 1/3 cup all-purpose flour Dredge the chicken lightly to create a base layer that helps the egg adhere; adds a neutral coating to promote crisp breadcrumb browning.
- 2 large eggs Whisk and use as a binding agent to help breadcrumbs stick to the flour-coated chicken; contributes moisture and helps achieve a golden crust.
- 1 cup Panko breadcrumbs Coat the chicken thoroughly to form the signature crunchy exterior of Milanese; delivers airy, crisp texture when fried or sautéed.
- 1 teaspoon garlic powder Sprinkle into the breadcrumb mix to impart a subtle savory garlic note; elevates the crust with warm, aromatic flavor.
- 1 teaspoon onion powder Blend into the breadcrumb mixture to add mild sweetness and savory depth; helps round out the seasoning profile of the coating.
- 5 ounces arugula about 5 cups Toss with lemon and oil to make a bright, peppery salad component; provides fresh, slightly bitter greens that balance the fried chicken.
- 1/4 cup extra-virgin olive oil Whisk into the dressing to contribute fruity richness and mouthfeel; helps carry lemon juice and coat the arugula evenly.
- 3 tablespoons freshly squeezed lemon juice Balance the olive oil with acidity to form a bright vinaigrette for the salad; provides sharp citrus tang that lifts the dish.
- 1/4 teaspoon ground black pepper Season the dressing and chicken with a final touch to introduce subtle heat; enhances contrast and rounds out savory elements.
- 4 tablespoons canola oil divided Heat in the skillet to cook the breaded chicken to a golden crisp; supplies a neutral frying medium that tolerates high temperatures.
Instructions
- Preheat the oven to 250°F. Place a wire rack on top of a baking sheet and keep handy.: The warm oven is your holding station, ensuring the cooked pieces stay crisp rather than soggy while you finish the rest. As the oven hums, you should sense a faint dry heat in the kitchen, and the wire rack prevents steam from collecting under the chicken . If you skip this, the cutlets will steam on a flat sheet and lose crunch, so take the minute to set it up. A common mistake is crowding the rack, which traps moisture, so leave space between pieces.
- Split each chicken breast in half horizontally to create two thinner pieces of chicken. I like to do this by carefully placing my hand on top to give myself a feel for whether or not I am slicing the chicken evenly. With a meat mallet or rolling pin, gently pound the chicken VERY thin—about 1/4-inch thick. To keep things tidy, place a sheet of plastic wrap or wax paper on top prior to pounding. Sprinkle both sides of the chicken with 1 teaspoon of the salt.: When you place your palm on top of the breast and slice, you will feel the resistance change as you work through the meat. The goal is two even pieces for even cooking. After slicing, lay a sheet of plastic wrap over the pieces and use a meat mallet or rolling pin to pound them to about 1/4 inch thick. The sound changes to a softer, more compliant thud as the fibers relax, and the meat will look uniformly thin. This thinning shortens cook time and keeps juiciness, and the plastic keeps cleanup easy. Avoid pounding so aggressively that the meat tears, which can cause uneven breading.
- Set up your dredging stations: Place the flour in a wide, shallow dish (a pie dish works well). Beat the eggs in a second shallow dish. In a third, combine the breadcrumbs, garlic powder, and onion powder.: As you salt both sides, notice the way the surface darkens slightly and takes on a subtle sheen. This initial salting seasons the meat all the way through while the breading adds external seasoning. Salt also helps the proteins tighten slightly, which improves searing. A misstep is over salting at this stage, so measure or use gentle pinches if you are unsure.
- Dredge the chicken: With tongs, grab one end of a piece of chicken, and dip in the flour, then the eggs, then the breadcrumbs, coating both sides of each piece of chicken and shaking off excess as you go. Transfer to a clean plate. Repeat with the remaining chicken.: Arrange the all purpose flour in one shallow dish, beaten eggs in another, and a mixture of Panko breadcrumbs , garlic powder , and onion powder in a third. The visuals are helpful here: white flour, glossy eggs, and the textured golden crumbs. This assembly line prevents cross contamination and keeps a smooth workflow. If your bowls are too deep, the coating can clump, so choose wide, shallow dishes for even coverage. Avoid skipping the flour step because it helps the egg adhere evenly.
- Place the arugula in a large bowl. In a small bowl or a liquid measuring cup with a spout, whisk together the olive oil, lemon juice, 1/4 teaspoon pepper, and remaining 1/4 teaspoon salt. Pour enough dressing on the arugula to moisten it. Toss to combine, reserving the extra dressing for serving.: Using tongs, pick up a piece of meat by one edge and press it into the flour , tapping off the excess, then plunge into the beaten eggs , letting the excess drip back into the bowl, and finally press into the crumb mixture to coat thoroughly. You should feel the crumbs cling and see an even golden layer forming. Transfer each coated piece to a clean plate without stacking them, which can flatten the breading. If the crumbs seem patchy, lightly press more crumbs into thin spots; however, avoid overloading the coating which can insulate and slow cooking.
- Cook the chicken: In a large skillet, heat 2 tablespoons of the canola oil over medium heat. Once the oil is hot, carefully lower two of the breaded chicken pieces into the skillet, ensuring that they are not touching. Cook on the first side until golden, about 3 minutes. Flip and cook on the other side until it is golden brown and the chicken is cooked through, about 2 minutes more. Transfer to the prepared baking sheet. Immediately sprinkle the top of the chicken with a small pinch of salt, then place in the oven to keep warm. Repeat with the remaining 2 chicken pieces, adding the remaining tablespoon canola oil to the skillet as needed to prevent sticking. Serve each chicken Milanese piece hot, with a pile of the arugula and lemon wedges alongside.: Add the measured arugula to a roomy bowl so the leaves can move freely when dressed. In a smaller bowl or measuring cup, whisk together the olive oil , lemon juice , the remaining salt , and the black pepper . Pour just enough to moisten the leaves and toss gently so each leaf glistens without wilting. The fragrance of lemon should pop immediately, and the leaves will look vibrant and glossy. If you overdress, the salad will go limp, so reserve some dressing to refresh plates when serving.
- Cook the chicken.: Warm 2 tablespoons of the canola oil in a large skillet over medium heat until it shimmers and gives a faint whisper when a breadcrumb is dropped in. Carefully lower two breaded pieces so they do not touch, and you should hear an immediate sizzle. Let them cook undisturbed until the bottom is golden, about 3 minutes, then flip and cook until the second side is golden and the meat is cooked through, about 2 minutes more. The crust should look evenly browned and smell toasty and nutty, and the meat will feel firm but springy. Transfer to the wire rack in the oven to stay warm. If the oil smokes, the pan is too hot, reduce heat slightly to prevent burning the crumbs.
- Immediately sprinkle the top of the chicken with a small pinch of salt, then place in the oven to keep warm.: The final pinch of salt brightens the crust and brings out savory notes. As the pieces rest in the warm oven, any residual oil settles and the crust firms without steaming. This resting moment also helps juices redistribute, keeping the interior juicy. Avoid leaving cutlets in the oven for too long, which can dry them out, so time your batches so they finish close together.
- Repeat with the remaining chicken pieces, adding the remaining tablespoon canola oil to the skillet as needed to prevent sticking.: As you work through the second batch, you will notice how the pan temperature shifts; adding the reserved oil helps the crust brown consistently. The second batch should sizzle right away and take similar time to brown. Watching the color is the clearest cue; if one side browns significantly faster, adjust heat. A typical mistake is overcrowding the pan to save time, but that causes steam and soft crusts, so maintain spacing.
- Serve each chicken Milanese piece hot, with a pile of the arugula and lemon wedges alongside.: Plate the warm, crisp cutlets next to a mound of the lightly dressed arugula , and offer lemon wedges for an extra burst of acidity. The contrast of textures and temperatures is delightful, and the citrus cleanses the palate between bites. Serve immediately to enjoy the peak crispness; if you wait, the contrast will soften and the experience will change.
Notes
- TO STORE: Refrigerate leftover chicken Milanese in an airtight container for up to 2 days. Let cool slightly before sealing to avoid condensation that softens the crust. When storing, separate layers with parchment to preserve texture.
- TO REHEAT: Rewarm leftovers on a baking sheet in the oven at 350 degrees F or in the microwave. For the crispiest results, use the oven and place the pieces on a wire rack so air circulates underneath, restoring the crust without drying the meat.
- TO FREEZE: Freeze chicken Milanese in an airtight, freezer-safe storage container for up to 3 months. Wrap each piece individually if possible to prevent freezer burn, and let thaw overnight in the refrigerator before reheating for best texture.
- SWAPPING BREADCRUMBS: If you do not have Panko breadcrumbs, you can pulse day old bread into coarse crumbs. They will brown similarly, though the texture will be slightly denser. Be gentle when pressing them onto the chicken to maintain flakiness.
- ADJUSTING ACID: If you prefer a softer lemon flavor, reduce the lemon juice slightly and add a touch more olive oil to balance. Taste the dressing before tossing and adjust incrementally to keep the salad lively.
- OIL ALTERNATIVE: For frying, neutral oils with high smoke points work best. If you must use another oil, ensure it has a high smoke point to avoid burned crumbs and off flavors.