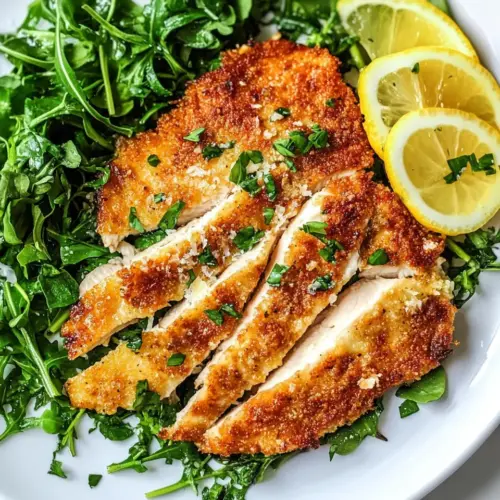
Chicken Milanese
Chicken Milanese is a crispy, golden cutlet recipe with a peppery arugula salad and shaved Parmesan, delivering crunchy, bright, and savory bites. This easy weeknight dinner comes together quickly and gives restaurant quality results at home, perfect for feeding a small crowd or a special family meal. Try it for a fast, impressive dinner that balances texture and acidity beautifully.
Equipment
- Large Skillet
- Mixing Bowls
- meat mallet or rolling pin
- Tongs
Ingredients
- 2 boneless, skinless chicken breasts Pounded or halved to an even thickness and seasoned, provides the primary protein and base for the Milanese; cooks quickly when thin and yields tender, juicy meat when not overcooked.
- salt and pepper to taste Used sparingly to enhance overall flavor balance and bring out the natural taste of the chicken; seasons both inside and on the surface before and after cooking.
- 1/2 cup all-purpose flour Dusted onto the chicken as the first coating to create a dry surface that helps the egg wash and breadcrumbs adhere; contributes a light crust and a bit of structure to the final texture.
- 2 large eggs Beaten together to form the egg wash that binds flour and breadcrumbs to the chicken; adds richness and helps the coating brown evenly during frying.
- 1/2 cup milk Mixed with the eggs to thin the wash, increasing moisture and helping the coating stick evenly; contributes a tenderizing effect and slight richness to the exterior.
- 1 cup Panko breadcrumbs (*) Provides a crisp, airy breading that creates the signature crunchy exterior of Milanese; delivers a light texture and golden color when fried or pan-seared.
- 1/4 cup grated Parmesan cheese Sprinkled into the breadcrumb mixture to impart savory, nutty, and salty notes; melts slightly against warm chicken and enhances overall umami.
- 1/2 teaspoon kosher salt Added to the breadcrumb or seasoning mix to provide a clear salty accent that lifts flavors; paired with other seasonings to balance the dish.
- 1/4 teaspoon ground black pepper Ground to give a warm, pungent heat when included in the seasoning; complements the salt and cheese by adding subtle depth to the breading.
- 6 tablespoons olive oil or butter (divided) Used for frying the chicken and adding rich flavor; divided between steps to control browning, crispness, and to finish the pan sauce if desired.
- 2 tablespoons olive oil Used to dress the salad or finish the plate with a bright, fruity olive oil flavor; can be combined with lemon and garlic for a simple vinaigrette.
- 1 tablespoon lemon juice (from 1/2 lemon) Squeezed into dressings or over finished chicken to add bright acidity and lift the richness; pairs well with parmesan and greens for contrast.
- 1/2 clove garlic (minced) Minced and incorporated into dressings or pan sauces for aromatic pungency; mellows with acid and oil to add savory depth without overpowering.
- salt and pepper to taste Used again to adjust seasoning of the greens and plated chicken, ensuring balanced flavor; applied sparingly to avoid over-salting the dish.
- 4 cups arugula Tossed with lemon and oil as a peppery, fresh bed for the chicken, providing textural contrast and a bright, slightly bitter counterpoint to the fried cutlets.
- shaved Parmesan cheese (optional, for topping) Shaved over the finished dish to add a creamy, salty garnish that complements the breading and greens; optional for extra richness and visual appeal.
Instructions
- Slice each chicken breast in half horizontally.: When you slice the chicken horizontally, you create thinner cutlets that cook uniformly and quickly, producing a tender interior without drying out. You should feel the meat give under the knife and see even, flat surfaces, which help when pounding. This step matters because thicker pieces require longer cooking, which risks burning the crust before the center reaches a safe temperature. A common mistake is leaving one side thicker than the other, resulting in uneven doneness.
- Place each piece of chicken between 2 pieces of parchment paper or plastic wrap. Use a rolling pin or meat mallet to pound the chicken flat.: As you pound, listen for the softening sound as the fibers break down and notice the cutlet spreading out evenly. The visual cue is a uniformly thin piece, about one quarter inch thick, which ensures quick, even cooking and a delicate texture. Pounding also tenderizes the meat, making every bite silky. Avoid over pounding to the point it tears, which will lead to an uneven crust and potential dry patches.
- Sprinkle each piece of chicken with salt and pepper to taste.: The grains of salt will dissolve and begin seasoning the meat immediately, so take a moment to season both sides lightly. You should see tiny specks of pepper and salt on the surface, which will help the interior carry flavor when sealed by the crust. Under seasoning at this stage is a frequent oversight that results in bland cutlets despite a flavorful coating.
- Prepare 3 dishes for breading the chicken. Place the flour in the first dish. In the second dish, whisk together the eggs and milk, and season the mixture with a pinch of salt and pepper.: Setting up an organized breading station prevents sticky fingers and saves time. The visual layout of flour, egg wash, and breadcrumb mix creates a reliable routine for even coating. Whisk the eggs until slightly frothy so the wash clings smoothly. If you rush this and skip seasoning the egg wash, the coating can taste flat.
- In the third dish, whisk together the breadcrumbs, parmesan cheese, salt, and pepper.: Combine the dry mix until the grated Parmesan cheese is evenly distributed among the Panko breadcrumbs , which ensures every bite has savory depth. You should notice flecks of cheese and a light, airy texture in the crumbs. Proper mixing helps the crust brown uniformly and adds aroma as it fries. A common error is compacting the crumbs, which prevents crisping and yields a dense coating.
- Dip each piece of chicken into each of the 3 dishes to dredge and fully coat in breadcrumbs.: As you move the cutlet through flour, egg wash, and crumbs, pay attention to the tactile changes the surface undergoes, from powdery to slick to textured. The flour creates a dry base, the egg adds adhesion, and the crumbs form the final crunchy layer. Ensure no bare spots remain because gaps will brown differently and leave the interior exposed. Rushing this can cause loose crumbs that fall off during frying.
- Heat 3 tablespoons of olive oil or butter in a large skillet over medium heat. Once heated, place two pieces of breaded chicken in the pan. Cook on each side for about 2 minutes or until the breading is golden brown and crispy and the chicken is cooked through.: You will know the oil is ready when it shimmers and a breadcrumb dropped in sizzles energetically. Place the cutlets away from you to avoid splatter and listen for a steady crackle as the crust forms. Visually, aim for a deep golden color and slightly darker flecks from the Parmesan . If the oil smokes, it is too hot and will burn the crumbs before the meat cooks; lower the heat and start again for consistent results.
- Add more olive oil or butter to the skillet and pan fry the remaining chicken breasts.: Replenishing the fat maintains an even frying surface and consistent browning. Watch how the new oil blends with the fond from the first batch, which can add flavor but also darken quickly, so refresh as needed. Each batch should sizzle similarly to the first; if it does not, adjust the heat. A common slip is overcrowding the pan, which drops the temperature and yields soggy crusts instead of crisp ones.
- In the bottom of a bowl, whisk together the olive oil, lemon juice, garlic, salt, and pepper.: As you whisk, the aroma of minced garlic and bright citrus will bloom, signaling a lively dressing. The emulsion should coat the back of a spoon, and you will notice a glossy sheen. This dressing brings acidity and aromatics that cut through the fried crust, balancing the plate. Overpowering the dressing with too much garlic is easy, so taste as you go.
- Add in the arugula and toss to coat.: Tossing should be gentle, ensuring the leaves are lightly coated but not saturated, so they stay crisp and slightly wilted by the warm cutlets later. You should hear a soft rustle as the leaves move, and observe a light gloss on each leaf that indicates even dressing. Avoid overdressing which will make the greens soggy and overwhelm the delicate textures.
- Add a portion of salad to each plate. Top each salad serving with shaved parmesan cheese. Place the chicken breasts on top of or alongside the salad. Serve with lemon wedges.: Arrange the warm cutlet beside or atop the arugula , and the residual heat will gently wilt the leaves, creating contrast between crunchy and tender. The shaved Parmesan cheese melts slightly against the warm chicken, enhancing savory notes, while a squeeze from the lemon wedge brightens each bite. A plating mistake is placing everything too early and letting the crust steam; serve promptly to maintain crispness.
Notes
- Swap breadcrumbs: Try a mix of seasoned panko and fine breadcrumbs for extra color and crispness, using the same quantity as the original to maintain coating balance.
- Herbed crust: Stir finely chopped fresh herbs into the breadcrumb mixture for a fragrant lift, adding parsley or basil in small amounts so they do not burn during frying.
- Butter plus oil: Use a combination of butter and olive oil to fry so you get the nutty, browned butter flavor while keeping the smoke point high enough to avoid burning the crumbs.
- Make it extra crunchy: Double dredge by re dipping the cutlets in egg and more panko for a thicker, more textured crust, which creates an even louder, satisfying crunch.
- Lighter finish: For a lighter approach, finish the breaded cutlets in a hot oven to crisp after a quick pan sear, which reduces oil absorption while preserving crunch.