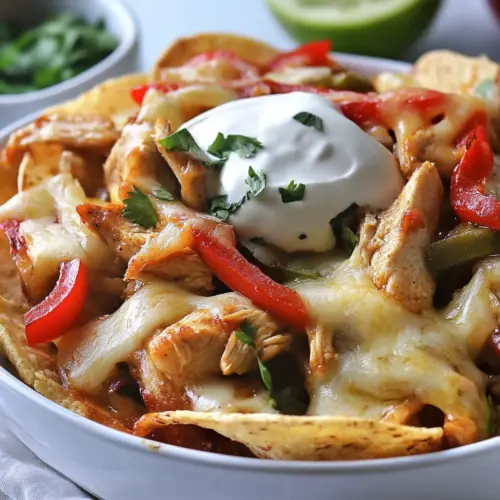
Chicken Fajita Nachos
Chicken Fajita Nachos combine crispy tortilla chips, seared chicken, sautéed peppers and onions, and melted monterey jack cheese for a crunchy, cheesy, and savory easy weeknight dinner. The dish is quick to assemble and perfect for sharing, delivering smoky seared notes and fresh salsa brightness in every bite. Make it when you want a crowd pleasing, hands on meal that comes together fast.
Equipment
- Skillet
- Oven
- Grater
Ingredients
- olive oil Drizzle and heat to provide a cooking medium and enhance flavor; helps brown the chicken and vegetables while carrying seasonings throughout the dish. Use sparingly to prevent sogginess and ensure even searing of fajita strips.
- 3 boneless skinless chicken breasts, sliced into 1/2-inch strips or 12 chicken tenderloins Sliced into strips to supply the main protein and hearty texture; cooks quickly and soaks up fajita flavors when marinated or tossed with seasonings. Choose tender breasts or tenderloins for uniform cooking and moist results when seared over medium-high heat.
- 1 medium onion, cut into strips Sliced into strips to add sweetness and a savory crunch that balances the dish; becomes tender and slightly caramelized when sautéed with the chicken. Use a medium onion to provide enough volume and flavor without overpowering the other ingredients.
- 1 medium bell pepper, green, red, or yellow, cut into strips Cut into strips to contribute crispness, color, and a slightly sweet, vegetal flavor; peppers soften and intensify when cooked with the chicken and onions. Select any color to vary sweetness and visual appeal while keeping slices uniform for even cooking.
- 1/2 teaspoon taco seasoning mix Sprinkle to introduce concentrated Mexican spice notes that season the chicken and vegetables; a small amount adds depth and warmth without overwhelming. Adjust quantity to taste and blend into the oil before cooking for more even flavor distribution.
- tortilla chips Layer under and around the toppings to provide a crunchy base and salty contrast; chips catch melted cheese and savory chicken, creating nacho-style bites. Choose sturdy tortilla chips to hold toppings without becoming excessively soggy from sauces or melted cheese.
- 1 cup grated monterey jack cheese Shred and melt over the assembled nachos to bind components and add a mild, creamy flavor; Monterey Jack melts smoothly and offers a gentle tang. Measure to achieve an even cheese layer that browns slightly under heat while coating the chips and chicken.
- 1/2 cups salsa Spoon over or serve alongside to introduce acidity, freshness, and a bright tomato-based counterpoint; salsa adds moisture and spice for balance. Use about half a cup to complement rather than saturate the nachos, adjusting for desired sauciness.
Instructions
- Preheat oven to broil at 500º F.: The moment the oven hits a fierce heat, you will notice a dry, intense warmth that crisps and bubbles the cheese quickly, producing those browned spots that taste toasted and slightly nutty. This is crucial so the chips do not go soggy before the cheese melts. A common mistake is leaving the oven on a lower setting, which can make the cheese melt slowly and saturate the chips instead of giving them a quick burst of heat. Keep an eye on the rack position, placing the skillet a bit lower if your broiler is extremely close, and always use oven mitts as the broiler will be unforgivingly hot.
- Drizzle olive oil into a skillet over medium heat. Add chicken strips to the skillet and sprinkle with half of the taco seasoning. Cook until cooked throughout, about 5-10 minutes. Remove chicken from skillet and into a bowl. Set aside. Add onions and peppers to skillet, sprinkle with remaining taco seasoning and cook until slightly tender, about 3 minutes. Remove from skillet and add to the bowl along with the chicken. Turn off the heat to the skillet.: You will hear a gentle shimmer as the oil warms, and it will thin and move quickly across the pan, indicating the right temperature for searing. This moderate heat allows the chicken to brown evenly without burning, creating the caramelized edges that add savory depth. If the oil smokes heavily, the pan is too hot and flavors can turn bitter; reduce the heat and let it cool for a moment. Use just enough oil to coat the surface, which helps the seasonings stick to the meat and vegetables.
- Arrange tortilla chips in a layer on the bottom and up the sides of the skillet. Add cooked chicken, onions, and peppers to the top of the tortilla chips. Top with cheese and place into the preheated oven. Broil until cheese has melted and turned slightly bubbly. Remove from oven and top with salsa. Serve immediately.: As the chicken hits the hot surface you will hear the satisfying sizzle that signals Maillard reaction, which creates rich, roasted flavors. The aroma will shift from raw to toasty as edges brown, giving you both scent and visual cues that the meat is cooking properly. This step deepens flavor quickly, so avoid crowding the pan which can steam the meat instead of searing it. A common pitfall is stirring too often; let the chicken form a light crust before flipping to preserve juices and texture.
- Cook until cooked throughout, about 5 to 10 minutes: You will notice the color shift from pale to opaque and some golden browning that means proteins have set. Press a piece gently to test firmness, and if you cut into the thickest piece it should show no pink. Overcooking will make the chicken dry, so remove it as soon as it is done and let carryover heat finish the job. A reliable method is to check for internal doneness with a probe if you have one, aiming for a safe but juicy result.
- Remove chicken from skillet and into a bowl: This brief rest lets the meat juices relax, which keeps slices moist when reintroduced to the chips. You will still smell the toasty notes clinging to the meat, and the bowl will capture any flavorful bits. A common oversight is leaving the meat in the hot pan where residual heat can overcook it; transferring immediately prevents that. Keep the skillet handy for the next steps so flavor transfers stay continuous.
- Set aside: Setting the cooked chicken aside gives you a chance to finish the vegetables at the same pan temperature, using the fond left behind to flavor them. The bowl will retain warmth and prevent the protein from cooling too quickly. If you leave the meat uncovered for too long it may dry, so keep it loosely tented if you are pausing for longer than a few minutes.
- Add onions and peppers to skillet, sprinkle with remaining taco seasoning and cook until slightly tender, about 3 minutes: The pan will release fragrant steam and the vegetables will soften while still holding slight crunch, offering a sweet, peppery aroma. Short cooking time preserves color and crispness, which is essential so they do not become limp under the broiler. Overcooking here results in floppy vegetables that lose their fresh brightness, so aim for tender crisp. The quick sauté lets the seasoning bloom without overpowering the dish.
- Remove from skillet and add to the bowl along with the chicken: Combining the hot vegetables with the chicken allows flavors to mingle, and the residual heat will help meld them without further cooking. You can smell the mingled spices and the gentle steam rising as everything comes together. If you wait too long to assemble, the components cool and the texture balance falters, so move decisively to the next step.
- Turn off the heat to the skillet: Powering down the heat prevents scorching and lets you use the warm pan as the assembly vessel, which keeps residual bits stuck to the surface available to enrich the nachos. This pause also keeps the skillet safe to handle briefly while arranging chips. Leaving the pan on can cause lingering heat to overcook ingredients or burn any stray toppings.
- Arrange tortilla chips in a layer on the bottom and up the sides of the skillet: The chips should create a sturdy bed and walls so toppings nestle into crevices and hold the melted cheese . Visually you will see chips overlapping, some standing, creating a pleasing texture variation. This structure helps trap juices and keeps the chips partially protected from immediate sogginess. If chips are too thin or piled only flat, they can collapse under topping weight, so choose sturdier chips and arrange with some vertical pieces for support.
- Add cooked chicken, onions, and peppers to the top of the tortilla chips: Once piled, the mixture releases a warm, seasoned aroma that promises flavor in every bite. Distribute ingredients evenly so each chip gets a balance of protein, veg, and seasoning. A common mistake is clustering too much protein in one spot which creates uneven bites; spread the mixture to ensure consistent tasting across the skillet.
- Top with cheese and place into the preheated oven: As the skillet slides under the broiler the room will fill with the scent of warming cheese, and you will see it begin to soften and pool. The close heat causes the proteins and fats in the cheese to brown in spots, producing nutty, toasty flavors that bring the dish alive. Avoid turning the broiler on and leaving the room; broiling can brown quickly, so watch for the perfect bubble and golden flecks.
- Broil until cheese has melted and turned slightly bubbly: Visual cues are paramount here, the cheese should be fully melted with gentle bubbling and small browned patches forming. The sound is a quiet hiss as moisture escapes, and the aroma is rich and toasty. Overbaking will make the cheese oily and the chips brittle, so remove when you see the first golden spots, not when everything is deeply browned.
- Remove from oven and top with salsa: The contrast between hot, bubbling cheese and cool, fresh salsa adds brightness and acidity to each bite. Spoon the salsa on after broiling to preserve its texture and vibrant flavor. A typical mistake is adding salsa before broiling, which can steam and dilute its freshness, so always finish with it for the best contrast.
- Serve immediately: Serve while the skillet is hot so the cheese stretches and the chips are still sturdy. The textures are at their peak right away, with warm toppings and crisp edges. If you wait, the chips may soften and the contrast that makes this dish so fun will fade, so bring it straight to the table and enjoy the communal bustle.
Notes
- Use room temperature chicken: Allowing the chicken to sit at room temperature for 10 to 15 minutes before cooking reduces shock in the pan and promotes more even browning, so you get a better sear and juicier meat.
- Toast the taco seasoning briefly: Blooming the taco seasoning in the hot oil for 20 to 30 seconds releases its aromatics, making the finished dish smell and taste more robust when combined with the chicken and vegetables.
- Choose sturdy tortilla chips: Thick, restaurant style chips hold up better under melted cheese and warm toppings, preventing sogginess and ensuring satisfying crunch in each bite.
- Grate cheese fresh: Freshly grated monterey jack cheese melts smoother and avoids the anti caking agents found in pre shredded blends that can affect melt and texture.
- Layer for even coverage: Build layers of chips and toppings so heat circulates and cheese melts uniformly, ensuring each portion gets a good balance of chicken, vegetables, and cheese.
- Finish with salsa at the end: Add the salsa after broiling to preserve its bright, fresh flavors and prevent it from watering down the finished nachos.