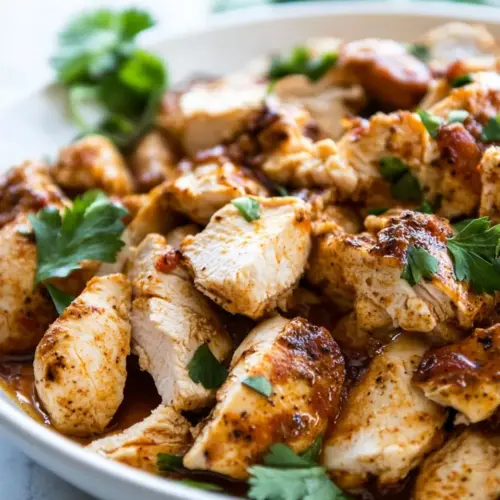
Chicken Chipotle
Chicken Chipotle offers smoky, tangy flavor with a crisp seared exterior and juicy interior. This easy weeknight dinner uses a simple spice rub and takes minutes to cook, delivering bold taste with minimal effort. Perfect for bowls, tacos, or sandwiches, it is both fast and flavorful, making it a go to for busy evenings when you want something satisfying.
Equipment
- Non-Stick Skillet
- Grill
- Tongs
- Cutting Board
- Instant read thermometer
Ingredients
- 2 -3 chicken breasts pounded thin (1 pound) Sear to develop a flavorful crust and cook the thinly pounded chicken breasts quickly while preserving juiciness; use oil heat control to avoid burning and ensure even browning. Pound breasts thin for uniform thickness so they finish at the same time and remain tender. Rest briefly after cooking to redistribute juices and maintain a succulent texture.
- 2 tablespoons olive oil Coat to prevent sticking and aid in even browning while contributing a subtle fruity richness to the chicken. Warm the oil before adding chicken to help form a crisp exterior and carry the spices' flavors. Use measured tablespoons to control fat content and balance with other seasonings.
- 1 teaspoon chipotle chili powder Season to add smoky heat and anchoring chipotle chile flavor; sprinkle evenly to ensure each bite has a consistent spicy profile. Pair with acidic or fatty elements to temper heat and enhance complexity. Adjust amount slightly to taste if a milder or hotter result is desired.
- 1/2 teaspoon chili powder Sprinkle to contribute general chili heat and layered spice complexity that complements the chipotle powder without overwhelming the dish. Use conservatively for a background warmth that enhances other seasonings. Combine with cumin and paprika for a balanced chili profile.
- 1/2 teaspoon ground cumin Add to provide earthy warmth and a slightly nutty, aromatic depth that rounds out the chili flavors in the rub. Toasting briefly in a dry pan before mixing can amplify its aroma, but measuring precisely keeps the cumin from dominating. Works particularly well with lime juice to brighten the overall taste.
- 1/2 teaspoons smoked paprika Include to impart a smoky, slightly sweet undertone that enhances the chipotle and chili powders and adds color to the chicken surface. Use smoked paprika to reinforce smokiness without additional heat, balancing the rub's flavor. Keep measurements accurate to avoid overpowering other spices.
- 1/2 teaspoon onion powder Dust to contribute savory, slightly sweet onion flavor that mimics freshly cooked onions without adding moisture; it builds background umami in the spice blend. Use powdered form for uniform distribution in the rub and to preserve the chicken's dry surface for searing. Combine with garlic powder for a classic savory base.
- 1/2 teaspoon garlic powder Sprinkle to provide concentrated garlic aroma and savory depth that complements the onion powder and spices. Use the powdered form for even coating and to avoid textural changes that fresh garlic might introduce. Balance with salt to avoid an overly pungent finish.
- 1/2 teaspoons salt Season to enhance and elevate all other flavors while controlling overall taste; salt is essential for seasoning meat and helping proteins retain moisture during cooking. Measure carefully to prevent oversalting and to allow the spice mix to shine. Consider adjusting the amount for low-sodium preferences.
- 1/4 teaspoon pepper Add to offer a subtle sharpness and balanced bite that rounds out the seasoning blend and lifts the overall flavor profile. Grind fresh pepper when possible for more pronounced aroma; use the measured amount to avoid excessive heat. Pepper works with lime juice to brighten the final dish.
- 1 tablespoon lime juice Squeeze to introduce bright acidity that cuts through the richness and amplifies the other seasonings, creating a balanced, tangy finish. Add at the end or as a finishing touch to preserve fresh citrus notes and avoid cooking off the brightness. Use fresh juice for the cleanest flavor impact.
Instructions
- In a small bowl, whisk chicken rub ingredients together and rub evenly all over chicken breasts. Time permitting, allow chicken to sit for 30 minutes at room temperature or refrigerate up to 8 hours then bring to room temperature before cooking.: The aroma of the spices will bloom as you mix them, releasing warm, smoky notes that smell inviting. When you rub the mixture on the chicken , press gently so the grains adhere and form a cohesive coating, which helps create a crust during cooking. If you skip rubbing completely, the seasoning will not penetrate and the surface will taste uneven. A common mistake is adding too much oil to the rub, which prevents a proper sear because the surface becomes slick rather than dry and flavorful.
- STOVETOP DIRECTIONS: Letting the seasoned chicken rest allows the flavors to meld and the salt to begin seasoning through, creating a more cohesive taste. If you refrigerate, the spices deepen and the meat picks up more character; when you bring it back to room temperature before cooking, you prevent the center from staying cold and overcooking the exterior. A common error is cooking straight from the fridge, which can yield uneven doneness. If you are short on time, even a 15 minute rest improves results.
- If chicken has been refrigerated, let sit at room temperature for 15-30 minutes (time permitting).: On the stovetop, preheating is essential; you want an immediate sizzle when the chicken hits the pan. The sound of a hot skillet searing the meat should be audible, and the surface will darken and caramelize in minutes, creating nutty, roasted notes. If the skillet is not hot enough you will see pale edges and a steamed texture rather than a crisp crust, which is a common pitfall. Avoid moving the chicken too often; letting it sit undisturbed yields the best sear.
- Heat a large non-stick skillet over medium high heat. Once very hot, add chicken and cook, undisturbed for 3-5 minutes, or until nicely browned (or blackened if you prefer) on one side. Turn chicken over, cover, and reduce heat to medium. Cook for approximately 5-7 more minutes (depending on thickness of chicken), or until chicken is cooked through. Remove to a cutting board and let rest 5 minutes before slicing.: Allowing the chilled chicken to warm slightly reduces shock when it meets heat, which encourages even cooking and juicier results. You will notice the meat feels less cold to the touch and the pan will bring it to temperature more smoothly. A frequent mistake is skipping this step in the rush to cook, leading to uneven doneness with dry edges. If you are pressed, at least 15 minutes helps significantly.
- GRILLING DIRECTIONS: A properly heated skillet will shimmer and may emit a faint nutty aroma from the oil, signaling it is ready. When you add the chicken , the surface should sizzle fiercely, indicating the Maillard reaction is occurring, which produces those desirable browned flavors. If you see smoke immediately, reduce the heat slightly, because burning will yield bitter notes. Using too low heat will prevent browning and leave the chicken pale and less flavorful.
- If chicken has been refrigerated, let sit at room temperature for 15-30 minutes (time permitting).: The sizzling will settle into a steady sound and you will see the edges pull away from the pan as a sign it is ready to flip. The surface should be deeply colored with a crust that resists sticking. If you try to lift it too early and it sticks, that means the crust has not formed yet and you may tear the coating. Avoid pressing the chicken down while searing, which squeezes juices out.
- Meanwhile, grease and preheat the grill to medium heat, 375-450°F.: Lowering the heat and covering traps heat to finish cooking through while preventing excessive charring. You should hear a softer sizzle and notice the top of the chicken lose its raw sheen as it cooks. A common mistake is keeping the heat too high, which overcooks the outside while leaving the center underdone. Using a lid helps maintain moisture so the interior stays tender.
- Grill chicken undisturbed for 5-7 minutes per side, or until chicken is cooked through. (An inserted thermometer should read 165 degrees F.): Rather than relying on time alone, watch for visual cues such as juices running clear and the center losing pinkness; the meat should feel slightly firm but springy when pressed. The aroma will shift from raw to savory roasted notes. If you overcook, the texture becomes dry and stringy, so pull the chicken when it is just done. A thermometer reads 165 degrees F to confirm doneness.
- Remove chicken from grill and let rest 5 minutes before slicing.: Resting is where the juices redistribute, turning what might be a dry piece into something juicy and tender. You will notice the surface calm and the aroma concentrate during this short pause. Cutting immediately releases juices onto the board, leaving the meat drier, which is a common misstep. Patience here pays off in mouthfeel and flavor.
- GRILLING DIRECTIONS: On the grill you will get more pronounced char and a smokier finish; the visual of grill marks and the scent of outdoor smoke elevate the dish. Preheat and oil the grates to prevent sticking, and listen for a confident sear. If the grates are not hot enough you will get pale marks and steamed meat, which reduces flavor. Keep an eye on flare ups to avoid bitterness from burned bits.
- If chicken has been refrigerated, let sit at room temperature for 15 to 30 minutes (time permitting): As with stovetop cooking, tempering the chicken before it hits the grates prevents a temperature shock that can cause uneven cooking. You will see more even searing and better color when you do this. Grilling cold meat often leads to tough exterior and undercooked interior, a frequent oversight when guests are impatient. Even a short rest improves final texture.
- Meanwhile, grease and preheat the grill to medium heat, 375 to 450°F: When the grill reaches temperature you should feel radiant heat above the grates and see a faint shimmer. The specified range gives enough heat for searing without burning too quickly. If your grill is hotter than stated, move pieces to indirect heat to finish cooking, as excessive surface charring can create bitter flavors. Uneven heat zones are common, so rotate as needed.
- Grill chicken undisturbed for 5 to 7 minutes per side, or until chicken is cooked through: The first side should develop clear grill marks and a caramelized surface; resist flipping early to allow these marks to form. After flipping, look for clear juices and a springy texture as signs of doneness. A common grilling mistake is constant flipping, which prevents crust formation and lengthens cook time. Check with an instant read thermometer if you are unsure.
- Remove chicken from grill and let rest 5 minutes before slicing: Resting after grilling allows carryover cooking to finish the interior gently and keeps the meat juicy. You will notice concentrated aromas as the surface cools slightly. Cutting too soon loses juices to the cutting board, leaving slices less succulent. Keep it covered loosely while resting for best results.
Notes
- Press the chicken thin: Pounding the chicken to an even thickness ensures predictable cook times and consistent doneness across the breast. It also increases surface contact with the pan or grill, improving crust development.
- Preheat properly: Whether skillet or grill, make sure surfaces are hot enough to get an immediate sizzle. That initial sear locks in juices and creates the caramelized flavors you want.
- Season early when possible: If you can, let the rub rest on the chicken for at least 30 minutes or overnight to deepen flavor. Long marination intensifies smokiness and allows salt to penetrate.
- Use a thermometer: An instant read thermometer removes guesswork. Pull the chicken at 160 degrees F and let carryover heat finish it to 165 degrees F while resting for perfectly moist results.
- Avoid overcrowding: Cook in batches if necessary. Overcrowding lowers pan temperature and encourages steaming instead of searing, which robs you of that desirable crust.
- Fresh spices matter: Spices that are too old lose aromatic oils and yield less vibrant results. Fresh-smelling chipotle chili powder and smoked paprika will make the rub pop.