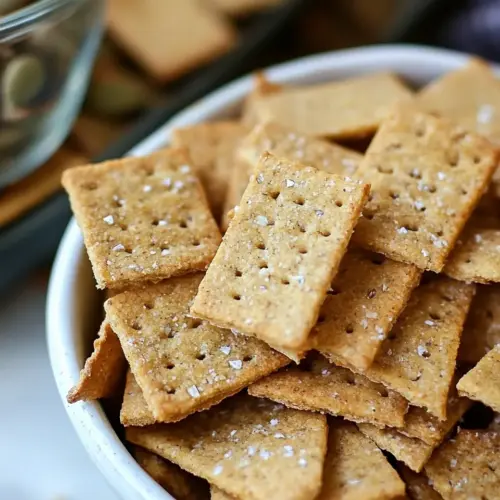
Cheesy Pumpkin Seed Crackers
Cheesy Pumpkin Seed Crackers are crispy, savory, and delightfully nutty, made with ground pumpkin seeds, spelt flour, and nutritional yeast for a vegan cheesy flavor. These easy crackers bake to golden perfection and pair beautifully with dips for an easy weeknight snack or party platter, offering a wholesome crunchy bite you will want to make again and again.
Equipment
- Oven
- Baking Sheet
- Parchment Paper
- Food Processor
- Rolling Pin
- Pizza wheel
- Bench scraper
- Fork
- wire cooling rack
Ingredients
- 1/3 cup raw pumpkin seeds Provide a crunchy, nutty base and contribute texture and toasty flavor when lightly toasted; also add healthy fats and protein that help enrich the cracker structure and mouthfeel.
- 2/3 cups spelt flour Add bulk and a tender, slightly nutty crumb to the crackers while offering gluten-lite structure; spelt flour hydrates with liquids to form the dough and browns pleasingly on baking.
- 2 tbsp nutritional yeast Impart a savory, cheese-like umami depth without dairy and help intensify overall savory flavor; nutritional yeast also contributes subtle thickness to the dough when mixed with dry ingredients.
- 1/2 tsp garlic powder Deliver a warm, savory garlic note that uplifts the savory profile without adding moisture; garlic powder disperses evenly through the dough for balanced flavor in each bite.
- 1/2 tsp sea salt Enhance and balance the overall flavors while subtly strengthening gluten development; sea salt seasons the crackers throughout the dough for a more satisfying taste.
- 1/4 tsp baking powder Provide a light leavening boost that helps create slight lift and crispness; baking powder interacts with moisture and heat to prevent overly dense crackers.
- 3 tbsp avocado oil Contribute smooth richness and tenderness to the dough while helping bind ingredients; avocado oil adds a neutral, slightly fruity fat that promotes flakiness and browning.
- 3 tbsp cold water Hydrate the dough to the proper consistency for rolling and shaping while activating the leavening; cold water helps control dough temperature for a crisper final texture.
- 1 tsp Maldon sea salt, for topping the crackers Add a bright, flaky finish and concentrated saline crunch on top of the baked crackers; Maldon sea salt enhances flavor perception and provides an attractive, crunchy garnish.
Instructions
- Preheat the oven to 350°F and line a baking sheet with parchment paper.: As the oven warms, you will notice the faint mechanical hum of preheating and the air beginning to feel slightly warm near the oven door. This steady heat is crucial because it promotes even browning across the crackers, producing that attractive golden edge we want. A common error at this stage is waiting until the dough is rolled to preheat the oven, which can slow the process and affect texture; always preheat first so the baking sheet is ready. Make sure the rack is centered so heat circulates evenly, and use parchment to prevent sticking and make clean removal simple.
- In a food processor, blend the pumpkin seeds until they are a fine flour.: You will hear the motor pulse and see the seeds transform from distinct kernels into a fine, slightly grainy powder. The aroma becomes more pronounced, with warm, toasty notes surfacing as oils are released. This texture is important because it mimics nut flour, giving the crackers structure and nutty flavor. Avoid overprocessing into a paste, which can release too much oil and yield a greasy dough; pulse in short bursts and scrape down the sides as needed to check the consistency.
- Add the spelt flour, nutritional yeast, garlic powder, sea salt, and baking powder to the food processor bowl with the pumpkin seed flour and pulse a few times to blend.: After combining, you will sense a uniform, sandy mixture with the faint scent of yeast and garlic lifting gently. This dry mix ensures even distribution of flavors so no bite tastes underseasoned or overly intense. Watch for clumps of baking powder or uneven pockets of seasoning; pulsing several times helps eliminate these. A typical mistake here is pulsing too long, which can warm the mix and begin breaking down delicate flours, so keep the bursts short and controlled.
- Pour the avocado oil into the food processor and pulse to blend until the mixture resembles fine wet sand.: As you add the oil and pulse, the texture will shift, becoming slightly cohesive and pebbly, with tiny glints of oil visible. This tactile change is a sign that the fat is coating the dry ingredients, which helps create crisp layers during baking. If you skip this step or add too little oil, the crackers can be dry and crumbly. Conversely, too much oil makes the dough fatty and hard to roll. Aim for a sandy, barely-moist feel to the mixture.
- Next, add the cold water and pulse a few times, or until the dough begins to clump.: The addition of cold water is the moment the dough comes together, forming a cohesive mass that holds when pressed. Cold liquid keeps the fat slightly firm, helping create that tender, flaky texture after baking. You will notice the mixture forming into a ball when enough water is added, and the sound of the processor will change slightly to a quieter, more muffled pitch. A common pitfall is adding too much water; if the dough becomes sticky, chill it briefly before rolling to firm it up.
- Remove the dough from the food processor and form it into a firm ball.: Handling the dough lets you feel its elasticity and moisture; it should be smooth and not sticky. Forming a tight ball helps minimize air pockets and makes rolling easier. If it feels too crumbly, press it together and add a tiny splash of water, but do so cautiously. One mistake people make is overworking the dough with warm hands, which can soften the fats and alter the final crispness, so work briskly or chill the dough if needed.
- Place the dough ball on a sheet of parchment paper, and top with another sheet of parchment. Use a rolling pin to roll the dough into about 1/8 inch thin sheet. Peel the top layer of the parchment paper off of the dough.: Rolling between parchment prevents sticking and keeps the surface smooth. You will feel the dough spread evenly under the pin, and visually you want a uniform thickness so crackers bake at the same rate. Thinness is key for crispness, but if you go too thin the crackers can bake too fast and burn. Remove the top parchment carefully, so the sheet remains intact for later transfer.
- Sprinkle the Maldon sea salt over the dough, and gently press the salt into the top.: The salt crystals will look like tiny jewels against the dough, and pressing them in ensures they stay attached after baking. This step adds bright, crunchy bursts of flavor that contrast with the mellow base. Take care not to press too hard or you may compress the dough unevenly, creating spots that bake differently. If you prefer less salt, reduce the quantity, but the crystals are part of the sensory experience.
- Use a pizza wheel to cut the dough into about 1-inch small squares. You can cut them a little larger or smaller if you’d like, this does not have to be exact.: Cutting produces clean edges, and you will notice how the dough separates smoothly without tearing when properly hydrated. The sound of the wheel gliding and the visual of neat squares is satisfying, and consistent sizing helps all crackers finish cooking at the same time. A frequent misstep is pushing the wheel too hard and dragging the dough; use a confident, even motion to get sharp cuts.
- Use a bench scraper to gently remove the crackers from the parchment paper and place them onto the parchment paper-lined baking sheet. Allow at least 1/4 inch between each cracker. Gently prick each cracker with a fork.: Transferring them carefully preserves the crisp edges. The small air gap between crackers helps hot air circulate, ensuring even baking. Pricking with a fork prevents large air bubbles and encourages a uniform, flat surface. Rushing this transfer can cause cracks or misshapen pieces, so work patiently and maintain spacing for best results.
- Bake the crackers for 15 minutes, until fragrant and lightly browned.: As they bake you will notice a warm, toasty aroma and the edges developing a light golden color. The sound is subtle, but the change in color and the scent are reliable indicators that they are near done. Overbaking can lead to bitter notes, while underbaking yields limp crackers; check that the centers feel firm and the edges are golden to know they are ready. Rotate the sheet if your oven has hot spots for the most even finish.
- Allow the crackers to cool on the baking sheet for at least 15 minutes before enjoying or moving to a wire cooling rack to cool completely. They will continue to crisp up as they cool.: Cooling is where the magic of crisping finishes. You will hear tiny clicks and see steam dissipate as moisture leaves the crackers, firming them to the perfect snap. Moving them too soon can cause breakage, and tasting before they cool fully may give a misleadingly soft texture. Patience here pays off; wait for them to come to room temperature for maximum crunch.
Notes
- Swap the flour: Try replacing part of the spelt flour with another whole grain flour, keeping the total weight similar, to add rustic texture while maintaining crispness.
- Adjust the salt finish: Use less Maldon sea salt on top for a milder finish or scatter a few seeds for visual interest while preserving the dough seasoning.
- Make them thinner or thicker: Roll to a slightly thinner sheet for crisp, delicate crackers or a touch thicker for a heartier bite suited to sturdy dips.
- Chill the dough before rolling: Allowing the dough to rest in the fridge firms it, making rolling and cutting neater and often improving final texture.
- Double the batch safely: Scale ingredients linearly and pulse in batches in the processor to keep texture consistent across a larger quantity.