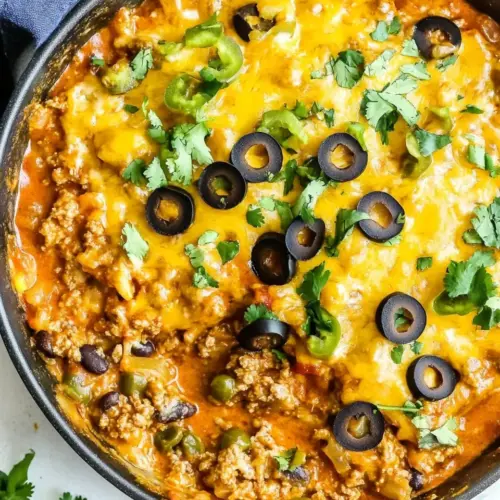
Cheesy Beef Enchilada Skillet
Cheesy Beef Enchilada Skillet delivers creamy, savory, and slightly tangy flavors in an easy weeknight dinner. Ground beef simmers in red enchilada sauce until rich and saucy, then cheddar cheese melts through for a gooey finish. Quick to make and family friendly, this skillet is a cozy, satisfying meal that is perfect when you want comfort without fuss.
Equipment
- Skillet
- Spatula
- Can opener
Ingredients
- 2 lbs ground beef, lean Brown and cook thoroughly to develop savory flavor and provide the dish's primary protein; drain excess fat if necessary to prevent greasiness. Season while cooking to infuse the beef with aromatics and blend with other ingredients for a cohesive skillet filling.
- 1 onion, diced Sauté until translucent to add natural sweetness and aromatic depth; finely dice for even distribution throughout the skillet. Help soften other bold flavors and create a tender base that complements the beef and sauce.
- 1/2 tsp garlic powder Season lightly to introduce a warm, aromatic garlic note without fresh cloves; sprinkle during cooking to evenly permeate the mixture. Provide background flavor that enhances the meaty and cheesy components without overpowering the dish.
- 1/2 tsp salt Enhance and balance overall seasoning levels; add gradually and taste to avoid oversalting, especially if using canned ingredients. Promote flavor integration by drawing out other aromatics and helping cheeses melt smoothly.
- 1 cup red enchilada sauce Coat and bind the filling while contributing tangy, mildly spicy enchilada flavor; pour in to create a saucy base that keeps the skillet moist. Help marry the beef and dairy elements and provide authentic enchilada character to the dish.
- 4.5 oz diced green chiles, (1 small can) Introduce mild heat and a bright, slightly tangy flavor while adding texture; stir in from the can, including juices if desired for more moisture. Offer a traditional Southwestern element that lifts the overall flavor profile without overpowering other components.
- 1/2 cup sour cream Add creaminess and a tangy richness that lightens and smooths the sauce; fold in after cooking to create a luscious finish. Temper the acidity of the sauce and contribute to a silky, cohesive mouthfeel throughout the skillet.
- 1 cup cheddar cheese Melt and bind toppings while contributing sharp, tangy dairy flavor; sprinkle or stir in near the end to achieve gooey, melted coverage. Provide a familiar cheesy comfort element that complements the beef and enchilada sauce.
- 2.5 oz sliced black olives, drained, (1 small can) Add briny, salty contrast and a tender, slightly firm texture; drain well to avoid excess moisture before folding in. Offer a piquant accent that cuts richness and enhances the overall savory balance of the dish.
- 3 green onions, diced Garnish with fresh, mild onion flavor and a pop of color; dice finely and scatter over the finished skillet just before serving. Brighten and refresh each bite while adding a crisp, vegetal note that complements the heavier components.
Instructions
- Brown the ground beef and diced onion over medium heat until the beef is no longer pink and the onions are translucent. Drain any excess grease or moisture.: As you cook, listen for a steady sizzle and watch for the beef to break into small crumbles with a deepening brown color, these browned bits give savory intensity. The onions should turn soft and slightly translucent, releasing a sweet, savory scent that mixes with the beef aroma. Use a spatula to break the meat into even pieces so it cooks uniformly. The why here is that browning creates Maillard reaction flavors, which are essential for a rich, layered finished dish. A common misstep is turning the heat too low, which causes steaming rather than browning, yielding bland meat. If there's a lot of fat, remove it after cooking to prevent a greasy final texture. If you accidentally dry the pan out, add a splash of the enchilada sauce later to bring moisture back.
- Place the skillet back on the stove over medium heat. Add the garlic powder, salt, enchilada sauce, green chiles, and sour cream. Mix well.: Once everything is combined you will notice the sauce start to coat the meat evenly, transforming loose browned crumbles into a cohesive filling. The scent will shift, becoming tomato forward with a warm chile undertone and a gentle tang from the sour cream . Stir until you see a uniform color and texture, this ensures every bite is balanced. The reason for adding these seasonings now is to let them bloom in the residual heat and fat, marrying flavors. A pitfall is adding the sour cream at too high a heat, which can make it separate, so keep the pan at moderate temperature. If separation occurs, lower the heat and stir gently until it smooths back together.
- Bring sauce to a boil and then lower heat and simmer for 4-6 minutes or until thickened.: As the sauce comes to a brief boil you will see bubbles rise and the aroma will intensify, indicating moisture is evaporating and flavors are concentrating. Lowering to a simmer lets the sauce reduce without scorching, and you should watch for it to become visibly thicker, clinging to the meat rather than pooling. This step amplifies the sauce flavor and prevents a watery final skillet. A common mistake is leaving the heat too high which can burn sugars in the sauce, producing bitterness. Stir occasionally to keep the bottom from sticking, and if the sauce seems to reduce too quickly, drop the flame and cover loosely for a short period.
- Stir in half the cheese to the meat mixture, then sprinkle the other half on top. Place the lid on the pan for 2-3 minutes or until the cheese is melted.: When you fold some of the cheddar cheese into the warm filling it becomes glossy and creamy, adding richness throughout. The remainder on top melts into a golden, gooey layer that signals comfort and indulgence. Covering the pan traps heat and creates a gentle steam that finishes the melting without overcooking the meat. The sensory cue is the cheese becoming uniformly gooey and slightly shiny, with occasional little bubbles at the edge. Avoid leaving the pan unattended on high heat, because the bottom can scorch while the top looks melted. If the cheese needs a touch more melting, reduce heat and cover a bit longer rather than increasing temperature.
- Remove from heat and top with black olives and green onions if desired.: The final act introduces fresh and briny contrast, the sliced black olives lending a soft, slightly salty chew, and the diced green onions offering a crisp, bright lift. Once off the heat the skillet will continue to settle and the residual warmth will meld the toppings without wilting them. Visually you want dark olive slices and vivid green rings scattered across the melted cheese, creating a pleasing contrast. One mistake is adding toppings too early, which can soften them excessively and mute their fresh qualities. Let the skillet rest a minute so the flavors marry, then serve straight from the pan for a communal, satisfying experience.
Notes
- Make it milder by choosing a mild enchilada sauce and using the listed amount of green chiles, which provides flavor without excessive heat.
- Increase creaminess by stirring in an extra tablespoon or two of sour cream off heat, which will yield a silkier mouthfeel without thinning the sauce if you add it gently.
- Boost cheesiness by sprinkling an extra quarter cup of shredded cheddar cheese on top before covering for the melt, giving more gooey pull.
- Make it lighter by using leaner ground beef and draining thoroughly, this keeps savory flavor but reduces overall fat in the finished skillet.
- Swap toppings by substituting additional diced green onions or skipping the black olives if you prefer a cleaner finish; toppings are an instant way to change the final profile.