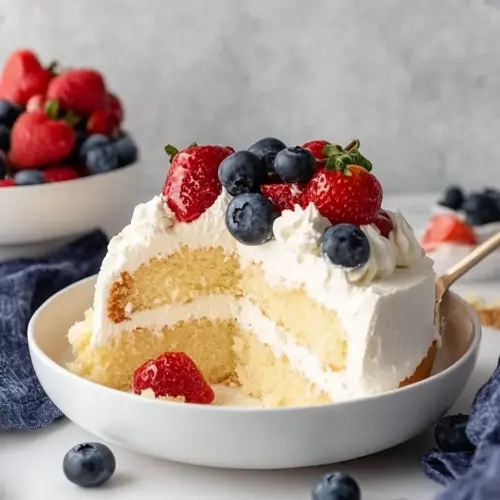
Chantilly Cake
Chantilly Cake is a light and creamy layered dessert with a tender sponge and a silky mascarpone Chantilly cream, finished with fresh berries. This cake feels both elegant and approachable, perfect for spring gatherings or easy weeknight celebrations. With balanced sweetness and bright fruit notes, it delivers a refined finish that is worth making for any special moment.
Equipment
- Stand mixer
- Paddle attachment
- Whisk attachment
- Two 8 inch round cake pans
- Wire Rack
Ingredients
- 3 cups cake flour Provides a tender, fine crumb and structure for the cake; sifted to remove lumps and combine evenly with leaveners. Balances absorption of fats and liquids to create a light, airy texture when properly measured and folded into the batter.
- 2 teaspoons baking powder Leavens the batter by producing carbon dioxide when combined with moisture and heat; combined with baking soda or beaten eggs to help the cake rise. Measured accurately to avoid metallic or bitter flavors and to ensure even crumb.
- 1/2 teaspoon kosher salt Enhances overall flavor and balances sweetness while also slightly strengthening gluten networks; dissolves easily into the batter when evenly distributed. Helps to highlight other flavors like vanilla and butter without overpowering the cake.
- 1 cup 2 sticks unsalted butter, softened Contributes richness, moisture, and tender texture while aiding in aeration when creamed with sugar; softened to ensure proper incorporation. Adds flavor depth and helps create a fine crumb and consistent batter.
- 2 cups granulated sugar Sweetens and helps with creaming to incorporate air into the batter; granulated texture assists with structure during mixing. Provides bulk sweetness and helps the cake brown and develop a pleasant crust in the oven.
- 4 large eggs Adds structure, moisture, and emulsification, helping bind ingredients and trap air for lift; large eggs are typically room temperature for best mixing. Contributes to richness, color, and stability of the finished cake layers.
- 2 teaspoons pure vanilla extract Provides aromatic flavor and enhances sweetness, adding depth to the batter; measured as pure extract for consistent taste. Brings a pleasant, familiar note that complements butter and vanilla-forward fillings.
- 1 cup whole milk Adds moisture and thins the batter to the correct consistency, contributing to a tender crumb; whole milk supplies fat for richness. Helps dissolve dry ingredients and balances the batter for even baking and texture.
- 8 ounces mascarpone cheese at room temperature Adds a rich, slightly tangy creaminess to the filling and contributes to a silky mouthfeel; brought to room temperature for smooth blending. Helps stabilize whipped cream when combined with powdered sugar and enhances overall creaminess of the Chantilly layer.
- 1/2 cup powdered sugar Sweetens and stabilizes the mascarpone or whipped cream filling while dissolving smoothly; powdered form prevents grittiness. Helps thicken and slightly stabilize whipped elements, contributing to a smooth, sweet filling.
- 1 tablespoon pure vanilla extract Adds concentrated vanilla flavor to the mascarpone mixture for a pronounced aromatic note; measured to control intensity. Complements the tanginess of mascarpone and balances sweetness in the cream layer.
- 2 cups cold heavy whipping cream Creates the light, airy Chantilly cream when whipped and provides structure to hold berries and cake layers; kept cold for optimal volume and stability. Blends with mascarpone and powdered sugar to form a stable, silky frosting with a cloud-like texture.
- 1 1/2 cups fresh berries blueberries, blackberries, raspberries, or diced strawberries will work Adds bright, fresh flavor and a contrasting texture to the cake; mixed varietals like blueberries, blackberries, raspberries, or diced strawberries offer different sweetness and tartness levels. Provides color, freshness, and a juicy bite that complements the rich cream layers.
Instructions
- For the Cake: Preheat oven to 350° F. Spray two round 8” cake pans with nonstick baking spray and dust them lightly with flour. Set aside.: Preheat oven to 350° F : As the oven warms, you will notice a gentle, dry heat that is crucial for even rise and proper structure. The smell is neutral at first, then comforting as it reaches temperature. Preheating ensures the batter begins baking immediately, creating lift from the baking powder. If you skip a full preheat, your layers may bake unevenly and sink in the center. A common error is relying on an oven dial setting alone, so use an oven thermometer for accuracy. Also prepare two 8 inch pans by spraying and dusting with flour so the batter slides out cleanly after baking.
- In a medium bowl, whisk together the flour, baking powder, and salt. Set aside.: When you whisk these dry ingredients, you distribute the leavening agent and salt evenly, which is key for uniform rise. The combined mixture looks pale and powdery, and sifting or whisking helps prevent clumps. This step quiets the risk of pockets of baking powder that can leave tunnels or odd domes. Avoid adding the dry mix to wet ingredients all at once, because that can encourage overmixing later and a tough crumb.
- In the bowl of a stand mixer fitted with the paddle attachment, cream together the softened butter and granulated sugar until light and fluffy, about 3 minutes. Scrape down the sides of the bowl.: As you beat the butter and granulated sugar , the mixture will turn pale and increase in volume, a sign that air is being incorporated for a tender cake. You should hear a steady, rhythmic hum from the mixer as it works. Scrape down the sides to keep everything even, and if the butter is too soft the mixture may appear greasy rather than airy. Resist the urge to rush this; proper creaming sets the stage for lift and a fine crumb.
- Add the eggs, one at a time, beating well after each addition. Scrape down the sides of the bowl.: Gradual addition of each egg allows the batter to emulsify, producing a smooth, cohesive texture. After each egg is incorporated, the batter will look silkier and gain body, and you may notice a glossy sheen. If you add them too quickly, the mixture can split and look curdled, which affects rise and texture. To recover from curdling, beat in a small spoon of the dry ingredients to bring the mixture back together, rather than adding more liquid.
- Add the vanilla and mix to combine.: Introducing vanilla at this point perfumes the batter, offering warm aromatic notes that weave through the cake. The scent deepens as it incorporates, and this small addition significantly enhances the overall flavor. Make sure it is evenly distributed by mixing briefly, then stop to avoid overworking the batter.
- With the mixer on low speed, add 1/3 of the dry ingredients, followed by 1/2 of the milk. Then add another 1/3 of the dry ingredients, the rest of the milk, and lastly, the rest of the dry ingredients. Mix just until fully combined – do not over mix.: Alternating additions of the dry mix and milk creates a harmonious batter, avoiding the shock that comes from dumping all of one component at once. The batter will glide between thicker and looser textures as you alternate, and moving slowly preserves air pockets. This technique prevents overdevelopment of gluten which would lead to toughness. If you pour everything at once you risk clumps or an overmixed batter.
- Divide the batter equally between the prepared cake pans.: As you finish the alternation, the batter should be smooth and glossy, with no visible streaks of flour. The rhythm of thicker to thinner will be obvious, and you should stop mixing as soon as combined to keep the crumb tender. Overmixing here will tighten the structure and make the cake dense. If you see streaks, fold gently with a spatula rather than running the mixer at high speed.
- Bake for 25-28 minutes, or until a toothpick inserted into the center comes out clean. Remove the cakes from the oven and let them cool in the pan for 10 minutes. Then run a knife around the perimeter of the pans and turn the cakes out onto a wire rack. Allow to cool completely before adding frosting.: When you spoon the batter into each pan, aim for even distribution so the layers bake uniformly. The surface will be slightly glossy and the batter should level with a gentle shake. If one pan looks fuller, adjust with a tablespoon to match the other. Baking two uneven layers can force you to trim more later, which reduces yield and can dry the cake edges.
- For the Chantilly Cream: In the bowl of a stand mixer fitted with the whisk attachment, beat the mascarpone, powdered sugar, and vanilla on medium speed to combine.: During baking the kitchen will fill with a warm, sweet aroma and the tops will turn a light golden color. The toothpick test is your best indicator of doneness, and the edges will also begin to pull slightly from the pan. Avoid opening the oven frequently, as that can cause the centers to sink. If the top browns too quickly, tent with foil to prevent overcoloring while the interior finishes baking.
- With the mixer on low speed, slowly drizzle in the cream. Then beat on medium-low speed until the cream is incorporated. Increase the mixer speed to medium-high and beat until the cream forms stiff peaks, about 2-3 minutes.: These first cooling minutes allow the crumb to set, and you will notice a slight contraction as the layers come away from the pan. After ten minutes, run a knife around the perimeter and invert onto a wire rack so they cool completely. If you try to unmold them too soon they may tear; if you wait too long they can stick. Cooling fully before frosting is essential to prevent the Chantilly cream from melting.
- Assembly: Once the cakes are completely cooled, place one layer on a serving plate. Spread a layer of Chantilly cream (about 1/2” thick) evenly over the cake. Sprinkle the berries over the cream and place the second layer of cake on top.: In the bowl of a stand mixer fitted with the whisk attachment, beat the mascarpone, powdered sugar, and vanilla on medium speed to combine : The mixture will look smooth and slightly glossy as the mascarpone cheese , powdered sugar , and vanilla come together. This base forms the rich foundation of the Chantilly cream, and combining it first ensures there are no lumps before adding cold heavy whipping cream . If the mascarpone is too cold, it may not blend evenly and you risk small lumps in the final cream, so ensure it is at room temperature.
- Frost the top and sides of the cake with the remaining Chantilly cream and decorate the top with a few fresh berries for garnish.: Adding the cold heavy whipping cream slowly lets it incorporate smoothly, and you will hear the whisk begin to pick up as the mixture thickens. Once incorporated, increase speed to medium high and beat until the cream forms stiff peaks, about 2 to 3 minutes. You'll see the cream hold shape on the whisk and feel a substantial lift under the bowl. Over whipping can turn the mixture grainy or cause separation, so stop once stiff peaks form.
- Refrigerate the cake for at least an hour before slicing and serving.: Once the cakes are completely cooled, place one layer on a serving plate : The first layer sets the stage visually and texturally, and the contrast between sponge and cream should be even. Spread a layer of Chantilly cream about one half inch thick, its texture smooth and airy. Scatter the berries over the cream, adding bursts of color and bright acidity. If the cake is still warm the cream will melt, so be patient and only assemble when cool.
- Frost the top and sides of the cake with the remaining Chantilly cream and decorate the top with a few fresh berries for garnish: As you spread the remaining cream, aim for gentle strokes so the layers remain intact and the surface looks inviting. The final decoration with berries offers a fresh contrast and a pop of color. If you prefer a cleaner finish, chill the cake briefly to let the cream firm before smoothing. Avoid overworking the surface which can compress the cream and make it look flat.
- Refrigerate the cake for at least an hour before slicing and serving: Chilling gives the cream time to set and the flavors to harmonize, producing cleaner slices and a firmer texture. The cold also helps the berries settle slightly into the cream for a cohesive presentation. If you slice too soon the cake may not hold its shape, so plan for this resting period. Store leftover slices covered in the fridge to preserve freshness.
Notes
- Chilling matters, chill the bowl and whisk before whipping the heavy whipping cream to speed up thickening and improve stability, especially in warm kitchens, which prevents overworking and helps achieve stiff peaks.
- Mascarpone handling, let the mascarpone cheese come to room temperature so it blends smoothly into the cream, cold mascarpone can create lumps that are difficult to smooth out without overwhipping the mixture.
- Even layers, divide batter using a kitchen scale for identical layers, this avoids trimming excess cake later and helps the final cake look professional without extra work.
- Don’t overmix, stop mixing the batter as soon as the flour streaks disappear to prevent gluten formation which would make the cake dense rather than tender and delicate.
- Fruit prep, pat berries dry and, if using very juicy strawberries, dice and drain briefly to avoid soggy cream, excess moisture can make the filling run and the sides weep.
- Storage, keep the assembled cake refrigerated and cover lightly with a dome to prevent the cream from absorbing fridge odors, the cake holds well for up to two days when stored properly.