Catalina London Broil
Catalina London Broil delivers tangy, caramelized flavor with minimal fuss. This easy weeknight dinner features a marinated London Broil soaked in bold Catalina dressing, grilled to a juicy finish for a tender, flavorful main that’s perfect for casual gatherings or a simple family meal. It’s approachable, savory, and worth making again and again.
Equipment
- Grill
- Resealable bag
- Instant read thermometer
Ingredients
- 1 London Broil Marinate the meat to tenderize and infuse robust flavor; coat the London broil in the dressing and let rest for several hours or overnight for best results. Use a shallow dish or resealable bag to ensure even coverage, turning occasionally so all surfaces absorb the marinade. Pat dry before cooking to promote a good sear and caramelization on the exterior.
- 1 (16-ounce) bottle Catalina Dressing Provide a tangy, sweet, and savory marinade base that both flavors and helps tenderize the beef; pour over the London broil and allow ample time for penetration. Choose a full 16-ounce bottle to ensure complete coverage and consistent seasoning throughout the cut. Reserve a small amount for basting during cooking if desired to enhance glaze and moisture.
- 1/2 teaspoon black pepper Season lightly to enhance overall taste without overpowering the dressing; sprinkle black pepper evenly before or after marinating to add mild heat and aromatic bite. Adjust quantity to preference, remembering that pepper blooms with heat so it becomes more pronounced when seared. Combine with other seasonings only if following a specific variation, but keep proportions balanced to preserve the dressing's profile.
Instructions
- Prick London Broil on both sides with a fork. Combine London Broil and dressing in a ziptop bag. Turn to coat and refrigerate for 12 to 24 hours.: The perforations let the Catalina dressing penetrate deeper into the meat, which helps with tenderness and flavor distribution. As you prick, you will hear a faint tearing of the surface and notice the meat becoming slightly more receptive to liquids. This technique increases surface area and encourages the dressing to reach inner fibers, which is why the texture improves after marinating. A common error is to overdo it and create too many holes, which can release juices; aim for even, spaced pricks rather than dense poking. You should also avoid using too much force, just enough to pierce the surface.
- Heat grill to medium-high.: Placing the London Broil and the entire bottle of Catalina dressing into a resealable bag lets the meat be fully coated and ensures even contact with the marinade. Seal the bag and gently press out excess air so the dressing hugs the meat; you will feel the dressing slosh and see it coat every surface. The visual cue of the meat evenly coated tells you the marinade is in full contact, which leads to uniform flavor. One mistake is not sealing properly, which reduces contact and can lead to uneven marination. For best results, remove as much air as possible before refrigerating.
- Remove London broil from bag and sprinkle with pepper.: Turning the bag periodically ensures the Catalina dressing bathes all sides, producing consistent tenderizing and flavor. Over the hours, you may notice the dressing changing color slightly and the meat appearing darker where it has absorbed more liquid, that is normal and desirable. The long chill is critical because the acid and sugars need time to act on the meat fibers and develop depth. The common pitfall is under marinating, which yields less tender meat; conversely, excessively long marination in highly acidic mixes can alter texture too much, so stick to the 12 to 24 hour window. Place the bag on a tray to catch any leaks and rotate it every few hours if possible.
- Grill for 10 minutes. Turn over and grill for 8 to 10 more minutes, depending on thickness and desired degree of doneness.: A properly preheated grill delivers the sear and caramelization that make the exterior flavorful while keeping the interior juicy. You should see steady, even heat and perhaps a faint smoke before placing the meat down; when you toss a few drops of water onto the grates they should dance and evaporate quickly. That audible sizzle when the London Broil hits the grates is a good indicator you built the right cooking environment. If the grill is too cool you will not get a good crust, and if it is too hot the exterior will char before the inside reaches the desired doneness. Clean grates and a small oil rub help prevent sticking.
- Remove London broil from bag and sprinkle with pepper: After marination, lifting the London Broil out of the bag will reveal a glossy, well coated surface. Pat lightly if there is excessive marinade pooling, then evenly sprinkle the black pepper so it forms a fragrant layer that crisps on the grill. You will smell the pepper blossom as the meat warms up, adding aromatic complexity. Avoid over seasoning as the dressing already carries robust flavor; too much pepper can turn bitter under high heat. Give the meat a minute at room temperature if it feels very cold from the fridge, so it cooks more evenly.
- Grill for 10 minutes: Place the London Broil on the hot grates and listen for a steady sizzling, the sound that signals Maillard reaction and crust formation. As the meat cooks, edges will darken and juices may begin to bead on the surface, creating a glossy sheen. This stage sets the flavor foundation, so resist the urge to move the meat constantly; let it develop a seared surface for visual and textural contrast. One common mistake here is flipping too often, which prevents proper browning; allow the full period to pass before turning.
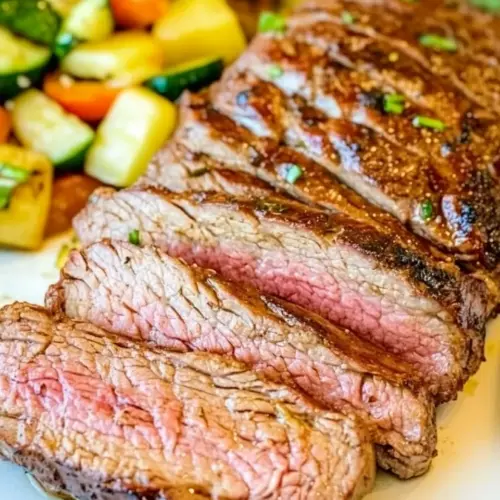
- Turn over and grill for 8 to 10 more minutes, depending on thickness and desired degree of doneness: After flipping, you will see the first side's crust and the second side will start to build its own sear. The interior will continue to come up in temperature, and you may hear a slightly softer sizzle as fats render. Use an instant read thermometer if available to gauge doneness, aiming for about 130 to 135 degrees F for medium rare, and a bit higher for more done preferences. Resting after this step is essential to let juices redistribute. A common error is cutting immediately, which causes juices to run out; tent the meat and let it rest before slicing. If the surface is charring too quickly while the interior remains underdone, move the meat to a slightly cooler zone to finish cooking through indirect heat.
Notes
- Substitute option : You can swap store bought Catalina dressing with French dressing if that is what you have on hand, as they are very similar in flavor profile.
- Bring to room temperature : If possible, let the London Broil sit at room temperature for about 20 minutes before grilling, this helps the meat cook more evenly and prevents the exterior from overcooking while the center comes up to temperature.
- Use a thermometer : An instant read thermometer is really helpful when grilling steak, and it removes guesswork; aim for 130 to 135 degrees F for medium rare, adjusting for your preference.
- Marination window : Stick to 12 to 24 hours of marinating time, as too little time will not tenderize adequately and too long can change texture from the acidic elements.
- Rest before slicing : Tent the cooked meat loosely with foil and rest for at least 10 minutes to allow juices to redistribute, which yields moister slices.