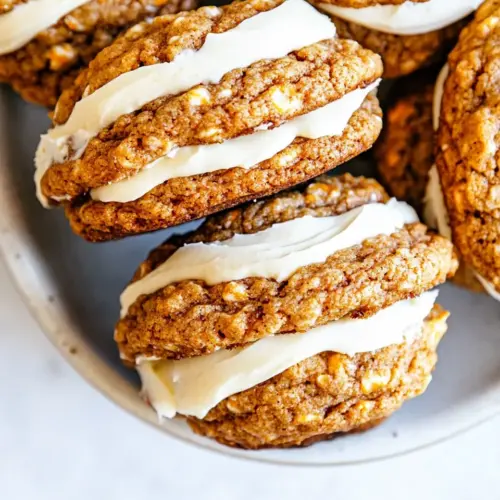
Carrot Cake Cookies
Carrot Cake Cookies are soft, spiced, and studded with oats and finely grated carrots, topped with a silky browned butter cream cheese filling. These easy to love sandwich cookies blend warm autumn spices, chewy texture, and creamy tang for a cozy treat that works for parties or weeknight baking. Make them ahead for effortless hosting and reliable crowd appeal.
Equipment
- Stand mixer
- Medium Bowl
- Baking Sheet
- Parchment Paper
- Saucepan
- Cooling rack
Ingredients
- 1 1/2 cups all-purpose flour Combine to provide structure and body to the cookie batter; all-purpose flour forms the base that binds wet and dry ingredients, yielding a tender crumb when measured and mixed properly. Sift or spoon into the cup for accurate measurement to avoid dense cookies. Avoid overmixing once combined to maintain a soft texture.
- 1 1/2 teaspoons cinnamon Add warm, aromatic spice and depth by contributing a sweet, earthy cinnamon note; it enhances the carrot flavor and complements the brown sugar. Incorporate evenly with the dry ingredients to ensure consistent flavor throughout the dough. Adjust slightly if preferring a more or less pronounced spiced profile.
- 1 teaspoon baking soda Leaven the cookie by providing lift and lightness through chemical reaction with acidic components; baking soda helps create a tender, slightly cakey texture. Mix thoroughly with flour and spices to distribute evenly and prevent metallic pockets. Ensure freshness for effective rising.
- 1/2 teaspoons salt Season and balance sweetness while enhancing other flavors; salt sharpens the overall profile and controls sweetness perception. Dissolve or mix well into dry ingredients to distribute uniformly. Use the specified small amount to avoid overwhelming the delicate spices.
- 1/4 teaspoon ground nutmeg Contribute warm, nutty spice notes and a hint of sweetness that complement cinnamon and ginger; nutmeg brings aromatic complexity to the recipe. Grate or measure carefully, as a little goes a long way in spices. Combine with other dry seasonings for even flavor.
- 1/4 teaspoon ground ginger Provide a bright, slightly peppery warmth that lifts the sweeter spices; ground ginger adds zing and balances the richness from butter and sugars. Use sparingly to avoid overpowering the dough and mix with dry ingredients. Freshly ground ginger will be most aromatic.
- 1/8 teaspoon ground cloves Add intense, warm spice character in small amounts to deepen the overall spice blend; cloves impart a slightly sweet and bitter edge that supports the other spices. Measure precisely because cloves are potent, and distribute evenly in the dry mix. Balance creates a nuanced spiced cookie.
- 3/4 cup unsalted butter, at room temperature Cream with sugars to create a light, aerated base; unsalted butter at room temperature helps incorporate air for tenderness and richness. Ensure butter is soft but not melted to achieve proper creaming and texture. Salt control remains with measured salt added separately.
- 1 cup packed light brown sugar Provide deep molasses-like sweetness and moisture that lends chewiness and complex flavor; packed light brown sugar also contributes acidity that reacts with baking soda. Cream with butter until fluffy for best texture and integration. Adjust packing to ensure consistent sweetness.
- 1/2 cup granulated sugar Supply crystalline sweetness and structure, aiding in creaming to create lift and crisp edges; granulated sugar balances the brown sugar's moisture. Combine with butter and brown sugar until light for proper cookie texture. Too much can lead to overly crisp cookies, so follow the amount.
- 1/2 cup finely grated carrots Introduce natural moisture, subtle sweetness, and mild vegetal flavor while contributing to texture and chewiness; finely grated carrots distribute evenly without adding bulk. Freshly grate and drain any excess moisture if very wet to avoid soggy dough. Carrots also add visual appeal and nutrition.
- 1 large egg Bind ingredients and add richness while contributing to leavening interaction; one large egg helps emulsify fats and liquids for a cohesive dough. Beat slightly before adding to ensure even incorporation and avoid pockets of unmixed egg. Use room temperature egg for better mixing.
- 2 teaspoons pure vanilla extract Lift and round out flavors with sweet, floral vanilla notes; pure vanilla extract enhances the overall aroma and taste. Add during mixing with wet ingredients to evenly infuse the batter. Use pure extract for best depth rather than imitation.
- 3 cups old fashioned oats Provide hearty texture and chewiness as a primary bulk ingredient; old fashioned oats add body, rustic bite, and absorb moisture to create a satisfying cookie. Stir in last among dry ingredients to prevent crushing the oats and preserve texture. Ensure oats are measured without overpacking for consistent results.
- 1/2 cup raisins and/or chopped nuts, optional Offer optional chew, texture, and flavor contrast through raisins and/or chopped nuts; they add bursts of sweetness and crunch depending on choice. Fold in gently to preserve distribution and avoid overmixing. Toast nuts lightly if using to amplify flavor.
- 1/2 cup unsalted butter, cut into tablespoon pieces Add richness and help create a silky, buttery component when used cold in the frosting process; unsalted butter cut into tablespoons chills and mixes into the frosting for structure. Soften or use as directed to achieve creamy consistency without being greasy. Keep butter unsalted to control overall saltiness.
- 8 oz full-fat brick-style cream cheese, at room temperature Provide the creamy, tangy base of the frosting with rich texture and balanced acidity; full-fat brick-style cream cheese yields a stable, smooth cream cheese frosting. Soften to room temperature for easy beating and to avoid lumps in the frosting. Use full-fat for best flavor and texture.
- 1 teaspoon pure vanilla extract Enhance the frosting with sweet, floral notes that round out tanginess and bring aromatic depth; pure vanilla extract lifts the cream cheese flavor. Add while beating the frosting to evenly distribute the flavor. Use the measured amount to prevent overpowering the cream cheese.
- 1/4 teaspoons salt Balance and stabilize the frosting by moderating sweetness and enhancing other flavors; salt in the frosting brings out the cream cheese and vanilla nuances. Mix thoroughly with the cream cheese and butter to ensure even seasoning. Small quantities prevent the frosting from tasting salty.
- 4 cups confectioner’s sugar Sweeten and thicken the frosting to a pipeable, stable consistency; confectioner’s sugar dissolves smoothly into the cream cheese-butter mixture for a silky finish. Sift or add gradually while beating to prevent lumps and control sweetness. Adjust consistency with small additions if needed.
Instructions
- Get your ingredients ready and preheat the oven to 350 degrees F. Line a large baking sheet with parchment paper or a silicone baking mat and set aside.: The kitchen fills with a faint warmth as I preheat the oven to 350 degrees F , a temperature that promotes even browning and a tender interior. You should hear the faint hum of an oven coming to life and smell the residual scents of whatever was cooked before, but the main cue is the dial or digital readout reaching the target temperature. Preheating is important because placing the dough into a fully warmed oven ensures consistent rise and edge color. A common mistake is skipping the preheat, which often results in uneven baking and longer bake times. Also line a large baking sheet with parchment or a silicone baking mat, the slick surface prevents sticking and promotes even bottom color, and spacing is key so cookies do not merge when they spread.
- In a medium bowl, whisk together the flour, cinnamon, baking soda, salt, nutmeg, ginger, and cloves. Set aside.: As you whisk, you will notice the dry mixture takes on a uniform, slightly russet tint from the spices and a gentle scent of warmth. This step ensures the baking soda and spices are evenly distributed, which prevents pockets of bitter leavening or concentrated clove. The tactile feel should be light and aerated after whisking, and you can run a spoon through to check for lumps of flour. A common error is rushing and not fully combining the ingredients, which leads to uneven flavor and texture in the finished cookies.
- In the bowl of a stand mixer, beat together the butter and sugars until creamy. Scrape down the sides of the bowl with a spatula and add in the grated carrots. Mix until well combined. Add the egg and vanilla extract and mix until combined.: When you cream unsalted butter with light brown sugar and granulated sugar , you are incorporating air that helps leaven the cookies and create a tender crumb. The mixture will transform from a pale yellow to a lighter, fluffier texture, and you will hear the mixer shift as the sugars dissolve into the fat. Scrape down the sides with a spatula to ensure no pockets of butter remain. Overbeating can warm the butter too much, causing spreading in the oven, while under beating may yield a dense result.
- Add the dry ingredients and mix on low until just combined. Stir in the oats and raisins, if using.: Adding the finely grated carrots at this stage lets them fold into the creamed mixture, releasing moisture and distributing their sweet, vegetal flavor throughout the dough. You will notice a fresh, slightly sweet aroma and a change in texture as the batter becomes studded with orange flecks. Be gentle when combining to avoid breaking down the carrots completely into the batter. A common mistake is using coarsely grated carrots, which can create a fibrous texture rather than the melt in mouth quality we want.
- Stir in the oats. You can add 1/2 cup raisins and chopped nuts, if desired. Scoop the cookie dough, 1 1/2 tablespoons per cookie, onto the prepared baking sheet, 2 inches apart.: At this point, the dough will take on a glossy sheen as the egg emulsifies the mixture and the vanilla extract lifts the sweetness. The batter becomes cohesive, and your whisk or paddle will move more smoothly through it. This emulsification helps the dry ingredients integrate later without streaks. If an ingredient is too cold or the egg is added too quickly, the mixture can split, leading to an uneven texture; tempering the egg slightly or mixing slowly prevents this.
- Scoop the cookie dough, 1 1/2 tablespoons per cookie, onto the prepared baking sheet, 2 inches apart.: Once you add the spiced flour mixture, you should mix on low and stop as soon as there are no visible streaks of flour. The dough should look evenly colored, studded with spice specks and carrot threads, but still slightly soft. This minimal mixing prevents overdevelopment of gluten, keeping the final cookie tender. Overworking here is the classic pitfall, producing tougher cookies instead of melt in mouth bites.
- Bake for 10 to 12 minutes or until golden brown around the edges but still a little soft in the center. Remove from the oven and let the cookies cool on the baking sheet for 5 minutes. Transfer to a cooling rack and cool completely.: The addition of old fashioned oats introduces chew and bulk while optional raisins add sweet bursts. Stir with a spatula until the oats are fully incorporated and raisins or nuts are evenly distributed. Visually, the dough becomes thicker and more textured, and you should be able to scoop it cleanly. A mistake to avoid is adding too many mix ins which can dry out the dough and hinder cohesion.
- To make the filling, place the butter in a medium saucepan and melt over medium heat, stirring often, until it foams, smells nutty, and browns. This will take about 5 to 7 minutes. Scrape the browned butter into a medium bowl. Place the bowl in the refrigerator for 30 minutes or until the butter is completely cooled and is mostly resolidified. Remove from the refrigerator and let it come back to room temperature if it’s too cold. You want it to be a soft solid, but not cold so it will mix in with the cream cheese.: Using a small scoop or a spoon, portion the dough so the cookies bake uniformly. The spacing of approximately 2 inches gives them room to spread without touching. You will see slight domes form in the center of each mound and a rough, textured surface from the oats. If you pack the dough too tightly when scooping, the cookies can bake dense rather than light and tender.
- In the bowl of a stand mixer, beat the brown butter and cream cheese together until smooth. Add the vanilla and salt and mix again.: You will notice the edges turn a warm gold while the centers remain slightly soft and pale, which is the ideal cue to remove them. The sound is subtle, but you may hear a faint settling as the cookies finish. They will continue to set on the hot baking sheet, which is why you remove them a touch underbaked. Leaving them in too long results in crisp, dry cookies instead of tender ones.
- Gradually, mix in the confectioner’s sugar, about 3/4 cup at a time, until all the sugar has been added. Scrape down the sides of the bowl with a spatula and mix again until smooth.: During this rest, residual heat finishes cooking the centers and the cookies firm up enough to transfer without breaking. You will notice a slight change in texture as the bottom continues to color and the steam dissipates. Transferring too soon can cause them to fall apart, while waiting too long could make them cool and stick to the sheet.
- To assemble the sandwich cookies, pipe or spread the filling on the flat side of half of the cookies and put the remaining cookies on top. You might have a little leftover filling.: Once on the cooling rack, air circulates around each cookie, preventing sogginess and preserving the desired chew. Visually, the cookies will look set and the surface will matte slightly as moisture evaporates. Allowing them to cool fully is important for assembly with the filling, otherwise the filling can melt and run. Common mistakes are stacking warm cookies which traps steam and softens them.
- To make the filling, place the butter in a medium saucepan and melt over medium heat, stirring often, until it foams, smells nutty, and browns: Browning the butter creates a toasty, caramel like aroma and deeper flavor; you will see foam form and then small brown bits appear, releasing a nutty scent. This stage requires attention because the butter can go from browned to burnt quickly. Scrape the browned milk solids into a bowl and chill so the butter resolidifies mostly; the texture should be a soft solid before mixing with the cream cheese . Rushing this step can leave you with overly runny filling.
- Scrape the browned butter into a medium bowl and refrigerate for 30 minutes until mostly resolidified: Cooling the butter concentrates its flavor and makes it workable with the dairy. You want a soft solid, not rock hard or icy, so it blends smoothly with the cream cheese . If you skip cooling, the filling may separate or become too loose to pipe between cookies.
- In the bowl of a stand mixer, beat the brown butter and cream cheese together until smooth: As they come together, the mixture will become glossy and velvety. The cream cheese should be at room temperature to ensure a lump free filling, and the nutty brown butter will integrate to add depth. This step benefits from scraping the bowl several times so no streaks remain. If lumps persist, a short whisk by hand can help.
- Add the vanilla and salt and mix again: The small additions of vanilla extract and salt round out the filling, cutting sweetness and highlighting the buttered notes. Taste and adjust lightly; even a tiny pinch of salt brightens the overall flavor. Be cautious with salt quantity, too much can make the filling taste briny.
- Gradually mix in the confectioner’s sugar, about 3/4 cup at a time, until all the sugar has been added: Adding the confectioner’s sugar in increments prevents a powder cloud and helps the filling build structure. After each addition, scrape the bowl and mix until smooth, aiming for a silky, pipeable consistency. If you add the sugar too quickly, the filling can become grainy or overly stiff.
- Scrape down the sides of the bowl with a spatula and mix again until smooth: This final incorporation ensures uniform texture and flavor, giving you a filling that spreads cleanly. The surface should be glossy and free of lumps, soft enough to pipe yet stable enough to hold between cookies. If it seems too soft, chill briefly; if too firm, beat in a teaspoon of room temperature cream cheese.
- To assemble the sandwich cookies, pipe or spread the filling on the flat side of half of the cookies and put the remaining cookies on top: When you pair cookies, choose ones that are similar in size so the sandwiches sit evenly. A small offset spatula or piping bag gives neat results, and you will see the creamy filling peeking from the edges in a pleasing way. If you overfill, the sandwiches will squish and the filling will ooze, so apply a measured amount. You may have leftover filling which freezes or refrigerates well for future use.
Notes
- Measure flour accurately by spooning into the cup and leveling to avoid a dense cookie. Too much all purpose flour will dry the dough and make the texture heavy rather than tender and cake like.
- Don’t overmix after adding dry ingredients, mix just until the streaks disappear to keep the cookies tender. Overworking develops gluten which gives a tougher bite instead of the soft crumb we want.
- Toast nuts before adding if you include them, this deepens their flavor and brings a toasty contrast to the sweet dough. Allow toasted nuts to cool before folding in so they don’t release oils that could alter the dough texture.
- Use old fashioned oats for texture because they maintain chew and structure in the cookie. Quick oats will absorb more moisture and create a denser, less textured cookie.
- Brown the butter carefully over medium heat, watching for brown bits and a nutty scent, then cool to a soft solid. Burnt butter turns bitter quickly, so transfer it to a bowl as soon as you see the solids brown.