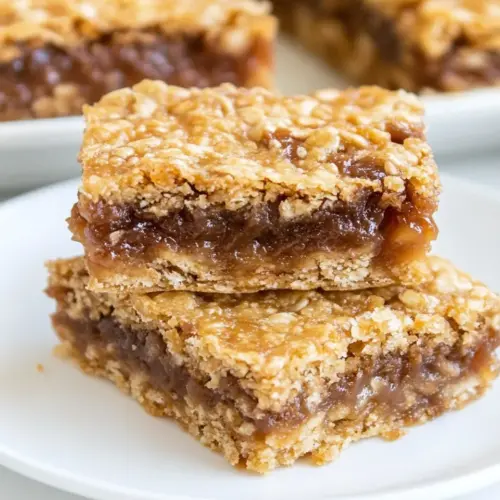
Carmelitas
Carmelitas are chewy oat bars studded with melting caramel and pockets of semi sweet chocolate chips, delivering a crispy edge and soft center. This easy to slice dessert uses simple pantry staples to create a comforting treat perfect for bake sales or easy weeknight dessert sharing. Expect buttery crust notes and rich caramel ribbons, a reliably crowd pleasing recipe to make again and again.
Equipment
- 9 x 9 baking dish
- Small Saucepan
- Mixing Bowl
- Measuring Cups
- Spatula
Ingredients
- 111 ounce package caramels or caramel bits Melting provides the sweet, chewy caramel layer that binds the bars; heat gently with cream for smoothness and pourability. Adds a rich, toasted sugar flavor that contrasts with the oat base and chocolate topping.
- 1/2 cup heavy cream or half and half Thickening lends creaminess and prevents caramel from seizing when melted; use heavy cream or half and half to create a glossy, spreadable caramel sauce. Contributes dairy richness that balances sweetness and improves texture.
- 1 cup all-purpose flour Binding contributes structure to the oat crust and helps the bars hold together when baked; use all-purpose flour to create a tender, cohesive crumb. Adds slight chew and supports the caramel and chocolate layers without overwhelming them.
- 1 cup old fashioned oats Texturing supplies hearty chew and rustic flavor to the crust, complementing the sweet caramel and chocolate layers. Old fashioned oats create a sturdy base that browns pleasantly and provides contrast in mouthfeel.
- 3/4 cup brown sugar Sweetening imparts deep, molasses-like flavor and moistness to the oat layer, enhancing the overall caramel profile of the bars. Brown sugar also helps with caramelization and yields a softer, chewier texture.
- 1/2 teaspoon baking soda Leavening lightens the oat-crust slightly and helps distribute air for a tender bite; baking soda reacts with brown sugar and heat to aid texture. Also helps slightly with browning and a more open crumb.
- 1/4 teaspoons salt Seasoning balances sweetness and enhances other flavors by providing a subtle contrast; a small amount of salt brightens caramel and chocolate notes. Ensures the overall flavor profile is well-rounded and not cloying.
- 12 tablespoons butter melted Fattening adds moisture and richness to the crust when melted and incorporated, creating a tender, buttery base. Melted butter also helps hold oats and flour together and promotes browning during baking.
- 6 ounces semi sweet chocolate chips Melting supplies a glossy chocolate layer that melts slightly into the warm caramel, adding depth and bittersweet contrast. Semi-sweet chips offer cocoa intensity that balances the very sweet caramel and oat components.
- 1/2 cup chopped walnuts Crunching contributes nutty flavor and crunchy texture to balance the soft caramel and chewy oats; chopped walnuts add earthy, toasted notes. Nuts also introduce visual interest and contrast in each bite.
Instructions
- Preheat the oven to 350°F. Grease a 9 x 9 baking dish or line it with parchment or foil.: As the oven warms, you will notice a gentle electric hum and the familiar warmth that signals readiness. Preheating ensures even baking so edges set at the same pace as the center, preventing soggy middles and overly browned rims. A correctly preheated oven also helps the caramel meld with the oat base rather than seeping through excessively during the early bake. A common pitfall is placing the pan in before the oven reaches temperature, which can yield uneven texture, so wait until the dial or display reaches the target.
- Add the caramels or caramel bits and the heavy cream to a small saucepan. Heat the caramel over low heat, stirring frequently, until the caramels are completely melted and smooth. Remove from heat and set aside.: Lining the dish creates clean edges and makes removal effortless; parchment peels away for neat slices. Greasing without lining still works but you may lose some edge crisps when lifting the slab out, so I usually line for portability and presentation. Press the parchment to the corners so it sits flat; this helps the oat base press evenly. Avoid using too little grease if you skip parchment, as the caramel can stick stubbornly to metal and tear the crust when removed.
- In a medium bowl, mix together the flour, oats, brown sugar, baking soda, and salt. Pour the melted butter into the bowl and mix to combine.: On low heat, you will see the caramels start to soften, and the smell will shift to deep, buttery toffee. Stirring frequently encourages an even melt and prevents scorching on the bottom of the pan, which would introduce bitterness. Bring the mixture to a smooth pourable consistency, watching for separate streaks to disappear. If the caramel thickens too much, a splash more warm cream will rescue it, so keep a bit extra on hand to adjust texture.
- Press half of the oat mixture into the bottom of the prepared baking dish. Bake for 10 minutes (do not turn off the oven).: The melded caramel should shimmer slightly and slide off your spoon in ribbons, not clump. This sheen signals a smooth emulsion between dairy and sugar. Removing from heat at the right moment prevents graininess that occurs when caramel cooks too long; rapid bubbling or a burnt aroma means it is over the mark. Constant, gentle stirring is the best defense against lumps and scorching.
- Sprinkle the chocolate chips and walnuts over the baked crust, then pour the melted caramel over the top, spreading gently to cover. Sprinkle the remaining oat mixture over the top of the caramel (it’s okay if it doesn’t cover the caramel completely). Bake 15-20 minutes, until light brown.: As the mixture cools a bit, it thickens and becomes easier to pour evenly over the pan without sinking through the crust. Cooling slightly also reduces the chance that the caramel will cause the top oat layer to collapse into it. However, do not let it set solid; you want it fluid enough to spread. A frequent oversight is letting it cool too long so it thickens into a glue like mass, making it hard to distribute.
- Remove the carmelitas from the oven and cool them completely before slicing and serving.: When you combine these dry ingredients, you will notice a dusty, sweet aroma and the granular texture of brown sugar. Mixing first ensures the leavening and salt disperse uniformly, so every bite lifts and tastes balanced. Use a spatula or fork to break up any brown sugar clumps so the final texture is even. Rushing this step can leave pockets of baking soda that create uneven flavor or texture.
- Pour the melted butter into the bowl and mix to combine: The melted butter will coat the dry ingredients and transform them into a cohesive, sandy mixture. You should be able to press some of it together between your fingers; this indicates the right consistency for pressing into the pan. The butter also helps with browning during baking, adding a toasted note. If the mixture feels dry, a tablespoon more melted butter will help, but avoid making it greasy, which can lead to a dense base.
- Press half of the oat mixture into the bottom of the prepared baking dish: Press firmly to create a compact crust that will hold the caramel and toppings, using the back of a measuring cup for an even surface. You want enough compression so the base does not crumble when you slice the bars, but not so tight that it becomes rock hard after baking. If you leave it too loose, caramel can find its way underneath, creating a soggy bottom, so take a little time here to get it even and compact.
- Bake for 10 minutes do not turn off the oven: During this initial bake the base sets and starts to color around the edges, releasing a warm, toasty oat scent. This partial bake is crucial so the bottom has structure before you add the wet caramel, ensuring the final texture is sliceable. Keep the oven on so the subsequent assembly bakes into a uniform slab. A common mistake is skipping this step which often yields a gooey, unstable center.
- Sprinkle the chocolate chips and walnuts over the baked crust then pour the melted caramel over the top spreading gently to cover: As you layer on the chocolate chips and walnuts , you will hear a soft scattering sound and see contrasting dark and pale bits on the golden crust. Pour the warm caramel in a slow stream so it settles among the chips without displacing them. Gently nudging the caramel with a spoon helps it flow into gaps. Be careful not to over stir, which can cause the chips to melt into a thin layer instead of remaining as pockets of chocolate.
- Sprinkle the remaining oat mixture over the top of the caramel: The final layer creates a rustic crown of oats that bakes into crisp peaks and chewy valleys. It is fine if it does not perfectly cover the caramel, the contrast is part of the charm. Lightly press a few spots so it adheres, but avoid compacting it fully, as that will limit the lovely top crunch. A typical misstep is pressing too hard and losing the textural contrast between the layers.
- Bake 15 to 20 minutes until light brown: Watch for the edges to turn a warm golden hue and for the top to show gentle browning, which signals caramelization and depth of flavor. You might smell a buttery, toasted aroma as the sugars finish cooking. If the center still seems overly soft, let it bake a few more minutes, but avoid deeply darkening the top which can scorch the sugar. Opening the oven too often will drop the temperature and may lengthen cooking time.
- Remove the carmelitas from the oven and cool them completely before slicing and serving: Cooling is the final act that lets the caramel firm up and the bars set cleanly, resulting in neat squares rather than a gooey mess. I often let the pan cool on a rack for an hour, then chill briefly in the fridge for cleaner slicing. Cutting too soon is a common error that results in smears and sticky knives, so patience here pays off with tidy, appealing pieces.
Notes
- Swap caramel format Use caramel bits for convenience, or chop wrapped caramels for a slightly chewier, homemade feel.
- Adjust nuts Swap walnuts for pecans for a sweeter, more rounded nut profile, or omit for nut free bars.
- Chocolate intensity Use bittersweet chips for stronger chocolate contrast, or milk chips for a creamier finish.
- Make ahead Bake and cool, then wrap tightly and store at room temperature for up to three days or refrigerate for a week.
- Transport tip Cut into squares and layer between parchment in a sealed container so pieces do not stick together en route to events.
- Flavor boost Brown the butter gently before mixing to add a toasty, nutty undertone that enhances the caramel notes.
- Serving temperature Serve slightly chilled for cleaner slices or at room temperature for a softer chew and deeper aroma.