Caramilk Brownies
Caramilk Brownies are fudgy, rich, and laced with pockets of creamy caramelized chocolate. This easy dessert uses pantry staples and melts into a glossy batter that bakes into chewy squares with a crackly top. Perfect for casual gatherings or a simple treat, these brownies offer deep cocoa flavor balanced by sweet, buttery Caramilk notes. Make a pan for sharing and watch them disappear.
Equipment
- Mixing Bowls
- Whisk
- Rubber spatula
- 8 x 8-inch baking pan
- Parchment Paper
Ingredients
- 1/3 cup butter salted and melted Melted and salted to add rich, glossy texture and tender crumb to the batter; contributes fat that carries flavor and helps dissolve sugars. Provides moisture and helps create fudgy brownies by promoting a dense structure when combined with eggs and cocoa.
- 1 cup white sugar or Caster sugar Sweet and granulated to provide bulk sweetness and contribute to the batter’s structure through sugar dissolution and caramelization during baking. Helps balance the deep chocolate bitterness while aiding in the development of glossy brownie crust on top.
- 1/2 cup brown sugar Moist and slightly caramelized to deepen flavor complexity and add softness to the crumb; brown sugar’s molasses content increases chewiness and enhances a rich, toffee-like note. Works with butter to create a tender, slightly sticky texture characteristic of fudgy brownies.
- 4 large eggs Beaten to incorporate structure and stability while providing richness and leavening through trapped air and coagulated proteins. Eggs also emulsify the batter, helping fat and water-based ingredients bind together for uniform texture and a moist, set center.
- 1 teaspoon vanilla extract Added for aromatic lift and to round out flavors with warm, sweet floral notes; enhances the perception of chocolate and caramel without altering texture. A small quantity intensifies overall flavor depth and balances sweetness in the finished brownies.
- 1 cup cocoa powder Cocoa powder is sifted into the dry mix to deliver concentrated chocolate flavor and deep color while contributing to structure through its dry particulates. Balances sweetness and adds a slightly bitter backbone that contrasts with the caramel notes from other ingredients.
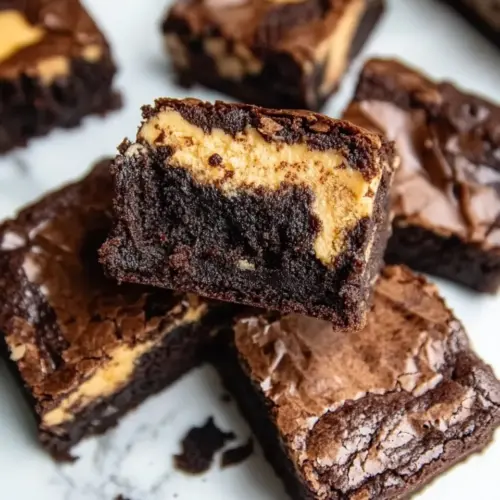
- 1 cup Caramilk chocolate or Caramilk baking chips Chopped or stirred into batter to provide pockets of melted caramelized milk chocolate that create gooey, sweet bites throughout the brownies. Also contributes additional chocolate flavor and texture contrast when baked, producing molten centers and caramel highlights.
Instructions
- Preheat the oven to 180 C/350 F. Grease and line an 8 x 8-inch pan and set aside.: The kitchen warms with a comforting heat, and you may notice a faint, anticipatory aroma as the oven comes up to temperature. Proper preheating ensures the batter begins to set immediately, encouraging an even rise and that thin, crackly top we all enjoy. A common mistake is putting the pan into an oven that is still heating, which can cause uneven bake and soggy centers. I set my oven to the stated temperature, then wait until the indicator light goes off and I give it a couple of minutes more for stability.
- In a large mixing bowl, whisk together the butter, caster sugar, and brown sugar until combined and thick. In a separate bowl, whisk the eggs together until frothy.: The act of lining the pan with parchment and greasing the sides prevents sticking, and the parchment also helps you lift the brownies cleanly after cooling. When I press the paper into the corners I smooth it so there are no air pockets, because trapped air can cause uneven baking. Skipping the lining or greasing lightly can lead to tearing when you remove the brownies, so take this step seriously.
- Add the whisked eggs into the sugar/butter mixture until smooth. Gently add the cocoa powder and vanilla extract and mix until just combined. Using a rubber spatula, fold through the Caramilk chocolate.: The mix becomes glossy and slightly ribbon like as the sugars incorporate into the warm butter . You will hear a faint swish as you whisk and see the volume pick up a touch. This thick mixture contributes to a tender crumb and a shiny top. Overdoing the whisk can introduce too much air and make the brownies more cake like, so stop when everything looks uniformly blended.
- Transfer the brownie batter into the lined pan. Bake the brownies for 30-35 minutes, or until a skewer comes out mostly clean.: Whisking the eggs adds lightness, giving a subtle lift to the brownies without turning them cakey. The surface should show small bubbles and a pale sheen when ready. If you under whisk, the batter may be denser; if you over whisk vigorously, you might introduce too much aeration. I whisk until I see froth and then pause, which yields the best texture.
- Remove the brownies from the oven and let them cool in the pan completely. Once cool, sliced them into pieces.: As the warm sugar mixture meets the frothy eggs , you will feel the batter relax into a cohesive, velvety texture. The sound is quiet, but you will notice the gloss deepen. This step ensures proper emulsification, which affects the final chew. If the eggs are too cold, the mixture may seize slightly, so using room temperature eggs helps avoid that hiccup.
- Gently add the cocoa powder and vanilla extract and mix until just combined: When you fold in the cocoa powder and vanilla extract , the batter darkens and releases a warm chocolate scent that fills the kitchen. Mixing just until combined prevents overdeveloping the gluten, preserving a moist, fudgy interior. Overmixing after the dry ingredient is added is a frequent error that yields a tougher texture, so I stop as soon as streaks disappear.
- Using a rubber spatula, fold through the Caramilk chocolate: Folding in the Caramilk chocolate creates pockets of creamy caramelized chocolate that melt into gems as the brownies bake. You should see ribbons of chocolate scattered through the batter, offering both melted spots and intact chunks. A heavy handed stir will distribute the pieces too evenly and reduce gooey pockets, so I fold gently to preserve contrast.
- Transfer the brownie batter into the lined pan: Pouring the batter, you will notice its glossy surface and a slightly thick pour that settles evenly in the pan. Use the spatula to smooth the top so the batter bakes uniformly. If you leave deep valleys, those areas could bake differently; smoothing ensures consistent rise and texture across the pan.
- Bake the brownies for 30 to 35 minutes, or until a skewer comes out mostly clean: The oven transforms the batter, releasing an intoxicating aroma and lightly puffing the surface into a crackly top. Listen for a gentle, quiet settling as moisture escapes. The skewer test is key here, you want just a few moist crumbs, not wet batter, to keep the center fudgy. A common mistake is overbaking, which dries them out, so start checking at the earlier end of the time range.
- Remove the brownies from the oven and let them cool in the pan completely: Cooling is where the brownies finish their transformation, firming up to slices that hold together. The room will fill with a deeper chocolate scent as they cool and set. Cutting too soon results in crumbly pieces and a gooey mess, so patience pays off. I usually let them rest on a wire rack until completely cool before moving to the next step.
- Once cool, sliced them into pieces: A clean, sharp knife gives neat edges, and you may notice small pockets of melted Caramilk chocolate that gleam at the surface. For the cleanest cuts, I wipe the knife between slices and cool the pan fully beforehand. Rushing to slice warm brownies often leads to squashed pieces and uneven portions, so waiting is the best practice.
Notes
- Measure precisely — Spoon and level your cocoa powder and sugars to avoid over or under measurement, which can tilt the texture toward dry or overly wet.
- Melt the butter gently — Warm the butter just until it liquefies, avoid browning it unless you want a nutty flavor, which will change the final profile.
- Don't overmix after adding dry ingredients — Stir just until the streaks disappear to keep the brownies fudgy and not cake like.
- Use a timer — Ovens vary, so start checking at 30 minutes to prevent overbaking and preserve a moist center.
- Cool completely before slicing — Patience here yields cleaner slices and the ideal chewy texture that holds together.