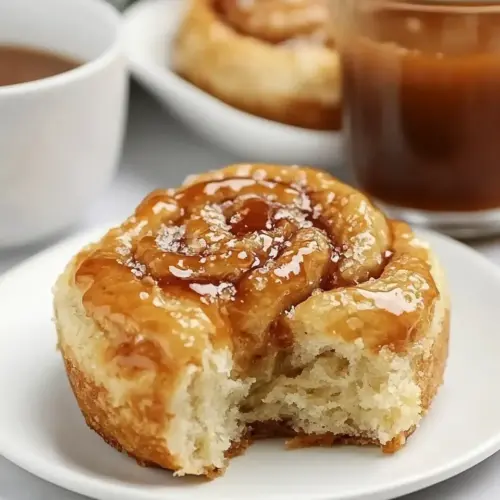
Caramel Rolls
Caramel Rolls are golden spirals of tender dough filled with cinnamon sugar and bathed in a buttery, silky caramel. Soft, slightly gooey, and warmly spiced, they make an easy weekend breakfast or a show stopping brunch addition. Follow the straightforward steps for reliably fluffy rolls and a glossy caramel finish, perfect for sharing with family and friends.
Equipment
- Stand mixer
- Mixing Bowl
- 9 x 13 inch pans
- Rolling Pin
- Saucepan
- Dough Hook
Ingredients
- 41/2 teaspoons active dry yeast 2 packets @ .25 ounce each Activate the yeast by dissolving it in warm water to create a foamy starter that leavens the dough; ensure water temperature is between 110° and 115°F for optimal yeast activity. Allow to rest until bubbly, which indicates fermentation and readiness to incorporate into the dough.
- 1/2 cup warm water 110° to 115° F, which is nice and warm, but not hot Provide warmth and hydration to dissolve active dry yeast, maintaining an ideal temperature of 110° to 115°F to avoid killing the yeast. Use measured volume to ensure proper yeast activation and predictable dough rise.
- 1 cup hot water Aid in dissolving sugars and melting shortening as needed while contributing additional hydration to the dough; hot water helps combine fats and dry ingredients smoothly. Use with care when mixing eggs and yeast to prevent overheating sensitive components.
- 3/4 cups shortening Tenderize the dough and add richness while contributing to a soft crumb; shortening helps create a flaky, tender texture in rolls. Measure accurately to balance fat content and achieve desired dough consistency.
- 1 cup cold water Supply cold hydration to control dough temperature during mixing, helping prevent over-warming that can prematurely activate yeast. Use measured cold water to achieve a balanced dough consistency and proper gluten development.
- 3/4 cup granulated sugar Sweeten the dough and feed the yeast slightly, contributing to flavor and browning during baking. Use as specified to maintain proper sweetness and structure in the final rolls.
- 1 heaping teaspoon Morton kosher salt Season the dough to enhance flavor while helping balance sweetness; kosher salt also tightens gluten structure slightly for improved dough handling. Measure carefully as different salts vary in volume-to-saltiness.
- 2 large eggs beaten Enrich the dough by adding moisture, structure, and flavor; beaten eggs contribute to tenderness, color, and binding. Incorporate at room temperature if possible to promote even mixing and proper dough elasticity.
- 71/2 cups unbleached all-purpose flour Form the bulk of the dough's structure by supplying starch and protein that develop gluten for chew and lift. Use unbleached all-purpose flour for dependable texture and consistent results when kneading and shaping.
- 1/2 teaspoon vegetable oil Prevent sticking during proofing and pan preparation by lightly coating surfaces with vegetable oil, aiding in easy release of the finished rolls. Apply sparingly to avoid greasy spots while ensuring smooth handling.
- 1/2 cup unsalted butter melted Moisten and enrich fillings or glazes while adding a buttery flavor; melted unsalted butter combines with sugars and spices for a smooth spreadable filling. Use unsalted butter to control overall salt level in the recipe.
- 1/2 cup granulated sugar Sweeten the filling and contribute to caramelization and texture when baked, helping create a rich interior sweetness. Use granulated sugar as specified to balance flavors and assist in browning.
- 4 teaspoons cinnamon Flavor the filling with warm, aromatic spice to provide classic cinnamon notes central to caramel rolls; cinnamon pairs with brown sugar to create a classic filling profile. Measure for consistent spice intensity across rolls.
- 21/4 cups light brown sugar Create a deep, molasses-like sweetness and sticky texture for the caramel topping or filling, giving rolls their signature gooey quality. Pack lightly when measuring to ensure accurate sweetness and consistency.
- 21/4 cups heavy cream Add richness and a silky mouthfeel to the caramel sauce, contributing to a creamy texture that blends with sugars and butter. Heat gently with sugars to create a smooth, velvety caramel without curdling.
- 3/4 cup unsalted butter at room temperature Soften and enrich the caramel or filling by contributing buttery flavor and spreadable consistency at room temperature. Cream at room temperature allows easy incorporation into the filling for even distribution.
- 3 tablespoons white corn syrup Increase shine and prevent crystallization in the caramel by adding syrup, which helps create a cohesive, glossy topping. Use corn syrup to stabilize the caramel and maintain a smooth texture when reheating.
- 3 tablespoons water Adjust caramel viscosity and help dissolve sugars while contributing minimal flavor; added water assists in dissolving brown sugar and creating a uniform caramel base. Use measured water to control consistency during cooking.
- 2 teaspoons pure vanilla extract Enhance flavor depth by introducing a concentrated vanilla aroma that complements the sweet and buttery elements; pure vanilla extract brings warm, complex notes. Add near the end of cooking to preserve volatile flavors.
Instructions
- Place the warm water (110° to 115° F) in a small bowl or measuring cup. Sprinkle the yeast over the top and set aside for 5 minutes, or until it becomes frothy on top and smells "yeasty". Very lightly butter the insides of two 9″ x 13″ pans, then set aside – Mom always prefers light-colored aluminum baking pans for this recipe.: As the yeast blooms, you will notice a frothy foam and a faint bready aroma, signals that fermentation has started. This phase sets the tone for rise and texture, so resist the urge to rush it. If the foam fails to form, the yeast may be old or the water temperature incorrect, and you should start again with fresh yeast and water in the specified temperature range to avoid dense rolls. The smell will be slightly sweet and fragrant, and the surface should look bubbly and active.
- In a small pan over medium heat, melt shortening in 1 cup of hot water. Remove from heat and add 1 cup cold water.: When you lightly coat the pans with butter , the caramel will spread and cling without sticking excessively to the metal. This helps when you invert the rolls later, giving a glossy finish. If you over butter, the caramel can slide and puddle unevenly, so use just enough to coat. Choose pans that provide even heat so the bottoms caramelize uniformly.
- Add the water and shortening mixture to the bowl of a stand mixer, and then add the 3/4 cup sugar, salt, and eggs, followed by the activated yeast mixture. With a dough hook attachment, mix these ingredients just until combined.: As the shortening melts, the mixture becomes silky and warm but not scalding, creating an emulsion that contributes tender crumb. The sudden addition of cold water brings the temperature down to a safe range for the eggs and yeast . You should see the shortening fully liquefy and blend into the water, creating a balanced temperature. If you skip cooling, you risk killing the yeast or cooking the eggs .
- Then add the flour, 1 cup at a time, mixing it in almost entirely each time before adding the next cup. When all flour has been incorporated, you will have a very soft dough that is easy to handle. At this point you can either use the dough right away or store the dough in the refrigerator for up to a week to make the rolls at a later time (see Notes section for details).: At this point the bowl will smell faintly sweet and yeasty, and the batter will look cohesive though loose. Mixing until just combined prevents overworking the dough before flour is added, preserving tenderness. A common error is overmixing here which can overdevelop gluten and lead to tougher rolls, so keep the mixer on low and watch for the ingredients to come together into a unified mass.
- Cover the inside of a large bowl with a very light coating of oil. Place dough in the oiled bowl, turning it over to get some oil on all sides, so the top of the dough stays soft. Cover top of bowl with a clean kitchen towel and set in a warm place. Let dough rise to about double the original amount. This can take at least an hour, depending on the warmth of your surroundings, etc.: Gradual flour addition helps you gauge the dough texture, which should remain soft and slightly tacky rather than dry. You will hear a quieter, more elastic sound as the dough comes together under the hook, and visually it will pull away cleanly from the bowl while staying supple. If you dump all the flour at once, you risk ending with a stiff, crumbly dough, so take your time and stop adding when the described texture appears.
- While the dough is rising, prepare the caramel. In a medium saucepan over medium heat, stir together brown sugar, cream, butter, corn syrup, and water until melted and combined. When it just starts to bubble (do not let it boil), remove the saucepan from the heat. It will have a cloudy appearance and will stay soft once the rolls are cooked. Divide the caramel between the two 9″ x 13″ pans, then set the pans aside to let the caramel cool while the dough continues to rise.: Cold storage slows fermentation, which can deepen flavor while offering scheduling flexibility. The dough may continue to rise slowly in the fridge, so use an airtight container with a light coating of oil to prevent sticking. A typical pitfall is forgetting to let refrigerated dough come to room temperature before shaping, which will extend proofing time in the pan and may yield uneven rise.
- Once the dough has doubled, score it in half. With a rolling pin, on a lightly floured surface, roll out each dough half into a large rectangle shape, about 14″ x 8″.: As the dough proofs, you will see it expand and become pillowy to the touch, with small bubbles forming under the surface. The texture becomes bouncy and airy, and the aroma grows notably sweet and yeasty. Avoid placing it in a drafty or cold spot, which can stall the rise, and do not let it overproof or it may collapse when shaped.
- Using the Cinnamon Sugar Filling ingredients, brush half of the melted butter over one dough rectangle. In a small bowl, stir together the granulated sugar and cinnamon. Sprinkle half the cinnamon sugar mixture evenly over the melted butter on the dough rectangle. Starting with the wide side of the dough rectangle, roll the dough up tightly, and finish by pinching the seam to seal it. Cut the dough roll into 12 equal slices, using a sharp serrated knife or a piece of dental floss or thread. Place dough slices, cut-sides facing up, in one of the 9″ x 13″ pans with caramel in the bottom. Repeat with the other half of the dough, to create a second pan of rolls.: The caramel will smell buttery and aromatic, with a glossy sheen as it combines, signaling it is ready. Heating just to the point of gentle bubbling keeps the sauce soft after baking, which is ideal for these rolls. Boiling the mixture aggressively can darken the sugars and make the caramel firm or bitter, so remove it promptly and stir in the vanilla extract off the heat.
- Cover each pan with a clean kitchen towel and let dough rise again in a warm place, until dough has doubled in size. This can take at least an hour, depending on the warmth of your surroundings.: Pouring the caramel into the pans creates a shallow pool that will become the sticky base for the rolls, smelling warmly of brown sugar and butter. Letting it cool slightly prevents the butter and cream from separating when the dough is added. If it is too hot it may make the dough soggy or start to cook the bottom of the rolls prematurely.
- Preheat oven to 350° F. Place pans in oven and bake for about 30 minutes, or until lightly browned. If you want to turn the rolls out onto a platter, let the rolls rest for 5-10 minutes after removing them from the oven before doing so. We usually just serve the rolls straight from the pan. If the rolls are at room temperature, I highly suggest warming them up just a bit, so they're warm and super tender!: The dough should feel soft and elastic, stretching easily under the rolling pin into an even rectangle. Light flouring prevents sticking but avoid overflouring which will dry the surface. If the dough resists stretching, let it relax briefly; forcing it will snap it back and make shaping harder.
- Using the Cinnamon Sugar Filling ingredients, brush half of the melted butter over one dough rectangle. In a small bowl, stir together the granulated sugar and cinnamon. Sprinkle half the cinnamon sugar mixture evenly over the melted butter on the dough rectangle.: The buttered surface should shimmer and the cinnamon sugar distribute in a thin, even layer so each spiral has consistent sweetness and spice. When you brush, the butter helps the sugar adhere and melt slightly into the dough during baking, giving those signature ribbons. Uneven spreading leads to pockets that are overly sweet or bland, so be methodical.
- Starting with the wide side of the dough rectangle, roll the dough up tightly, and finish by pinching the seam to seal it. Cut the dough roll into 12 equal slices, using a sharp serrated knife or a piece of dental floss or thread.: A tight roll ensures close layers that bake into tender coils; you will feel gentle resistance as you roll and hear a faint rustle as the spiral forms. Cutting with dental floss gives clean edges without dragging the filling. If you cut unevenly, some rolls may be under or overbaked, so measure or mark before slicing.
- Place dough slices, cut-sides facing up, in one of the 9" x 13" pans with caramel in the bottom. Repeat with the other half of the dough, to create a second pan of rolls.: As you place the slices, they should sit snugly but not crowded, allowing room to expand and press into the caramel beneath. The contrast between pale dough and glossy caramel is a good visual cue that you are assembling correctly. Too tight packing can prevent even browning and rise, while too much space can create exposed edges that bake firmer.
- Cover each pan with a clean kitchen towel and let dough rise again in a warm place, until dough has doubled in size.: The second proof is when the rolls relax and become pillow soft, showing uniform domes above the pan rim. Gently pressing a finger should leave a small indentation that slowly springs back. Overproofing may cause them to collapse in the oven, while underproofing results in dense centers, so watch for that gentle bounce.
- Preheat oven to 350° F. Place pans in oven and bake for about 30 minutes, or until lightly browned.: In the oven, the caramel will become glossy and the tops acquire a warm golden color. You will hear a faint crackle as the sugars bubble, and the kitchen fills with a rich, sweet aroma. If the tops brown too quickly, tent foil lightly to prevent overdarkening. A toothpick into the center should come out clean of raw dough.
- If you want to turn the rolls out onto a platter, let the rolls rest for 5 to 10 minutes after removing them from the oven before doing so.: Resting allows the caramel to settle slightly so the rolls release cleanly and retain their shape when inverted. The aroma is at its most comforting now, and the texture softens a touch as it cools. If you invert immediately, the hot caramel may run and create an uneven glaze.
- We usually just serve the rolls straight from the pan. If the rolls are at room temperature, I highly suggest warming them up just a bit, so they're warm and super tender!: A gentle rewarm brings back that fresh from the oven sensation, with steam rising and the caramel loosening into ribbons. Use a low oven to prevent drying, and avoid microwaving for long periods which can toughen the crumb. Warmth accentuates the flavors and makes them irresistibly soft.
Notes
- Make ahead refrigeration: After the first rise, refrigerate the dough in an oiled airtight container. It will rise slowly and you can shape when ready, but allow extra time to come to room temperature before rolling so the dough is pliable.
- Baking from chilled rolls: If you shape from cold dough, expect an extended second rise in the pan. Keep them covered and check for the double size indicator rather than strictly following a clock.
- Freezing fully baked rolls: Cool completely, then freeze in a single layer before stacking. Thaw in the fridge overnight and reheat gently in a 250° F oven for best texture.
- Caramel thickness: If your caramel firms too much after cooling, rewarm gently until pourable before dividing between pans, but do not boil it again to avoid hardening.
- Even slicing tip: Use dental floss or a serrated knife and a ruler to mark 12 even sections, ensuring uniform size and consistent baking.