Caramel Apple Dip
Caramel Apple Dip is a creamy and crunchy party favorite, marrying silky cream cheese with sweet caramel and toffee bits. This easy no fuss dip is perfect for gatherings and quick snacks, offering bright apple wedges with indulgent flavor. Ideal for simple entertaining and last minute hosting, it delivers big taste with minimal effort and keeps guests coming back for more.
Equipment
- KitchenAid Hand Mixer
Ingredients
- 8 ounce cream cheese (at room temperature) Soften to room temperature for easier mixing and a smoother, creamier dip texture; helps bind other ingredients and adds rich, tangy dairy flavor. Beat until fluffy to ensure a light base that carries sweetness and balances the caramel and apple flavors.
- 1/2 cup brown sugar (add more or less to taste) Sweeten and deepen the flavor profile while contributing a moist, slightly molasses-like note; adjust amount to taste to control overall sweetness. Sprinkle in gradually and taste as you go to achieve a balanced caramel-cream cheese combination.
- 5.5 ounce caramel dip (found in the fruit section of your grocery store) Provide ready-made melted caramel flavor and smooth, sticky sweetness, simplifying preparation by eliminating homemade caramel steps. Spoon or stir into the cream cheese mixture to create a cohesive, luscious dip with classic caramel notes.
- 3.5 ounces skor bits (found in the baking aisle) Add crunchy, toffee-like texture and intense buttery, chocolate-covered toffee flavor; sprinkle into or on top of the dip for contrast. Use as both mix-in and garnish to introduce pleasant textural variation against the creamy base and fresh fruit.
- 6 apples (or the fruit of your choice) Serve as the primary dipping vehicle offering crisp, juicy freshness and natural acidity that balances the rich, sweet dip. Slice or arrange attractively to complement the creamy, caramel-coated flavors and deliver a refreshing bite.
Instructions
- Make Cream Cheese Mixture: Using an electric mixer, mix the cream cheese and brown sugar together until well blended.: The bowl will smell faintly tangy and sweet as the cream cheese and brown sugar come together, producing a pale, slightly glossy batter. As you mix with your KitchenAid Hand Mixer , listen for a smooth, consistent whir and watch the texture transform from stiff clumps to a silky mass that ribbons slowly off the beater. This step matters because a fully smoothed base prevents lumps under the caramel dip and gives an even mouthfeel. If the cream cheese is too cold you will see tiny white pockets and hear the motor strain, so let it warm longer next time. A common mistake is over mixing, which can incorporate too much air and make the mixture soft and weepy; stop mixing when the texture looks uniform and spreadable.
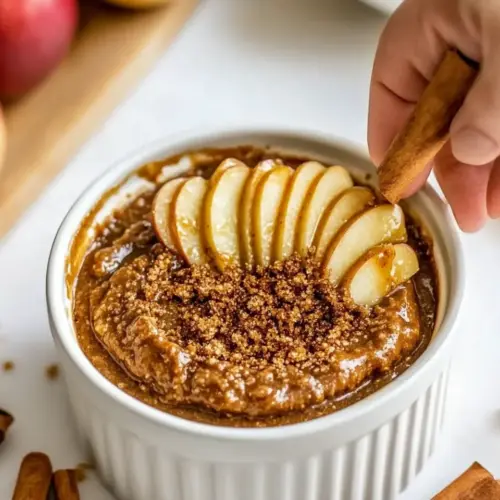
- Assemble: Spread the cream cheese/brown sugar mixture on a large round serving plate (you want it to be at least 1/2 inch deep). Next, spread the caramel dip over the cream cheese mixture.: When spreading the mixture onto your serving plate, you will notice the cream cheese forms a thick, velvety canvas with a matte finish. Use a small offset spatula to create an even layer about 1/2 inch deep, and you will see the surface hold gentle peaks, which helps the next layer adhere. Adding the caramel dip over the top creates a glossy, amber ribbon that contrasts visually and texturally. This assembly technique ensures each bite gets both creamy and sweet components. The why is simple, the even base supports the caramel dip and keeps the platter tidy. Avoid spreading too thinly, or the caramel dip will dominate and the ratio will feel unbalanced.
- Top: Sprinkle with skor bits (add more skor bits for a crunchier texture).: As you sprinkle the skor bits , listen for a faint scattering sound and enjoy the light sparkle they add on top. Visually they break up the caramel sheen with little toasted flecks, and the first bite should offer a crisp counterpoint to the smooth layers beneath. This topping step matters because texture is key to keeping the dip from feeling one dimensional. If you add them too early they may absorb moisture and soften, so I recommend adding most of the skor bits right before serving while saving a few to refresh the top later. A common error is clumping the bits in one area, which creates inconsistent crunch, so distribute them evenly.
- Chill: Store it in the fridge covered with plastic wrap until you are ready to serve. Take it out at least 20 minutes before serving so the cream cheese can soften a bit. While you're waiting for the cream cheese to soften, cut your apples into wedges. I usually drizzle a bit of lemon juice over them so they don't turn brown.: When the assembled dip chills in the refrigerator, the flavors knit together and the solids firm slightly, creating a pleasing resistance when you dip. The surface will cool and the caramel dip may set a touch, forming a tacky sheen rather than a runny puddle. Chilling also helps the cream cheese stabilize, making the dip less likely to slide off fruit. A typical pitfall is under chilling, which results in a loose spread that slides; on the other hand over chilling makes the cream cheese too firm, so take it out about 20 minutes before serving to let it soften a bit. If it is not softening, let it sit at room temperature for 10 to 15 minutes.
- Serve: Dip your apples and enjoy!: The moment you bring the platter out you will notice the contrast between cool dip and crisp apples . The sound of a crisp apple wedge biting through is part of the pleasure, and the first smear should show a glossy ribbon of caramel dip mingling with the pale base and a scatter of skor bits . Serving matters because presentation invites people to dig in, so arrange the apple wedges in a fan or ring around the dip and keep extra napkins handy. A common mistake is slicing the apples too early, which causes browning; slice them close to serving and toss with a little lemon juice if needed. Enjoy the satisfying mix of textures and flavors together.
Notes
- Room temperature cream cheese is key. If you forget to let it warm, you can cut the block into small cubes to help it soften more quickly, but avoid using the microwave on high which can create hot pockets and change the texture.
- Adjust brown sugar to taste. Start with the suggested amount and add a teaspoon at a time if you want sweeter, tasting as you go so the sweetness complements rather than overwhelms the caramel dip.
- Caramel dip convenience. Using a store bought caramel dip saves time and provides consistent texture. If your caramel is very thick, warm the jar gently in a bowl of warm water to make spreading easier.
- Skor bits timing. For best crunch add most of the skor bits right before serving. If you must assemble early, keep some reserved to sprinkle on top at the last minute to refresh the texture.
- Apple selection. Pick firm varieties like Fuji or Honeycrisp so they remain crisp under the weight of the dip, and slice them shortly before serving to avoid browning and loss of crunch.