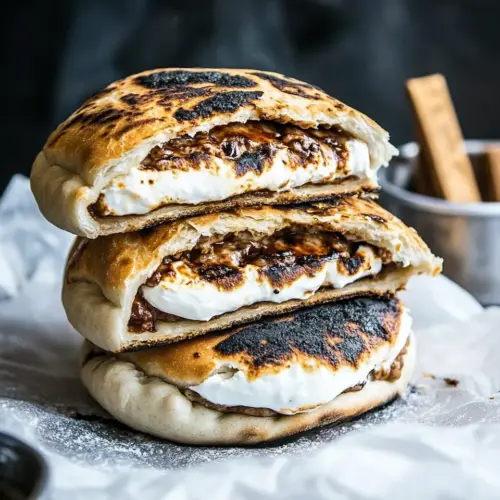
Campfire Grilled S’more Calzones
Campfire Grilled S’more Calzones combine a tender, slightly sweet dough with molten chocolate and gooey marshmallow for an easy, crispy handheld dessert. Ideal for summer cookouts and casual gatherings, they deliver warm, melty texture and buttery crust with minimal fuss. Make them for an effortless nostalgic treat that everyone will reach for.
Equipment
- Large Bowl
- Rolling Pin
- Cookie Sheet
- Parchment Paper
- Grill
- Oven
Ingredients
- 1 cup warm water Hydrate and activate the yeast while providing warm liquid for the dough; maintain a comfortably warm temperature so yeast blooms and dough becomes elastic. Use measured warmth to avoid killing the yeast and ensure consistent rise times for the calzone dough. Can be reused in recipes that call for proofing yeast solutions.
- 2 tablespoons honey Sweeten and tenderize the dough while adding a subtle caramelized flavor that enhances the s'more profile; honey also feeds yeast for a slower, more flavorful fermentation. Adjust amount slightly for desired sweetness and crumb texture. Works well to improve crust browning during baking or grilling.
- 2 1/4 teaspoons active dry yeast Leaven the dough by producing carbon dioxide during fermentation, which creates lift and airy texture in the calzone crust. Sprinkle into warm liquid to proof and verify activity before mixing into flour. Choose quality active dry yeast for reliable rises.
- 2 cups white whole wheat or whole pastry flour may also use all-purpose flour Provide structure and a wholesome whole-grain flavor to the dough while contributing fiber and nutrients; can be swapped with all-purpose for a lighter crumb. Measure and sift if needed to avoid dense pockets and to ensure even hydration with the wet ingredients. Balances chewiness and heartiness in the finished calzone.
- 1 cup all-purpose flour Contribute gluten and fine texture to the dough for elasticity and an even crumb; blends with whole wheat flour to lighten the final texture. Use as the primary white flour component to help the dough stretch for calzone formation. Kept dry until combined with wet ingredients for consistent results.
- 1 teaspoon ground cinnamon Add warm, toasty spice that complements the s'more filling and enhances aroma; cinnamon can be mixed into the dough or sprinkled in the crust edges for subtle sweetness. Use sparingly to avoid overpowering the chocolate and marshmallow flavors. Blends well with honey for depth of flavor.
- 1 tablespoon olive oil Improve dough elasticity and mouthfeel while adding a touch of richness to the crust; oil also helps create a tender exterior when grilled. Brush onto dough surface to prevent sticking and promote browning during cooking. Store remaining oil sealed to maintain freshness.
- 1/2 teaspoons salt Enhance flavor and control gluten development by moderating yeast activity; salt strengthens dough structure and improves overall taste balance. Dissolve in the liquid or add to the flour by mixing evenly to avoid direct contact with yeast during proofing. Use measured amounts to prevent overly salty results.
- 1 pound batch of the above dough or 1 store bought pizza or pastry dough Provide the required amount of prepared or store-bought dough to form individual calzones; determines yield and size for grilling or baking. Use homemade dough for tailored flavor or a store-bought alternative for convenience and time savings. Ensure dough is at room temperature before shaping to prevent tearing.
- 2 -4 Hershey's Milk Chocolate Bars Add melted, classic chocolate layers that replicate the s'more experience; break into pieces to distribute evenly inside each calzone pocket. Use enough bars to achieve a gooey, chocolatey center without overwhelming the pastry. Choose milk chocolate for traditional s'more sweetness.
- 10 or store bought marshmallows Supply soft, gooey sweetness when heated, creating the signature toasted marshmallow interior; use whole or cut marshmallows to fit inside calzones. Roast slightly before enclosure or place directly inside to soften during cooking for optimal chewiness. Monitor closely to prevent excessive burn or leakage.
- finely crushed graham crackers and powdered sugar for dusting Provide a crunchy, graham-like element and a light dusting for presentation; crush finely to mimic classic s'more crust and use powdered sugar for an attractive finish. Sprinkle on top after cooking to add texture contrast and a touch of sweetness. Combine with cinnamon if desired for extra flavor.
- vanilla ice cream for serving Offer a cold, creamy contrast to the warm, gooey calzone for serving; scoop alongside each portion to elevate the dessert experience. Choose vanilla to complement chocolate and marshmallow without competing with flavors. Serve immediately so ice cream contrasts with the hot filling.
Instructions
- In a large bowl, combine water, yeast and honey. Mix with a spoon, then let sit until foamy, about 10 minutes. Add in the 1 1/2 cups whole wheat flour, all-purpose flour, cinnamon, salt and olive oil, stirring with a spoon until the dough comes together but is still sticky. Using your hands, on a floured surface, form the dough into a ball and work the additional 1/2 cup flour into the dough if needed. All of the mixing and kneading can also be done in a stand mixer with the dough hook attachment. Next, rub the same bowl with olive oil, then place the dough inside, turning to coat. Cover with a towel and place in a warm place to rise for about 1 hour.: The first thing you will sense is the warm, sweet scent as the water , yeast , and honey come together, and within minutes the surface will look foamy and alive, which indicates active yeast. The foam smells faintly yeasty and floral from the honey, and this stage sets the foundation for a light dough. Why this matters: a well proofed yeast mixture ensures a tender crumb and good rise. Troubleshooting tip: if nothing foams after ten minutes, your yeast may be dead or the water too cold or too hot; discard and try again with fresh yeast and comfortably warm water.
- Divide the dough in 10 equal size balls. Then either roll the dough out into a 6 inch circle or divide the balls into two and roll into 2 (3 1/2 inch) circles. Working on one side of the dough or with one dough round, add two pieces of chocolate. Flatten one marshmallow and place it on top of the chocolate. If desired add another two pieces of chocolate (I did). Now either take the top half of the dough and fold it over the filling or add the top round of dough. Crimp the edges of the dough to seal. At this point, the s'mores can be placed on a floured cookies sheet, covered and stored in the fridge overnight or until ready to cook.: As you stir the flours, cinnamon , salt , and olive oil into the foamy mix, you will feel the texture turn from wet to a shaggy mass, and a toasty, spiced aroma will rise from the bowl. The oil brings shine and a touch of richness, while the salt balances the sweetness of the honey . Why this matters: combining dry and wet ingredients properly ensures even hydration and a consistent dough. Troubleshooting tip: adding all the flour at once can lead to a dry dough, so work gradually and keep stirring until the dough comes together but remains slightly sticky.
- Preheat the grill to medium high heat or the oven to 375 degrees F.: When you transfer the dough to a floured surface, you will feel it become smoother as you knead and incorporate that extra flour , and the dough will start to spring back slightly when pressed. The tactile feedback is crucial here, because the dough should be pliable and soft, not dry and crumbly. Why this matters: correct kneading develops gluten for structure and chew. Troubleshooting tip: avoid adding too much flour in a single go, which makes the dough stiff; instead, add small pinches and test the texture frequently.
- Brush the top and bottom of each s'more with melted butter. If baking the s'mores, line a cookie sheet with parchment and place the buttered s'mores on the baking sheet. Bake 15-20 minutes or until lightly golden.: Using a mixer reduces effort and gives a uniform texture, and you will hear a steady, low hum as the hook turns the dough into a cohesive, elastic ball. The dough will climb the hook slightly and then settle, which is a good sign of proper gluten development. Why this matters: consistency is easier to achieve mechanically, and less hands on time keeps the dough temperature stable. Troubleshooting tip: do not overmix at high speed, which can overdevelop gluten and yield a tough crust; stop and check the dough frequently.
- To grill, add the buttered s'mores to the grill and grill for 2-3 minutes per side.: The light sheen of olive oil on the bowl prevents sticking and adds a faint richness as the dough rests, and you will notice the surface become smooth and glossy. Turning the dough ensures all sides get a light oil coating, which helps maintain moisture during the rise. Why this matters: it keeps the exterior from drying out and forming a crust during proofing. Troubleshooting tip: if your kitchen is cold, place the bowl in a slightly warm spot, because a chilled dough will rise much more slowly.
- Serve the s'mores warm, dusted with graham cracker crumbs, powdered sugar or even served with ice cream.: During the rise, small bubbles form and the dough puffs noticeably, releasing a faint yeasty fragrance that tells you it is active. The surface should feel airy and spring back slowly when pressed. Why this matters: this first rise builds volume and texture, making the pockets light rather than dense. Troubleshooting tip: if the dough barely rises, it may have been under proofed initially, so give it more time in a warmer environment until it doubles.
- Divide the dough in 10 equal size balls: When you divide the dough, you will notice even snaps and a uniform crumb when you pull pieces apart, which helps each calzone bake evenly. Use a gentle palm press to form tight balls, which creates a smoother surface and easier rolling. Why this matters: equal portions ensure consistent cook times and presentation. Troubleshooting tip: weighing portions helps precision, but if you do it by eye, try to keep sizes as close as possible to avoid uneven baking.
- Then either roll the dough out into a 6 inch circle or divide the balls into two and roll into 2 (3 1/2 inch) circles: Rolling produces a thin, even sheet that will crisp quickly; you will see the dough stretch, and it will resist a bit before relaxing. The visual cue to look for is an even, consistent thickness with no tears. Why this matters: uniform thickness prevents undercooked centers or burnt edges. Troubleshooting tip: if the dough sticks, dust your surface and roller lightly with all-purpose flour , and avoid overworking which can make the dough tough.
- Working on one side of the dough or with one dough round, add two pieces of chocolate: As the chocolate hits the dough it feels cool, and when the warm calzone hits heat it will melt into glossy ribbons that create that decadent pull. Position the pieces centrally so they melt evenly. Why this matters: placing chocolate properly ensures even melting and a gooey center. Troubleshooting tip: too much chocolate at the edge can leak during cooking, so keep filling centered.
- Flatten one marshmallow and place it on top of the chocolate: Flattening the marshmallow speeds melting and creates a broader surface area so it melts into the chocolate. You will see it compress slightly and feel a sticky texture; when heated the marshmallow puffs and becomes pillowy and golden on the outside. Why this matters: the marshmallow texture is the heart of the experience, and flattening helps achieve an even melt. Troubleshooting tip: if the marshmallow is too large, it may tear the dough when folded, so trim or flatten as needed.
- If desired add another two pieces of chocolate: Adding extra chocolate increases richness and creates layers of melted flavor, and visually you will see thicker, silkier pockets of chocolate when you break them open. Why this matters: chocolate quantity affects overall sweetness and mouthfeel. Troubleshooting tip: be mindful of adding too much, which risks leakage during cooking.
- Now either take the top half of the dough and fold it over the filling or add the top round of dough: Folding creates a sealed pocket, and you will feel the edges meet and press together; the dough should stick without excessive force. This action traps air inside that will expand during cooking, giving a light interior. Why this matters: sealing properly prevents melted filling from escaping. Troubleshooting tip: if the edges do not seal, slightly dampen them with a bit of water to glue them shut.
- Crimp the edges of the dough to seal: Crimping gives both function and a rustic look, and you will notice a tactile firmness along the seam that indicates a solid seal. A fork or your fingers can make a pattern while ensuring the filling stays inside. Why this matters: a well crimped edge keeps the fillings contained through grilling or baking. Troubleshooting tip: avoid creating holes while crimping, which causes leaks; gently press without tearing.
- At this point, the s'mores can be placed on a floured cookies sheet, covered and stored in the fridge overnight or until ready to cook: Chilling the assembled calzones firms the dough and makes them easier to handle, and you will notice they hold their shape better after refrigeration. This also allows flavors to meld slightly. Why this matters: chilling reduces risk of filling leakage and can improve texture when cooked. Troubleshooting tip: if refrigerated overnight, bring them closer to room temperature before cooking so they heat evenly.
- Preheat the grill to medium high heat or the oven to 375 degrees F: The air will warm and you will smell the faint hint of toastiness as the oven or grill reaches temperature, which primes the surface to brown quickly. This temp produces a golden crust without burning. Why this matters: consistent heat is essential for melting the insides while crisping the outside. Troubleshooting tip: avoid too high heat which can char the exterior before the interior warms through.
- Brush the top and bottom of each s'more with melted butter: Brushing with melted butter creates a glossy, golden finish and a rich, savory edge that contrasts the sweet filling. You will see the surface glisten and smell a warm, toasty butter aroma that signals readiness for cooking. Why this matters: butter promotes even browning and adds flavor. Troubleshooting tip: do not overbrush or the butter can drip into the grill flames causing flare ups.
- If baking the s'mores, line a cookie sheet with parchment and place the buttered s'mores on the baking sheet: On the baking sheet the calzones will brown evenly and the parchment prevents sticking, and you should space them so air circulates for uniform color. The oven air will envelop them and produce a dry heat that crisps the exterior. Why this matters: correct placement ensures consistent bake and prevents sticking. Troubleshooting tip: overcrowding will produce uneven browning and longer cook times.
- Bake 15 to 20 minutes or until lightly golden: In the oven you will hear a faint tick and the scent of butter and cinnamon rising as the crust turns golden, while inside the chocolate melts and the marshmallow softens. The visual cue is a warm golden color around the edges. Why this matters: this timing melts the filling while maintaining a crisp shell. Troubleshooting tip: if you notice excessive browning before the interior is hot, lower the temperature slightly and extend time.
- To grill, add the buttered s'mores to the grill and grill for 2 to 3 minutes per side: On the grill you will get a quick sear and light char, and flipping yields an even crust with a smoky hint. Listen for a gentle sizzling as butter hits the grill. Why this matters: grilling gives a unique flavor and fast cook time. Troubleshooting tip: watch for flare ups and keep them over indirect heat if fillings start to escape.
- Serve the s'mores warm, dusted with graham cracker crumbs, powdered sugar or even served with ice cream: The final presentation is bright and inviting, and the aroma of warm chocolate and butter will draw people in. Dusting with crushed graham crackers adds contrast and a scoop of vanilla ice cream offers a cool counterpoint. Why this matters: serving warm preserves the melt and texture that make the treat irresistible. Troubleshooting tip: letting them cool too long will lose the gooey center, so serve promptly for best experience.
Notes
- Choose your dough wisely If you use store bought pizza or pastry dough, roll gently and avoid tearing. A slightly thicker edge helps contain the filling, while a thinner center ensures a crisp finish.
- Temperature matters for proofing Aim for comfortably warm proofing conditions for about 1 hour so the dough doubles and develops flavor. Too cold and the rise drags, too hot and the yeast can be damaged.
- Control filling moisture Flattening the marshmallow and centering fillings reduces leakage. If fillings seem wet, pat them dry or use slightly less chocolate to avoid sogginess in the crust.
- Grill technique If grilling, use indirect heat or a cooler zone to prevent charring before the center heats. Flip carefully after 2 to 3 minutes per side to achieve even color.
- Serving finish Dust with crushed graham crackers and powdered sugar right before serving so the crumbs stay crisp, and offer vanilla ice cream for a classic hot and cold contrast.