Butterfinger Pie
Butterfinger Pie is a creamy, candy studded no bake dessert with a fluffy Cool Whip filling and crunchy butterfinger pieces. This easy, crowd pleasing pie is perfect for parties and quick entertaining, offering a delightful contrast of smooth and crispy textures. Make it ahead for stress free hosting and enjoy slices that balance sweet, nutty, and chocolatey notes.
Equipment
- Hand-held electric mixer
Ingredients
- 1 (8-ounce) package cream cheese, room temperature Soften to room temperature and beat until smooth to create a rich, creamy base that adds body and tang to the filling. Provide structure and stability so the pie holds its shape when sliced while balancing sweetness.
- 1/2 cup creamy peanut butter Creamy texture should be blended with the cream cheese to add nutty flavor and silkiness; it enhances richness and provides a peanut-forward note. Acts as a secondary fat component that helps create a spreadable, scoopable filling consistency.
- 2 teaspoons vanilla extract Add as a fragrant flavor enhancer and stir into the filling to lift and round out the sweet and nutty elements. Contribute a warm, aromatic background that complements the peanut butter and chocolate notes.
- 1 1/2 cups powdered sugar Sift or gradually incorporate to sweeten and thicken the filling while ensuring a smooth, lump-free texture. Provide sweetness and stability to the mixture so the pie sets properly without becoming grainy.
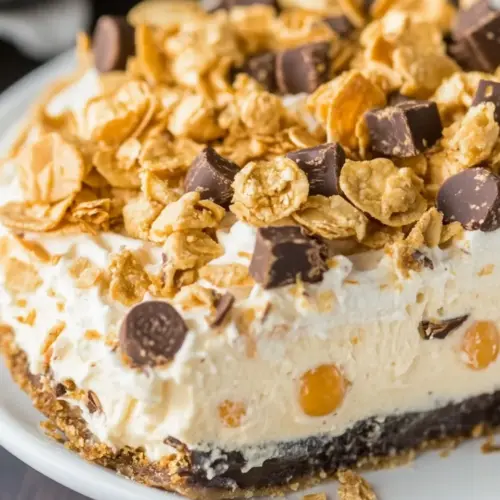
- 1 (12.5-ounce) bag fun-sized butterfinger bars, crushed (reserve 2 bars to sprinkle on top) Crush and fold into the filling to contribute crunchy, chocolatey-sweet shards and Butterfinger flavor throughout; reserve a couple of bars to sprinkle on top for garnish. Deliver texture contrast and the signature candy flavor that defines the pie.
- 1 (8-ounce) container Cool Whip, thawed Thaw fully and gently fold in to lighten the filling and add an airy, mousse-like quality; it also contributes creamy sweetness without extra mixing. Help stabilize the filling’s volume so the pie remains light instead of dense.
- 1 store-bought oreo or chocolate graham cracker crust Use as the pre-made shell to hold the filling and provide a cookie or graham base with crispness and chocolate notes. Offer convenience and a contrasting crunchy foundation that complements the creamy filling.
Instructions
- Place cream cheese and peanut butter in a large mixing bowl. Add vanilla and beat with an electric mixer until smooth.: The bowl should feel cool against your hands as you add the softened cream cheese and the glossy peanut butter . You will notice a dense, slightly tacky texture at first, and the aroma will be rich and nutty. Using room temperature cream cheese helps the two come together effortlessly when mixed, preventing lumps. A common mistake is starting with cold cream cheese , which causes graininess and makes the mixer struggle, so always let it sit at room temperature for about 30 minutes if needed. Visually aim for a homogenous, pale beige mixture with no streaks of white or peanut butter remaining.
- Beat in powdered sugar until smooth.: As the vanilla extract hits the bowl you will get an immediate lift in aroma, floral and sweet. The electric mixer will turn the dense blend into a silkier mass, with gentle whirring sounds and a sheen forming on the surface. This step matters because it evenly distributes flavor and gives body to the filling. Avoid overmixing which can incorporate too much air and make the filling collapse later, so mix just until smooth and fragrant.
- Fold in crushed butterfingers.: When you add the powdered sugar you will see the mixture thicken and become satiny, and a faint cloud of sugar dust may rise briefly. The sugar dissolves quickly, softening the bite and stabilizing the texture. Work at a low to medium speed to prevent sugar clouds and to ensure even incorporation. A common pitfall is adding the sugar too quickly, which can cause lumps or a gritty texture, so add gradually and scrape the bowl to achieve a fully smooth consistency.
- Fold in Cool Whip.: The moment you fold in the crushed butterfinger pieces the filling gains visual speckles of amber and dark flecks. Use a spatula to gently fold so the candy retains its crunch and does not get pulverized into dust. This technique keeps texture contrast, which is crucial for the eating experience. Watch for any overly soft candy that might bleed color or stick; if the pieces seem oily, fold carefully to avoid altering the filling’s structure. You want visible shards of candy throughout for that satisfying crunch.
- Spread filling in crust. Sprinkle reserved butterfingers on top.: As you fold in the thawed Cool Whip the mixture lightens and adopts a fluffy, cloudlike body. The sound of the spatula gliding through will be smooth and the mixture will billow slightly as air is gently trapped. This step matters because it ensures an airy, scoopable final texture. A frequent mistake is vigorous stirring which deflates the airiness, so fold with gentle, wide strokes until the color and texture are uniform.
- Refrigerate at least 4 hours before serving.: When you spread the filling into the store bought oreo or chocolate graham cracker crust you will feel a slight resistance as the creamy filling levels out. Use an offset spatula or the back of a spoon to smooth the top, creating clean edges for neat slices. The contrast between the dark crust and pale filling is visually appealing. Avoid overworking the filling at the edges which can push it up unevenly; instead redistribute gently for an even surface.
- Sprinkle reserved butterfingers on top: The reserved crushed butterfinger pieces on top provide that final crunchy signature and a golden finish. Scatter them evenly so every slice gets texture and visual interest. Press lightly if you want them to adhere, but do not press hard or they will sink. A common error is adding very small crumbs only, which mutes the crunch, so include a mix of fine crumbs and chunkier pieces.
- Refrigerate at least 4 hours before serving: Chilling is where the pie comes together. As it chills the filling firms and flavors meld, producing a cleaner slice and a cohesive texture. You should notice the filling set and become slightly firmer to the touch after at least four hours. Resist the temptation to slice too soon, because serving while under chilled will produce a loose filling that may not hold shape. If you need to speed it up, chill in the coldest part of the fridge, but do not use the freezer as it can change the texture abruptly.
Notes
- Swap crust style: Try a chocolate graham cracker crust instead of an Oreo crust for a slightly lighter chocolate note while preserving structure.
- Texture boost: Add a few larger chunks of butterfinger to the filling for extra bite in some slices, leaving other pieces finer for contrast.
- Make it ahead: Prepare the pie a day in advance and keep it covered in the refrigerator to let flavors meld and to save time on the day of serving.
- Presentation trick: Pipe a ring of extra Cool Whip around the edge before sprinkling reserved candy to create a neat, bakery style finish.
- Mixing method: Use a hand-held electric mixer on low speed to prevent over aeration and ensure a smooth, stable filling.