Bunny Bread
Bunny Bread is a soft, slightly sweet shaped bread that is fun to make and perfect for spring gatherings. This easy recipe yields tender rolls with a golden crust, great for brunch or festive tables. Ideal as an easy weeknight project or a hands on activity with kids, it invites creativity and sharing, making it a delightful reason to bake and celebrate together.
Equipment
- Stand mixer
- Mixing Bowl
- Parchment lined baking sheet
- Oven
Ingredients
- 1 cup warm water Provide warmth and activate yeast; warm water helps dissolve and hydrate yeast and sugar, creating a foamy starter that ensures proper fermentation. Maintain a temperature around 100–110°F to avoid killing yeast while promoting rising activity.
- 2 1/4 tsp yeast active dry Activate and leaven the dough; active dry yeast ferments sugars to produce carbon dioxide, giving the bread its structure and light crumb. Sprinkle into warm water to proof and confirm liveliness before combining with other ingredients.
- 2 tbsp sugar or honey Sweeten and feed yeast while tenderizing the crumb; sugar or honey supplies fermentable sugars for yeast and balances flavor. Use measured amount to control browning and moisture without making the dough overly sweet.
- 2 tbsp oil Add richness and improve texture; oil lubricates gluten strands for a softer, more tender loaf and extends shelf life by retaining moisture. Choose a neutral-flavored oil to avoid altering the intended flavor profile of the bread.
- 1 large egg Enrich the dough and contribute to structure; beaten large egg adds protein, color, and flavor while helping bind ingredients and producing a richer crumb. Incorporate at room temperature for more even mixing and better dough consistency.
- 1 tsp salt Season and strengthen gluten development; salt enhances flavor while tightening gluten to control fermentation rate and improve crumb structure. Sprinkle evenly into flour or dough to avoid direct contact with yeast during initial mixing.
- 3 cups flour Form the dough base and provide structure; all-purpose flour supplies starches and proteins that develop gluten and trap fermentation gases to create the loaf. Measure accurately and adjust slightly for humidity to achieve the desired dough consistency.
Instructions
- Pour warm water into the bowl of a stand mixer. Sprinkle yeast and sugar or honey and let sit for 5 minutes until mixture begins to bubble.: You will first notice a gentle steam rising if the water is at the right warmth, and a soothing warmth to your hand when you test it. This is the moment the dough begins its life, so choose water that is warm but not hot to the touch. The yeast will respond to this warmth by waking up, and if you pour water that is too hot you risk killing the yeast. A common mistake is assuming warmer is always better, which can halt fermentation. Keep the bowl steady so the yeast and sugar will dissolve evenly and start to bubble.
- Add oil, egg, salt and 1 1/2 cups of the flour. Mix on low-medium until combined. Add one more cup of flour, and continue mixing. Add the remaining flour. You will know you have added enough flour when the dough has pulled away from the sides of the bowl as you are mixing. It should be soft and slightly sticky – adding too much flour will produce a tougher bunny bread. If your dough seems too wet, add 1/4 cup more flour.: You should see small bubbles forming on the surface and a foamy scent developing, indicating active fermentation. That gentle foam is the yeast breathing, a fragrant yeastiness that promises good rise. If nothing bubbles, the yeast may be inactive, so do not continue; start again with fresh yeast. One error to avoid is rushing this proof; without a visible foam, the dough may remain dense.
- Knead the dough for 2-3 minutes until the dough looks smooth.: Once ingredients meet, the bowl will smell richer, with the faint scent of egg and oil blending into the yeast aroma. The initial flour addition creates a shaggy mass that will gradually come together as the mixer runs on low to medium. Be mindful that adding all the flour at once can make the dough stiff; this staged approach helps you control consistency. Overworking at this early point can make the dough tight, so mix only until combined.
- Place your dough in a lightly greased bowl and cover with plastic wrap or a light towel. Let the dough rise for an hour, or until it has doubled in size.: During mixing you will hear a rhythmic, low hum and see the dough pull from the sides into the paddle or hook. The texture should change from crumbly to elastic in a few minutes. If the dough sticks to the bowl excessively, a small scrape and light dusting of flour can help. Avoid cranking the speed, which can heat the dough and alter rise times. The goal is cohesion without drying.
- Once it has risen, place dough on a lightly floured surface. Divide into 10 equal pieces.: The dough will begin to feel less sticky as it absorbs more flour , and you may notice a smoother sheen on the surface. This stage develops gluten gradually, improving structure while keeping softness. Be careful not to add too much extra flour , a pitfall that leads to a tough crumb. Watch for the dough to become manageable yet still slightly tacky to the touch.
- Break a small piece of dough off of each of your 10 pieces for the bunny tail. Roll each piece into a rope shape. If your surface is too slippery, take a clean damp rag and run it on your surface to give your dough some grip.: As you add the final portion of flour , the dough should pull away from the bowl and form a cohesive mass. The sound will shift to a softer thud as the dough rounds on the hook. If the dough appears too wet, add up to 1/4 cup more flour sparingly, blending fully before deciding to add more. A common mistake is overshooting the flour amount and ending up with a dry, stiff dough.
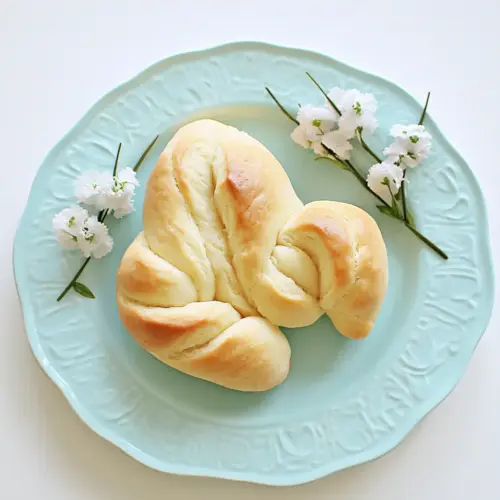
- To shape into a bunny: Fold the rope into a U shape. Cross one side over the other loosely leaving a space towards the bottom of the rope for the tail. Twist the top pieces under each other. Place on a parchment lined baking sheet and rearrange the ears to make them look how you like. Take the piece of extra dough and flatten slightly. Pinch underneath to create a 'bubble' and continue pinching until the top looks like a smooth round ball. Place into the bottom part of the bunny making sure it is secure down into the bunny twist.: This visual cue is reliable, showing proper gluten development and hydration balance. The dough should be soft and slightly sticky, yielding slightly to a gentle poke. If the surface cracks or looks excessively dry, it likely has too much flour . Resist the urge to add more unless it clearly sticks to your hands; a little tackiness is ideal.
- Heat oven to 375 degrees F. Cover with a light dish towel, and let the bunnies rise on the baking sheet for another 10 minutes. Brush the bunnies with an egg wash (1 egg mixed with 1 tbsp water).: The tactile feel here is crucial, a springy resilience that bounces back when pressed. That slight stickiness ensures the interior remains tender after baking. A key mistake is over correcting stickiness by adding more flour , which reduces the final softness. Trust the visual and tactile signs rather than exact measures when dough texture varies by ambient humidity.
- Bake for 10-15 minutes or until the tops are lightly brown. Enjoy!: The dough will feel noticeably wetter, with a glossy sheen and greater tendency to cling to the hook. Adding flour in small increments lets you regain control without making it dry. After each addition, mix enough to absorb it fully and reassess. The trap is adding too much at once and overshooting the desired texture; proceed cautiously and patiently.
- Knead the dough for 2 to 3 minutes until the dough looks smooth: As you knead, the dough will change from shaggy to silky, and you may hear a faint, soft tearing sound as gluten aligns. The surface should become satiny and elastic. This step strengthens the dough so bunnies hold their shape during rising. Over kneading is rare with short times, but excessive force can warm the dough, so aim for gentle, steady action.
- Place your dough in a lightly greased bowl and cover with plastic wrap or a light towel: You will notice the dough relax and slightly flatten as it rests in warmth, and a faint yeast scent will intensify during the rise. The bowl should be warm and draft free to encourage steady growth. A common error is placing it in a cold spot, which slows fermentation; aim for a comfortably warm corner of the kitchen.
- Let the dough rise for an hour, or until it has doubled in size: Visually, the dough should nearly double and look airy with a domed top. Lightly pressing a finger will leave an indentation that slowly springs back. If it does not double, the yeast might be sluggish or the environment too cool. Avoid punching it down too early, as underproofing yields dense texture in the final bunnies.
- Once it has risen, place dough on a lightly floured surface: The risen dough will feel pillowy and warm, emitting a sweet, fermented aroma. A lightly floured surface prevents sticking while you divide and shape. Too much flour here can transfer into the dough and dry the outer layer, so use just enough to work comfortably. Take care not to deflate it unnecessarily while transferring.
- Divide into 10 equal pieces: Dividing by eye is fine, but weighing pieces produces uniform bunnies that bake evenly. The pieces should feel soft and springy, and when placed side by side, they should be similar in size. A common mistake is making uneven portions, resulting in some bunnies baking faster than others. Aim for equal portions so everything finishes at the same time.
- Break a small piece of dough off of each of your 10 pieces for the bunny tail: The small tail pieces must be slightly smaller and tacky so they adhere well later. Pressing and pinching will create a smooth round shape for the tail, and you should feel a gentle resistance when forming it. If the tail is too large, it overwhelms the bunny shape; too small, and it may not stay secured during baking.
- Roll each piece into a rope shape: As you roll, the dough should form a smooth tube with an even thickness, and you might hear a soft friction sound against the countertop. The rope should be flexible, not brittle. If your surface is too slippery, a clean damp rag can provide slight traction, helping you maintain control. Rolling unevenly creates lopsided ears, so aim for uniform thickness.
- Fold the rope into a U shape: Folding creates the general ear structure, and visually the two sides will frame a central opening. The folded dough should hold its basic form without springing back immediately. If it snaps back, it likely needs a brief rest to relax the gluten. Forcing a tight fold can compress the interior, so keep the fold gentle and natural.
- Cross one side over the other loosely leaving a space towards the bottom of the rope for the tail: This crossing defines the bunny body and ear positioning, creating a recognizable silhouette. Leave a clear space at the bottom to attach the tail securely. Crossing too tightly can flatten the shape, while too loose a cross risks unraveling in the oven. Secure the twist slightly so it holds during proofing.
- Twist the top pieces under each other: Twisting the ears under gives a neat finish and helps them keep their upright shape. You will feel resistance as the dough layers nestle together, and visually the twist should look tidy without tearing. Avoid twisting so tightly that you cut off circulation in the dough, which can create dense spots. Aim for a confident, composed twist.
- Place on a parchment lined baking sheet and rearrange the ears to make them look how you like: On the sheet, you can fine tune ear spacing and tilt for personality. The parchment will prevent sticking and catch any small drips of egg wash. If the ears seem droopy, a light repositioning creates a more alert look. Be gentle when moving them, as rough handling can deflate the shapes.
- Take the piece of extra dough and flatten slightly: Flattening creates the base for the tail, and you will sense the dough give beneath your thumb. The flattened piece should be firm enough to shape but soft enough to blend into the body later. Overflattening yields a pancake like tail that is hard to round, so keep a gentle touch as you shape.
- Pinch underneath to create a 'bubble' and continue pinching until the top looks like a smooth round ball: This pinching process smooths the surface and traps small pockets of air for a light tail. The tactile feedback helps you know when the surface is even and ready. If you see cracks, the dough may be too dry or overworked; a brief rest and light smoothing will help. The goal is a smooth, slightly domed tail that will brown attractively.
- Place into the bottom part of the bunny making sure it is secure down into the bunny twist: When attaching the tail, press gently to adhere without deflating the surrounding dough. You should feel a secure connection that will hold through the second rise and baking. A common mistake is not pressing enough, which can let the tail come loose in the oven. Ensure it sits snugly into the twist.
- Heat oven to 375 degrees F: Preheating ensures the oven springs the dough into a nice oven rise and browns the exterior. You will notice the kitchen warming and the oven indicator reaching temperature. If the oven is not fully preheated, the bunnies may bake unevenly. Avoid opening the oven frequently during preheat, as it slows the process.
- Cover with a light dish towel, and let the bunnies rise on the baking sheet for another 10 minutes: During this brief proof, the bunnies will puff slightly and look airier, and you may detect a faint yeasty aroma returning. This short rest helps relax the shapes so they bake without tearing. Skipping this step can produce tighter shapes that do not expand pleasantly in the oven, so give them these few peaceful minutes.
- Brush the bunnies with an egg wash (1 egg mixed with 1 tbsp water): The egg wash gives a glossy, golden finish and enhances browning. As you brush, the surface will shine and the scent of egg will briefly become noticeable. Use a light hand to avoid pooling, which can create overly dark spots. A common error is over brushing, which can make the crust too glossy and mask the delicate crumb.
- Bake for 10 to 15 minutes or until the tops are lightly brown: As they bake, you will hear a faint set and see the tops transform to a soft golden color, releasing a warm, bready aroma that fills the kitchen. The edges should be set and the bottoms baked through. If they brown too quickly, tent with foil to prevent over darkening while the interior finishes. Underbaking yields a gummy interior, so check for a gentle golden hue and a hollow sound when tapped.
- Enjoy: Fresh from the oven, the bunnies will be warm, slightly crisp on top, and soft inside, and the first bite offers a comforting blend of textures and subtle sweetness. Let them cool a couple of minutes if you want cleaner slices, or serve warm for that irresistible pull apart feel. A common mistake is storing hot bread tightly covered, which traps steam and softens the crust too much; allow slight cooling before wrapping.
Notes
- Use honey for subtle sweetness instead of granulated sugar to add a faint floral note and deeper color to the crust, which pairs nicely with spring brunch flavors.
- Make one large bunny by combining all pieces into a single shaped loaf; baking time will increase, so watch for a golden top and a hollow sound when tapped.
- Brush with milk instead of egg wash if you want a softer sheen and a slightly less glossy crust while keeping a pleasant brown color.
- Add an extra 1 tablespoon of oil for a more tender crumb if you prefer a softer interior that stays fresh longer for sandwiches.
- Experiment with shaping by making different ear styles and tail placements to give each bunny its own personality for a playful table display.